(1) Understand the design and construction process of regular geometry formed by plane stacking method.
(2) Establish the understanding of bonding, fit degree, production quantity and cost control of stacked materials.
Social responsibility and moral literacy
(1) The content of the works is healthy and civilized, pay attention to the protection of information security, and comply with information laws and regulations, information ethics and moral norms.
(2) In practice, you can imitate others’ works in style, and you must do improved innovation when creating.
2. Application scenario
A piggy bank is a jar used to store coins, usually made of ceramic or plastic, with a hole at the top to insert coins and a larger opening at the bottom to take money out, as shown in the following figure. Of course, there are also a large number of clay POTS that do not have openings, and can only be smashed to remove coins when they are needed.
The intention of parents to give their children a piggy bank is to help children understand money and cultivate children’s financial management ability. Observe the shape and structure of the piggy bank, and think about how to design and make a simple piggy bank.
3. Project analysis
(1) Shape of the product: according to personal preference, you can choose cylinder, cube or polyhedron.
(2) Modeling method: cube and hexahedron are regular geometry, which can be used to combine the cutting parts by plane connection. However, other methods should be adopted to connect the surface or polyhedron planes, such as the way of plane stacking, the geometry is graphically perspective according to one of the directional sections, two-dimensional graphics are drawn, and then the multi-plane graphics are generated by array replication.
(3) The size of the parts: the size of the design section graphics.
(4) Bonding method: Strong glue suitable for wood can be used for bonding, and can also be fixed by means of longitudinal perforation.
(5) Material selection: basswood plywood board, acrylic board or Osung board can be selected.
(6) Process effect: mainly cutting process, using laminated structure.
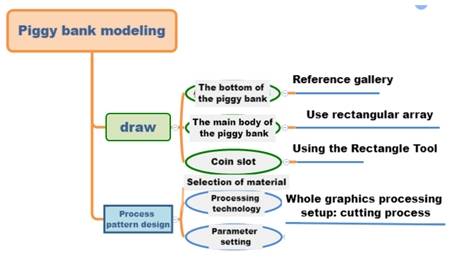
4. Modeling process
1.Research and hand-drawn design
Measure
According to the project design, mark the length, width and height of your piggy bank in the table below.
Measurement data
recording unit:mm
Length:
Width:
Height:
Paint
Please draw the design sketch of the piggy bank in the box according to your measurement data and design elements.
2.Software drawing
After the structural analysis of the piggy bank, we can complete the graph drawing of the piggy bank through 4 steps.
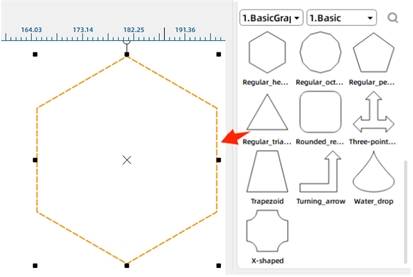
(1) Draw the bottom of the piggy bank
In the “1. Common Graphics” of “Select Gallery”, click “Regular Hexagon”, hold it down, and drag it to the drawing area to add graphics, as shown in the following figure. After adding “regular hexagon”, the size of the hexagon can be corrected according to the measured size, and it is used as
the bottom of the piggy bank.
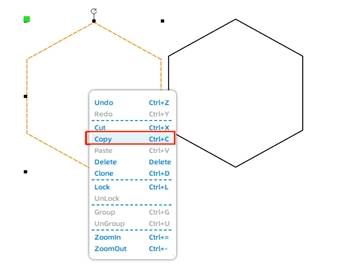
(2) Draw the body of the piggy bank
Select the right hexagon, click the right mouse button, click Copy in the option box, right-click again and choose Paste to copy the two hexagon. You can also use the shortcut keys Ctrl+C and Ctrl+V directly to complete the copy, as shown in the following figure.
The dimensions of one of the regular hexagons are reduced below. Select the hexagon, move the mouse pointer to the edge of its outer frame, hold down the left mouse button to move the mouse pointer, you can directly shrink the figure. The dimensions can also be modified by adjusting the values of width and height.
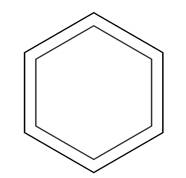
Move the reduced regular hexagon into the large regular hexagon and center it by referring to the alignment guides to form a ring regular hexagon, as shown in
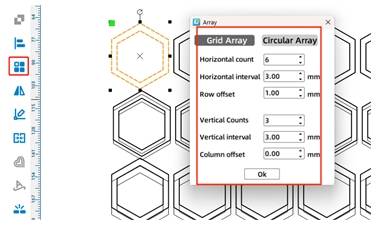
As shown in the following figure, select the circular hexagon, click “Rectangular array”, and the “Rectangular Array” dialog box will appear. Enter “6” in the “horizontal number” column, enter “3” in the “Vertical number”, “horizontal spacing” and “vertical spacing” columns, and click “OK” to complete the copy of the graph.
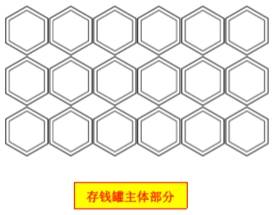
The main part of the piggy bank is drawn, as shown in the following figure.
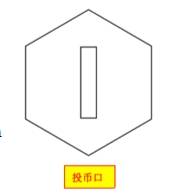
(3) Use the “Rectangle tool” to draw the coin slot
● Select the regular hexagon at the bottom of the piggy bank, click the right mouse button, and copy a regular hexagon. Click the Rectangle Tool to draw a rectangle in the regular hexagon. A one-dollar coin has a diameter of 25mm and a thickness of 1.85mm, and the slot is larger than this size. Set the length of the rectangle to 45mm and the width to 10mm. Use Align Guides to move the rectangle to the center of the regular hexagon, and the drawing of the slot is complete, as shown in the following figure.
(4) Process pattern design
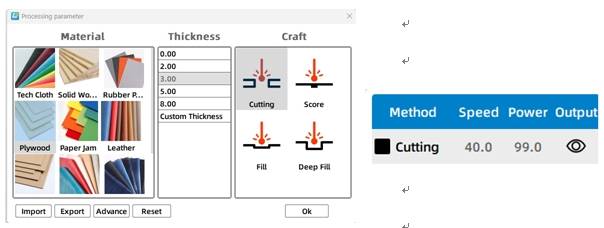
Select the deposit box object, double-click its corresponding “black cut” process layer, pop up the “Processing parameters” dialog box, set the processing material to basswood plywood, the process to cut, the processing thickness to 3mm, click “OK” to exit, get the default processing speed and power parameter values, as shown in Figure 5.89. After cutting the test product, you need to adjust the parameters. You can re-enter the “Processing Parameters” dialog box to modify the parameter values.
Thinking and debugging
(1) Can the plane graphic workpiece of the cut acrylic plate be bonded? Thinking and debugging
(2) What is the difference in shape design between the coin hole and the plug of the piggy bank? Modify the piggy bank in the example and design a stopper for it.
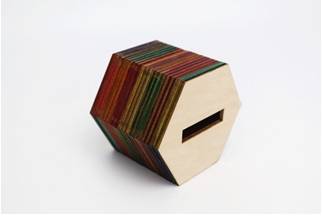
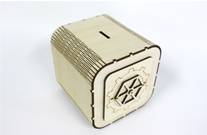
5. Display of finished products
The cut hexagonal work piece is bonded and colored layer by layer, and the finished product is shown in the following figure.
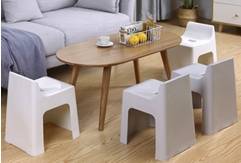
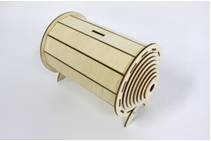
6. Extension exercise
In this section, we learned how to draw a piggy bank made by stacking process with rectangular array tool. Refer to the example shown in the following figure to draw a small stool made by stacking process with rectangular array tool with your creativity.
7. Work appreciation
The following figure shows the various stack structure works of the LaserBlock open source community for your reference and appreciation.


.png "laser cutter Globle") International
International
 United States
 Brasil
 Canada
 Costa Rica
 Mexico
 Česká
Česká
 Romania
 Polska
 Ireland
 Italia
 Lietuva
 Россия
 Deutschland
 Britain
 Україна
 France
 Sverige
 Norway
 Denmark
 Ελλάδα
 Portugal
 한국
한국
 中国
中国
 中国香港
中国香港
 Israel
 中國臺灣
中國臺灣
 ジャパン
ジャパン India
India
 پاکستان
 پශ්රී ලංකා
 ประเทศไทย
 Australia
 New Zealand
 South Africa