fbpx
Search
Close this search box.
Home> Blog>  A car inventor

 A car inventor

12/08/2024
Share:
soft drawing A car inventor 1

ThunderLaser STEAM Education Student

Course (Thematic)


1.2 Magic Brush Marliang -- A car inventor

(1) Preface

Once upon a time there was a poor boy named Ma Liang who liked drawing very much. One day he got a magic pen. Whatever he drew with the magic pen could be turned into reality. The kind Ma Liang used the magic pen to help many good people, and also punished the bad people of Kairen’s magic pen. Everyone wants to have such a magic pen, it can help others, but also to meet their own wishes, this lesson let us all have a “magic pen” addiction!

soft drawing A car inventor 23

Each of us is Ma Liang, as long as the idea is creative and bold enough, we can make the impossible possible!

We must first of all want to become a reality of the goods have enough understanding, you can first observe the physical and online query information and other ways to understand the full range of this item, and then start from the shape, and then to the internal structure, and then through step by step upgrade, finally complete the best work in my mind.
In this lesson, let’s make a car together first.

software drawing Car Inventor 1

(2)Thinking before class

1. What is the basic structure of a car?

2. What are the characteristics of the external structure of the car?

3. If you were to make a car, what materials would you use?

4. How do you make a car move?

soft drawing A car inventor 24

3. Do it by hand

1. Make a single silhouette car

1) Use a pen on the desk to draw the car in your mind on a piece of paper. Use your imagination to add more creative elements.

soft drawing A car inventor 25

2) Use the mobile APP “Scan Almighty King” to scan the car and import it into the laser editing software LaserMaker on the computer.

3) First, click “Picture – Crop” on the menu bar above the software to cut out the blank part.
(Thinking: Why crop the image?)

soft drawing A car inventor 26
4) Then click “Picture – Outline” to outline the image. (Tip: The outline will overlap with the image.)
soft drawing A car inventor 27

5) Remove the “Output” check mark of the BMP layer in the right layer parameter area, select all the inner outline in the box, press Delete to delete, leaving only the outer outline, restore the “output” check mark of the BMP layer, and press and hold down Alt+A key to select all and change the width to 140

(Tip: When deleting the inner outline, the selected range only needs to be slightly smaller than the range of the outer outline, you can select the inner outline at one time.)

(Think: Why leave only the outer outline?)

soft drawing A car inventor 28
6) Set the carving parameter to “Plywood Standard” by double clicking on the BMP layer and set the second layer to the cutting parameter “Plywood material Thickness 3.00mm”.
soft drawing A car inventor 5
soft drawing A car inventor 6
7) After completing the above Settings, import the laser cutting machine for processing, and the single piece of car will be finished.
soft drawing A car inventor 7
2. Make a single piece of wheeled car Thinking: How do I get the car moving 1) Draw a perfect circle with a diameter of 30mm in the blank of LaserMaker, draw a perfect circle with a diameter of 2.7mm inside the circle to center it, select both circles at the same time, click on “Array Copy” above the software, the number of horizontal and vertical are both 2, the spacing is 0, to get four wheels.
soft drawing A car inventor 29
2) Draw and array copy 16 wooden circle structures with outer circle diameter of 7mm and inner circle diameter of 2.7mm using the same method in the first step.
soft drawing A car inventor 30
3) Draw a circle with a diameter of 3mm right in the middle of each wheel of the car.
soft drawing A car inventor 31
4) Set the engraving and cutting parameters according to the previous demonstration, and then import them into the laser cutting machine for processing. The cut parts and small sticks will be fixed and assembled by the two wheel sticks and small wooden rings as shown in the figure below. The single wheel car is finished.
soft drawing A car inventor 9
3. Make a complete version of the car Think: How do you make a car more like a real car? 1) Draw a 50mm by 35mm rectangle for the car chassis and two 15mm by 35mm for the front and rear panels of the car.
soft drawing A car inventor 32

2) Draw 4 auxiliary rectangles of 3mm by 20mm (Ctrl+c copy command available) And for two of them, use the “rotating-left 90 degrees” function, the auxiliary shapes intersect in the center of the upper and lower two sides of the chassis, and the right side of the front and rear panels, respectively, use the “graph welding” command to weld the auxiliary rectangles one by one to complete the body bayonet design.

Think: Why do you want to do bayonet design?

soft drawing A car inventor 33
3) Draw another three 3mm*20mm rectangles, and use the function of “rotation-left 90 degrees” to place one of them in the center position of the left and right sides of the chassis (pay attention to not intersecting the edge) and the center position of the bottom of the car, select the whole frame of the car, and use “rotation-horizontal flip” to complete the car image processing.
soft drawing A car inventor 12
4) Use “Array copy” to increase the number of wheels designed in the previous demonstration to 8.
soft drawing A car inventor 13
5) Set the engraving and cutting parameters according to the previous demonstration and then import them into the laser cutting machine for processing. Assemble the cut parts according to the corresponding bayons as shown in the figure below to become a complete version of the car.
soft drawing A car inventor 34
soft drawing A car inventor 9

4. Machine processing

Students according to the last lesson learned the laser cutting machine operation course processing operation, and pay attention to remember to adjust the focal length before processing, to avoid the situation such as opaque cutting.

soft drawing A car inventor 15

5. Works upgrade

Add headlights

Clip the long foot of the LED to the positive terminal of the button battery, and the short foot to the negative terminal, and glue the tape to the front of the body as a simple car headlight, and make the rear light in the same way.

soft drawing A car inventor 16

Make a semi-automatic car

Thinking: How do you make a car drive itself?

Replace the small stick on the rear wheel with the rotating shaft of the drawstring clockwork and attach the device to the body of the car with glue.

soft drawing A car inventor 17

Making a fully automatic car

1) Design 8 small rings of D-shaped holes and 4 large rings of D-shaped holes in LaserMaker software, as well as a small inner wheel and two large inner wheels, the size data are as follows: the diameter of the small ring is 7mm, the diameter of the large ring is 9mm, so that the gallery marks the H shaped hole; The diameter of the small inner wheel is 20mm, the diameter of the large inner wheel is 25mm. (So the structure is more complex, can be directly used with fixed accessories)

soft drawing A car inventor 18
2) Fix the n20 motor on the inside of the body with hot melt adhesive, and assemble it into a rubber band linkage structure according to the following figure.
soft drawing A car inventor 35
3) Connect the No. 5 battery box to the n20 motor with a wire and place it in the car hopper. The automatic car is finished.
soft drawing A car inventor 20

(4) Thinking after class

1. Through the study of this lesson, what are the basic structures of cars?

2. In what direction can cars evolve in your world?

3. In addition to building cars, what else can we draw, build, and upgrade?

(5) Make a comment

Evaluate yourself and your partner.

Evaluation item

Self-evaluation

Peer evaluation

Creativity (30 points)


Firm (30 points)


Beauty (20 points)


Attitude (20 points)


Total (100 points)


6. Show your works

The students go to the platform together to display the works, and talk about the design and transformation ideas, don’t forget to take photos.

ThunderLaser STEAM Education Course (Thematic)


1.2 Magic Brush Marliang -- A car inventor

(1) Textbook analysis

Science and art complement each other. Science brings inspiration to artistic creation, while art fosters creativity. If science and art are well combined, there will be a wonderful chemical reaction.

Every child is a born painter. They pick up a paintbrush and paint fantastical designs on paper. There are quaint robots, colorful sea worlds, exaggerated and bizarre unknown objects, and so on. The world of children’s imagination is so colorful.

In this lesson, we will use modern and sophisticated digital equipment to turn students’ hand-drawn drawings into real objects, and guide them to improve their works step by step through N+1 innovative thinking. First of all, we let students use their imagination to create hand-painted works. After collection, software processing, design parts and other operations, finally through the digital processing of laser cutting machine, so that every student can make their own unique works. In the class, we should guide the students to think while doing and learning: What are the basic structures of the car? How can we make the car closer to the real thing? How do you make a car have a powertrain? How far can we go in the art of the shape of the piece?

Through the study of this class, not only let the students enjoy the imagination, but also exercise and cultivate their thinking and practical ability.

(2) STEAM index

soft drawing A car inventor 2

(3) Teaching Objectives

* Teach students to use software to manipulate images and design simple parts.

* Teach students to use laser cutting machines to cut and carve.

* Develop students’ hands-on skills.

* Train students to master N+1 innovative thinking.

(4) Teaching key points and difficulties

* Teach students to use software to manipulate images and design simple parts.

* Teach students to use laser cutting machines for cutting and engraving.

* Guide students to upgrade their works.

(5) Preparation for Teaching

* Please prepare relevant consumables, accessories and tools according to the attached table and the actual number of students.

* Ensure that students have the latest version of LaserMaker laser editing software installed on their computers.

* Please prepare the relevant presentation props in advance according to the PPT.

(6) Teaching Process

1. Teaching introduction

→ Guide students to know the basic structure of a car by asking questions:

Think about it, we see in life what the car is like? What kind of structure does it have?

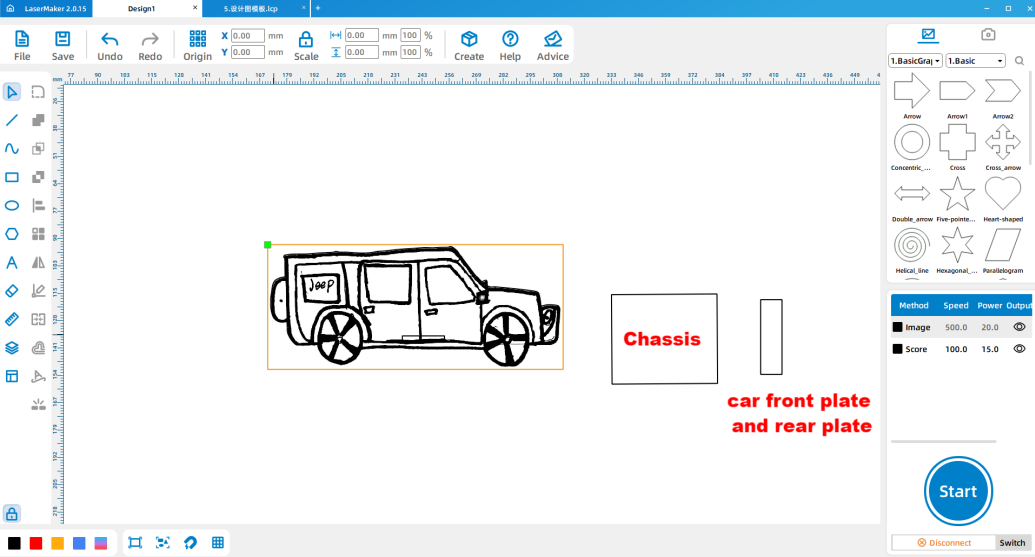
A car generally consists of four basic parts: engine, chassis, body and electrical equipment. The body is the external structure of the car, the engine, chassis, electrical equipment is the internal mechanism, we generally know more about the external structure of the car.

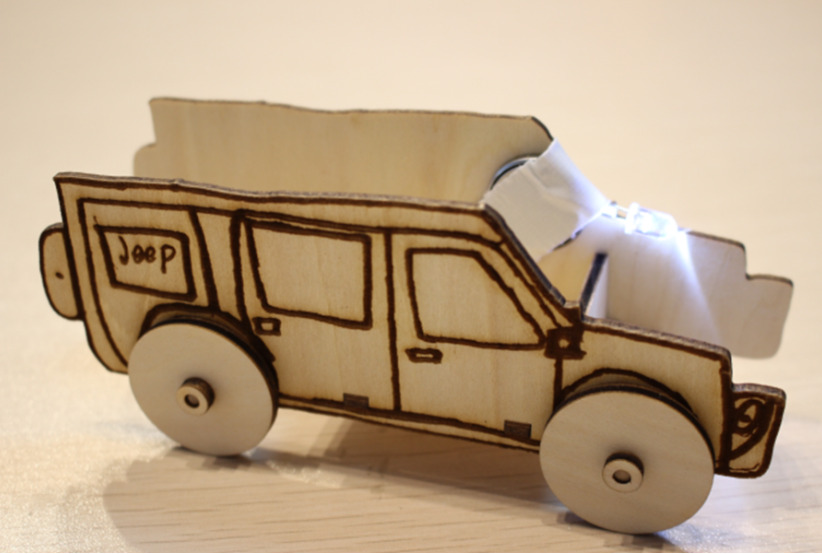
What are the elements of the external structure of the car?

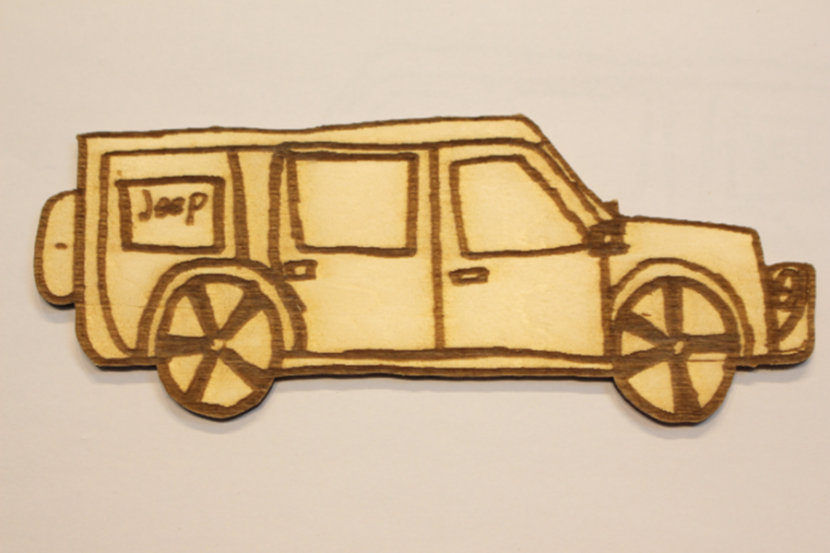
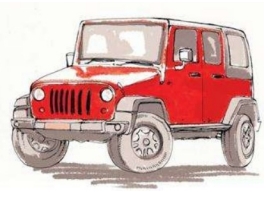
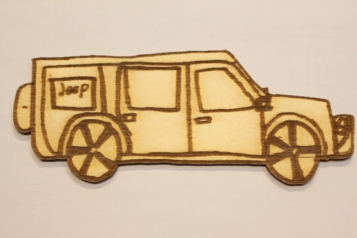
There are the wheels, the Windows, the doors, the lights, the front, the rear, the mirrors, etc., so when we want to draw the exterior structure of a car, we should not use these elements.

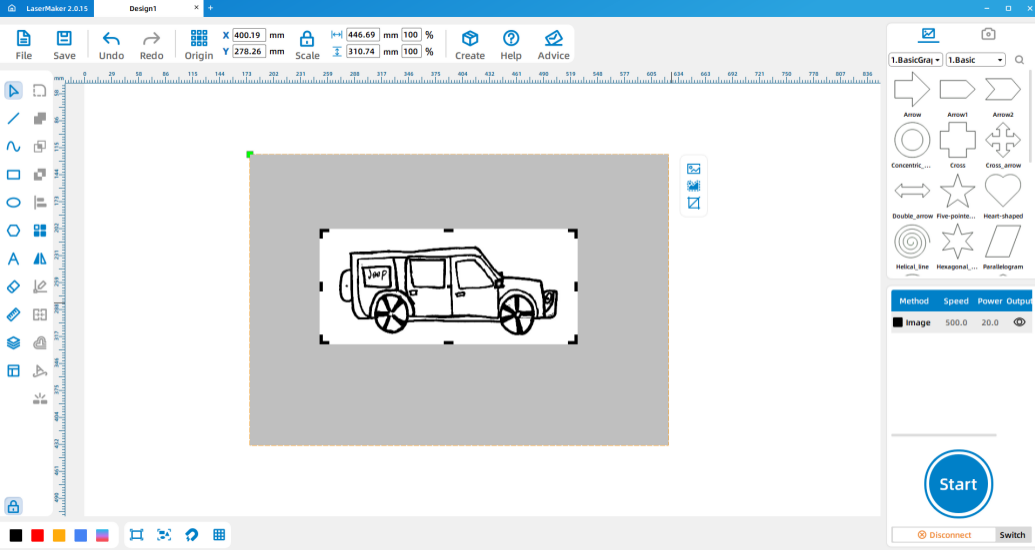
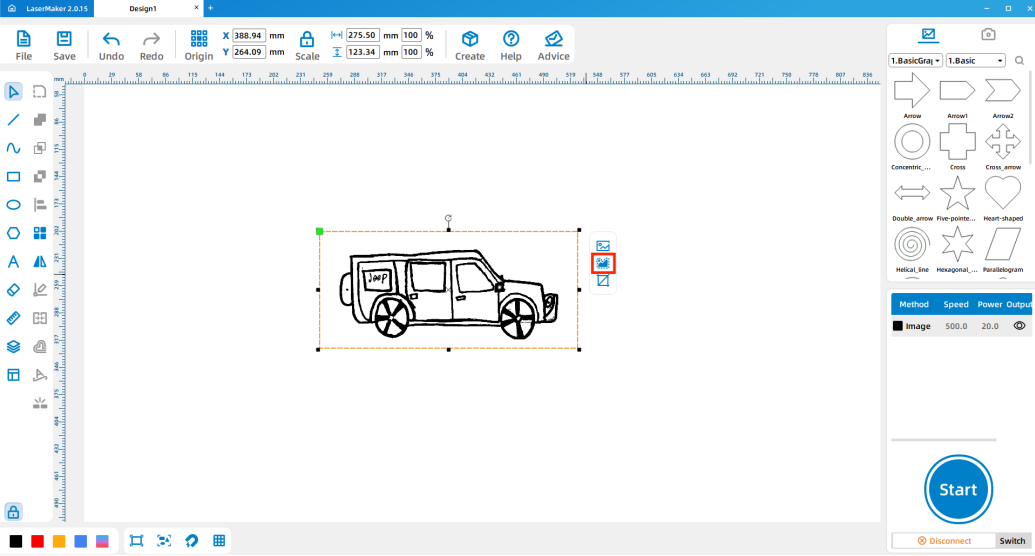
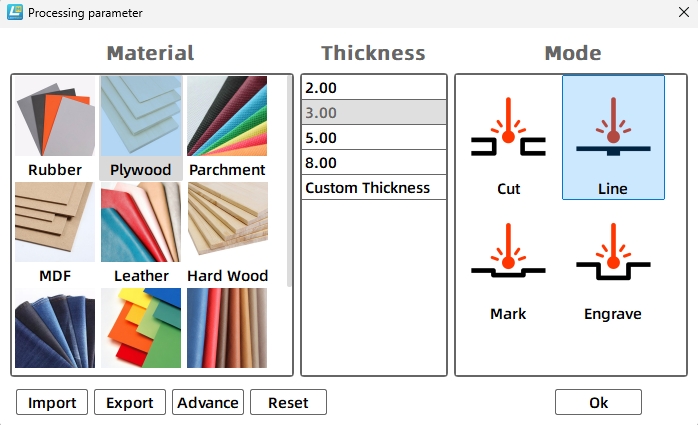
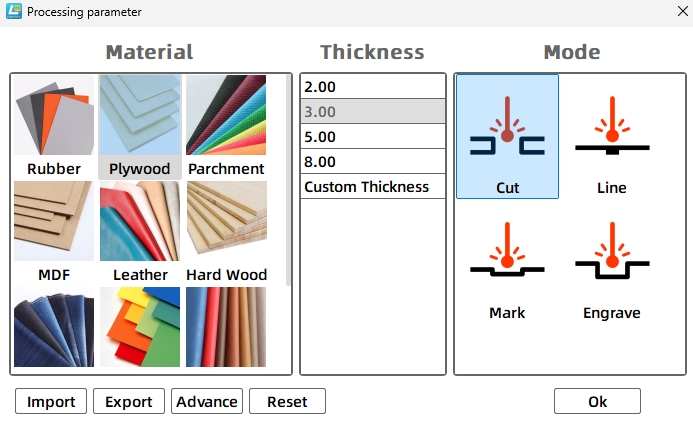
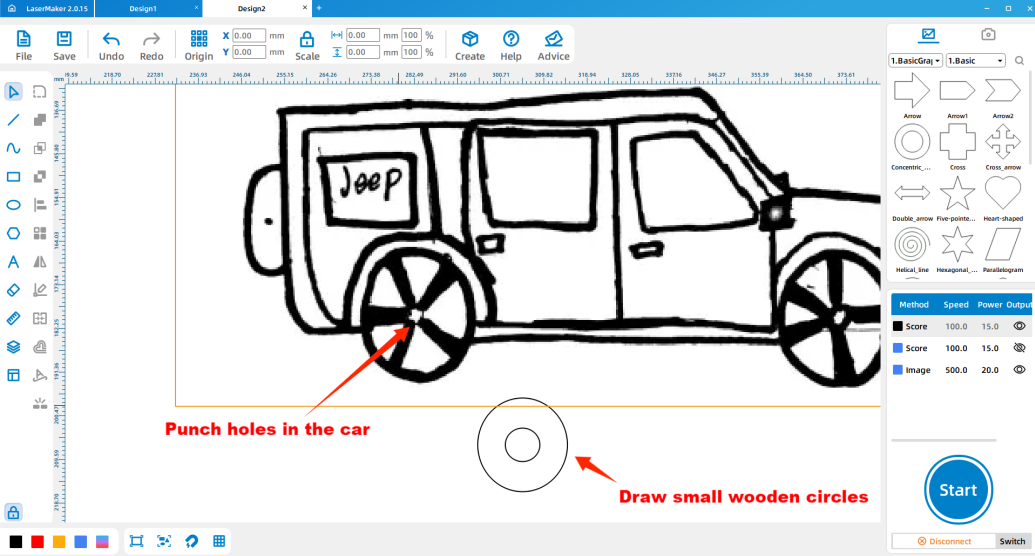
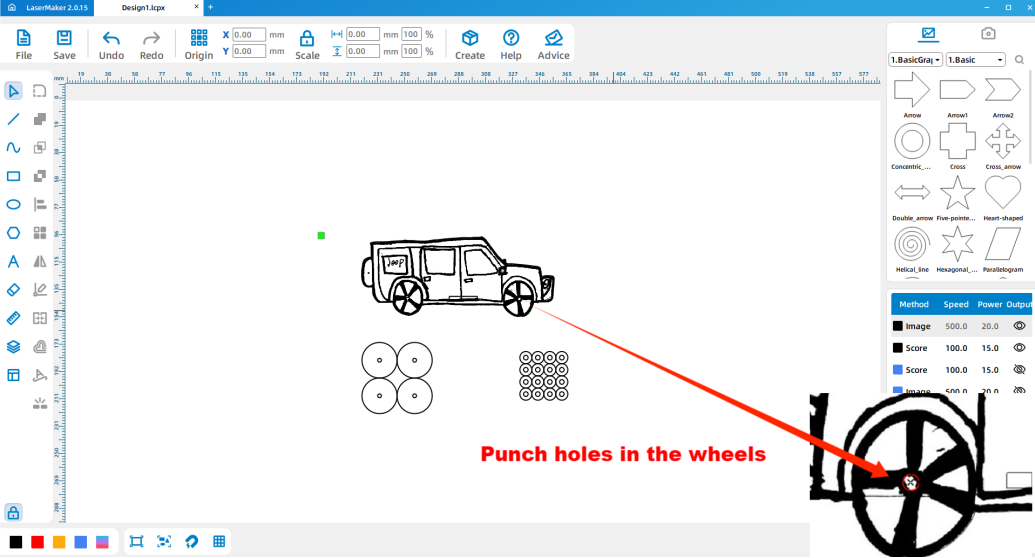
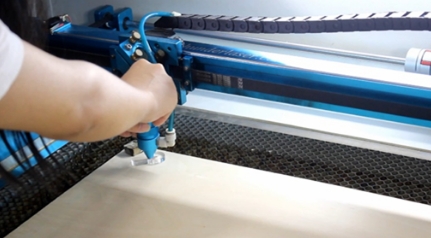
What materials can we use if we want to make a car? How do we make it move?

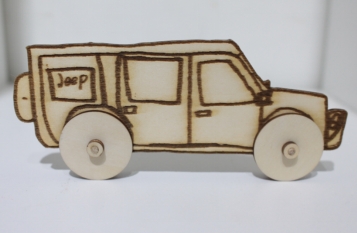
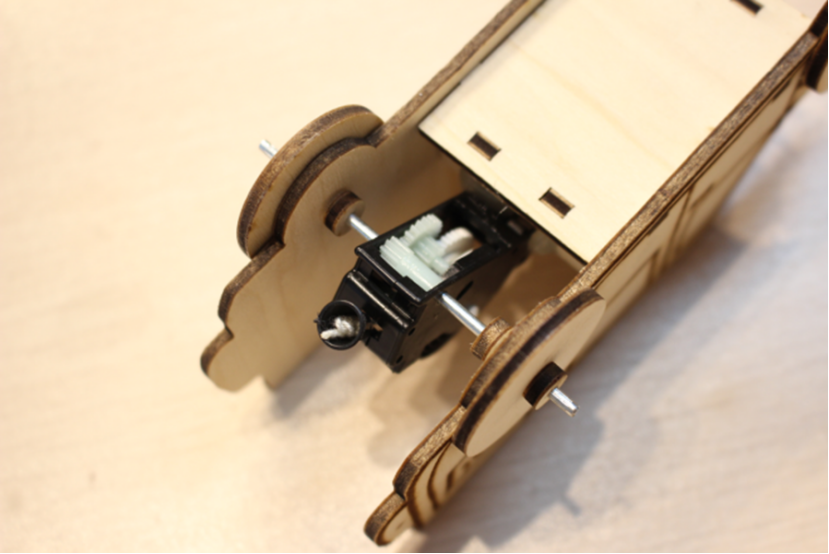
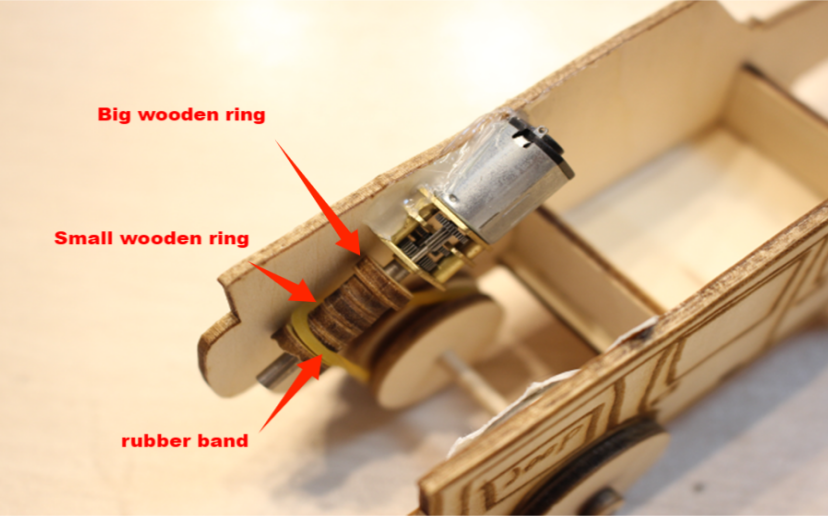
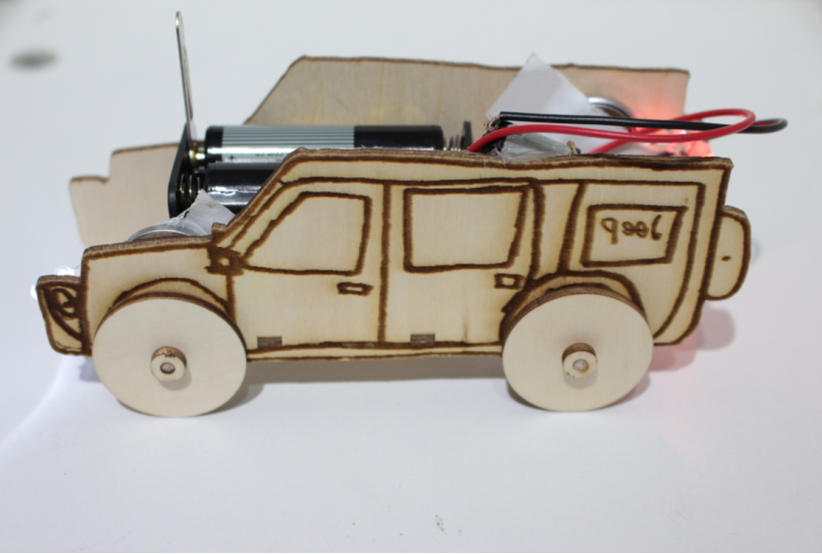
Plastic, wood, cans, etc., put wheels on the car, and then provide a power source (manual push, install a motor, etc.) to make it move.

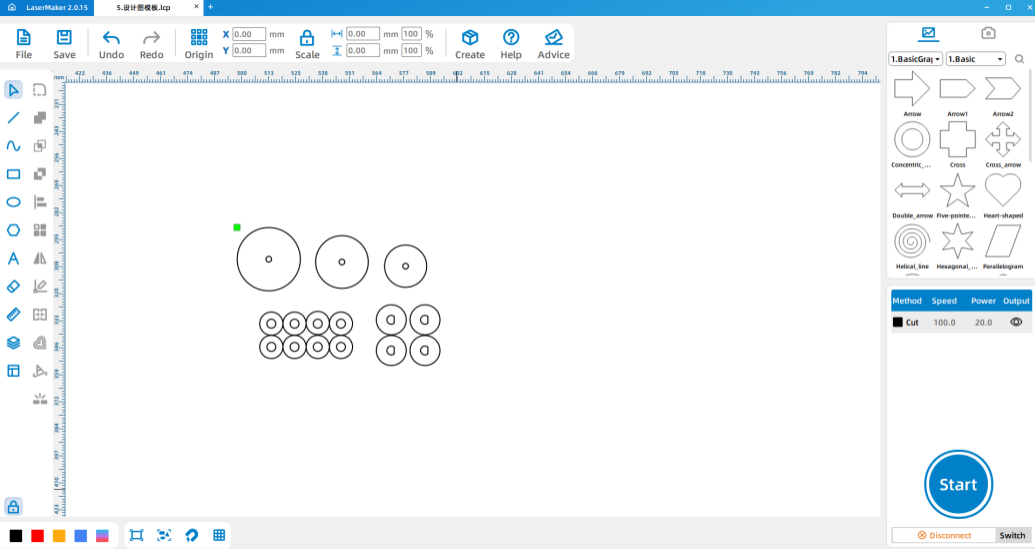
→ Play the Magic Brush Maliang – Car Inventor Tutorial Video, It lasts two minutes and 51 seconds

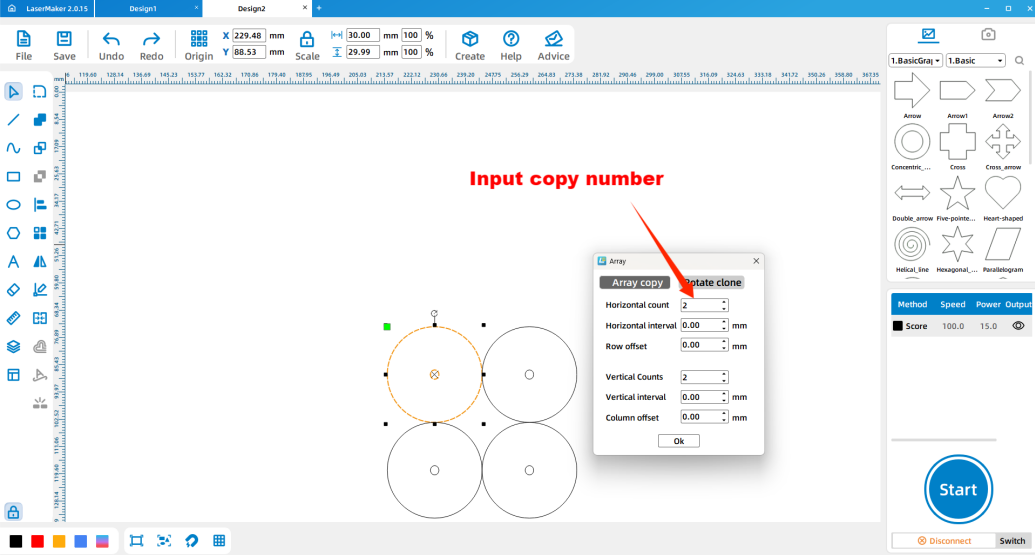
Guys, do you want to give it a try after watching the video? Without further ado, let’s get started with today’s lesson

2. Software design demonstration

Please combine teaching courseware PPT to explain and demonstrate.

Make a single outline car demonstration

(1) Combined with correct cases and wrong cases to clarify the basic requirements of hand-painted works: can be any shape but the outer edge should be clear and closed, if not meet the requirements may make the second step of one-click outline failure.

(2) Use the mobile APP “Scanning Almighty King” to scan and import the prepared hand-painted works into the laser editing software LaserMaker. Firstly, click “Picture – Crop” on the menu bar above the software to cut out the blank part, and then click “Picture Outline” to draw the outline of the image.

(Question: Why crop the image?)

A: Reduce the interference of impurities, thus saving the laser processing time.

soft drawing A car inventor 3

(3) Remove the “Output” check mark of the BMP layer in the parameter area on the right layer, select all the inner outline parts in the box, press Delete to delete, leaving only the outer outline, restore the “output” check mark of the BMP layer, and press and hold down Alt+A key to select all and change the width to 140.

(Skill Tip: When deleting the inner outline, the selected range only needs to be slightly smaller than the range of the outer outline, and the inner outline can be selected at once.)

(Question: Why leave only the outer outline?)

A: The closed outer contour vector lines are used to cut out the car outline, while the inner outline is sculpted using the original bitmap.

soft drawing A car inventor 4

(4) Set the carving parameter to “Plywood Standard” by double clicking on the BMP layer, and set the second layer to the cutting parameter “Plywood material Thickness 3.00mm”.

soft drawing A car inventor 5
soft drawing A car inventor 6

(5) After completing the above Settings, import the laser cutting machine to process the following single car outline structure.

soft drawing A car inventor 7

Make a single piece of wheeled car demonstration

Question: How do you make the car move? You need wheels, so let’s design the wheels.

(1) Draw a perfect circle with a diameter of 30mm in the blank of LaserMaker, draw a perfect circle with a diameter of 2.7mm in the circle to center it, select two circles at the same time, click on the “Array Copy” above the software, the number of horizontal and vertical are 2, the spacing is 0, to get four wheels.

(2) Draw and copy 16 wooden ring structures with outer circle diameter of 7mm and inner circle diameter of 2.7mm using the same method as in the first step.

(Question: What is the purpose of the small wooden circle?)

A: It holds the wheels in place.

(3) Draw a perfect circle with a diameter of 3mm in the middle of the car’s wheels respectively.

soft drawing A car inventor 8

(4) Set the engraving and cutting parameters according to the previous demonstration, and then import the laser cutting machine for processing. Assemble the cut parts and small sticks as shown in the following figure to form a single wheeled car.

soft drawing A car inventor 9

Make a full version of the car demonstration

Question: How do you make a car more like a real car? A: Make a body and add more wheels.

(1) Draw a rectangle measuring 50mm by 35mm for the car chassis, and two 15mm by 35mm for the front and rear panels of the car.

soft drawing A car inventor 10

(2) Draw 4 auxiliary rectangles of 3mm20mm (Ctrl+c copy command available) And for two of them, use the function of “rotation-left 90 degrees” to intersect the auxiliary rectangles in the center of the upper and lower sides of the chassis, and the right side of the front and rear panels. Use the command of “graph-welding” to weld the auxiliary rectangles in to complete the body card design

Question: Why do you want to do bayonet design?

A: It can make the chassis and the front and rear plates more closely combined.

soft drawing A car inventor 11

(3) Draw three rectangles of 3mm*20mm, and use the function of “rotation-left 90 degrees” to place one of them in the center position of the left and right side of the chassis (pay attention to not intersecting the edge) and the center position of the bottom of the car, select the whole frame of the car, and use “rotation-horizontal flip” to complete the body image processing.

soft drawing A car inventor 12

(4) Use “Array copy” to increase the number of wheels designed in the previous demonstration to 8.

soft drawing A car inventor 13

(5) Set the engraving and cutting parameters according to the previous demonstration and then import them into the laser cutting machine for processing. Assemble the cut parts according to the corresponding bayons as shown in the figure below to become a complete version of the car.

soft drawing A car inventor 14

3. Machine processing demonstration

The design files saved in the above demonstration are respectively imported into the laser cutting machine for processing. (Equipment operation tutorial see the previous lesson)

Tip: remember to adjust the focal length before processing to avoid the situation of impenetrable cutting.

soft drawing A car inventor 15

4. Student practical operation

(1) Hand-drawing: Organize to issue pen and paper to each student for hand-drawing creation within 10 minutes. Arrange at least two assistants to help check whether the edge of hand-drawn works is clearly closed, and use mobile phones to collect and import them into their own computers.

(2) Software design: Guide students to complete the complete design, assist in naming the design file with student number and name and transfer it to the matching computer of the laser cutting machine.

(3) Machine processing: Guide students to complete machine processing steps according to the order of completion of the design.

(4) Assembly: Distribute tools in groups and guide students to assemble their works independently.

5. Works upgrade

Added headlights demo

Clip the long foot of the LED to the positive end of the button battery, and the short foot to the negative end, and tape to the front of the body for a simple car headlight, and make a car rear light in the same way.

soft drawing A car inventor 16

Make a semi-automatic car demo

Question: How do you make a car drive itself?

A winding device can be added to provide power to the car.

Replace the small stick of the rear wheel with the rotating shaft of the drawstring wind-up device, and fix the device to the body of the car with glue.

soft drawing A car inventor 17

Make a fully automatic car demonstration

(1) Design 8 small rings of D-shaped holes and 4 large rings of D-shaped holes in LaserMaker software, as well as a small inner wheel and two large inner wheels, the size data is as follows: the diameter of the small ring is 7mm, the diameter of the big ring is 9mm, so that the gallery marks the H shaped hole; The diameter of the small inner wheel is 20mm, the diameter of the large inner wheel is 25mm. (So the structure is more complex, can be directly used with fixed accessories)

soft drawing A car inventor 18

(2) Fix the n20 motor on the inside of the body with hot melt adhesive, and assemble it into a rubber band linkage structure according to the following figure.

soft drawing A car inventor 19

(3) Connect the No. 5 battery box to the n20 motor with a wire and place it in the car hopper. The automatic car is finished.

soft drawing A car inventor 20

(7) Feedback in class

1. Through the study of this lesson, what are the basic structures of cars?

A: The car is generally composed of four basic parts, such as engine, chassis, body and electrical equipment.

2. In what direction can cars evolve in your world?

A: Painted in a variety of bright colors; A motor is also added to the front wheel to become a more powerful “four-wheel drive”; Transformed into a voice-activated car that can run with a shout; Add Arduino programming elements to make the car dance

3. In addition to building cars, what can we draw and build, and what kind of upgrades can we carry out?

A: Trains, planes, ships, rockets, even all kinds of animals, plants, or favorite people, etc., as long as we can draw them, we can create them, and then upgrade them level by level to become unique works.

(8) Display of works

Organize students to the platform to explain the design and transformation ideas of their own works, and select the best creative team from the aspects of ideological, normative, innovative, artistic, technical, teamwork and other aspects to commend, take photos.

(9) Teaching suggestions

● At the beginning of teaching, students can be divided into several groups according to the actual number of students, and each group leader is selected to assist the teacher to carry out classroom activities.

● Teachers should master the teaching rhythm flexibly according to the class time, give priority to guide the group with faster progress to complete the whole process to ensure the teaching effect, and give appropriate guidance and urge to the group with slower progress.

● In the three teaching modules of software, hardware and transformation, it should be ensured that more than half of the groups have completed the previous module before entering the next module.

● If it is necessary to compress the teaching time, a sufficient number of spare parts can be prepared in advance, which can greatly accelerate the teaching progress.

● The laser cutting machine supports batch processing, and can typeset several works into a processing document, which can also accelerate the teaching progress.

● The teacher should divide the course into several periods according to the actual situation, and it is appropriate for each student to have his own works.

soft drawing A car inventor 22
soft drawing A car inventor 21

Browse Thunder Laser 
Bolt >

Thunder laser Bolt Plus 2

Recent Blog

    America

    Europe

    Aisa

    Oceanica

    Africa