Guide the students in making a train based on what was taught in the first lesson.
(2)Thinking before class
1. Think about the difference between a car and a train.
2. What does a car look like as you know it?
3. What are the two most basic kinds of trains?
4. Where does the train run?
3.Doitbyhand
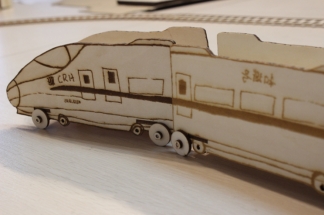
1.Makeasinglesilhouettetrain
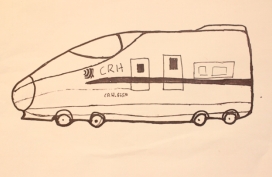
(1) Sketch the train in your mind.
(Tip: Unlike the car, a train is made up of a front and several compartments, so draw the front and compartments separately!)
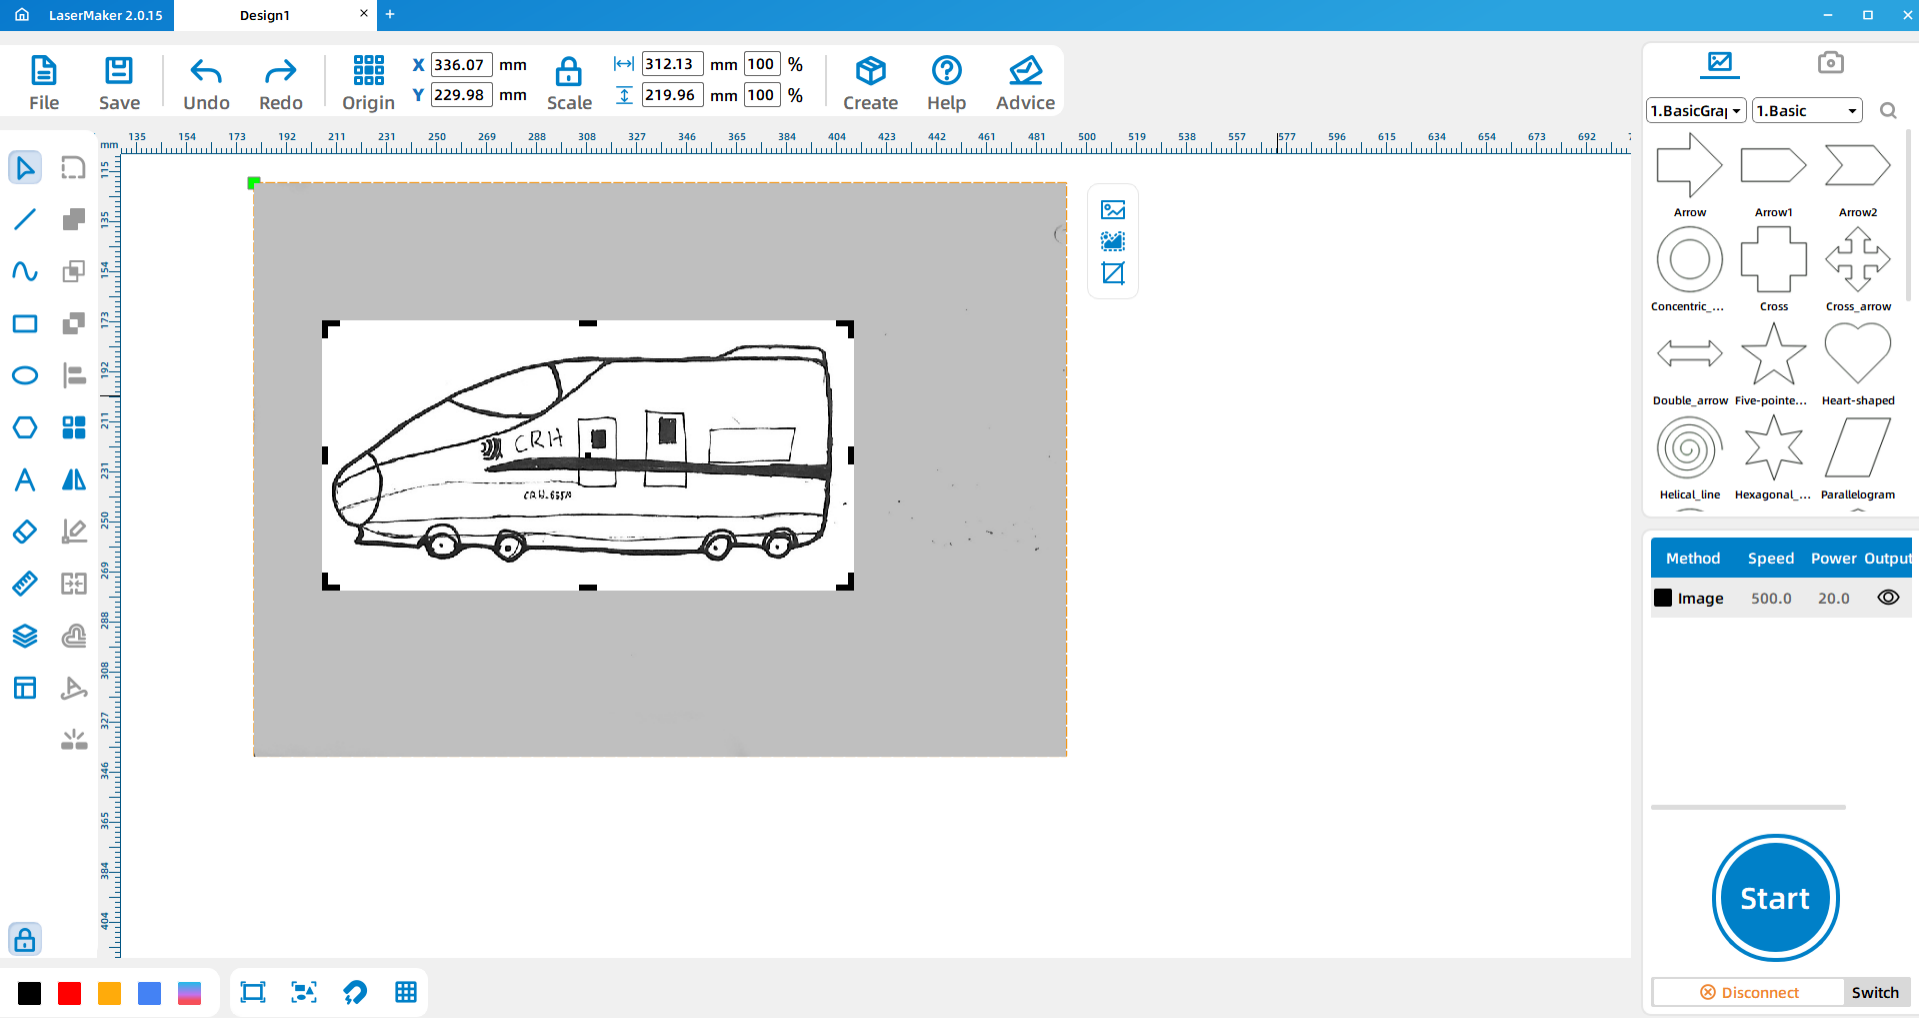
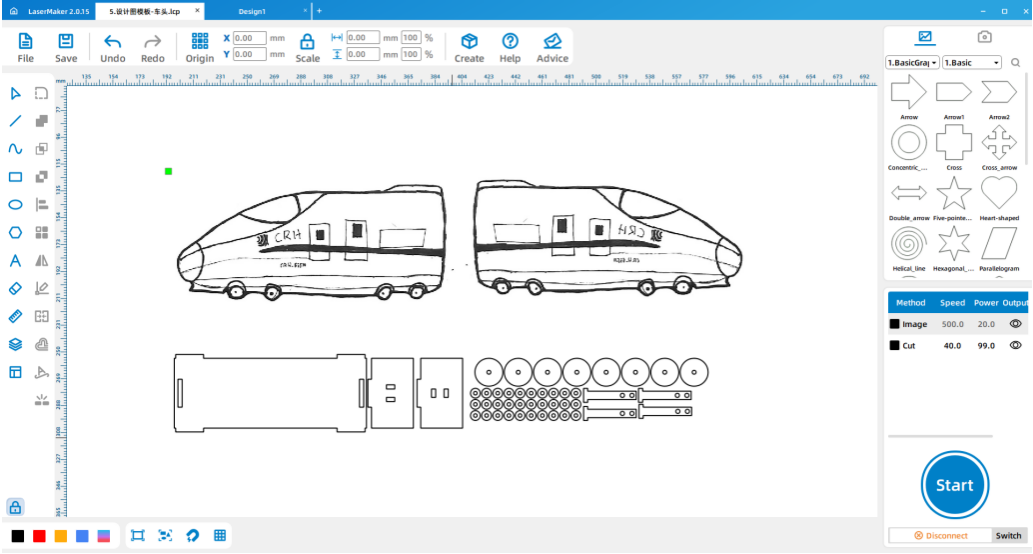
(2) Use the mobile APP “Scanning Almighty King” to scan the painted train and import it into the laser software LasrMaker in the computer.
(3) First, click “Picture – Crop” on the menu bar above the software to crop out the blank part.
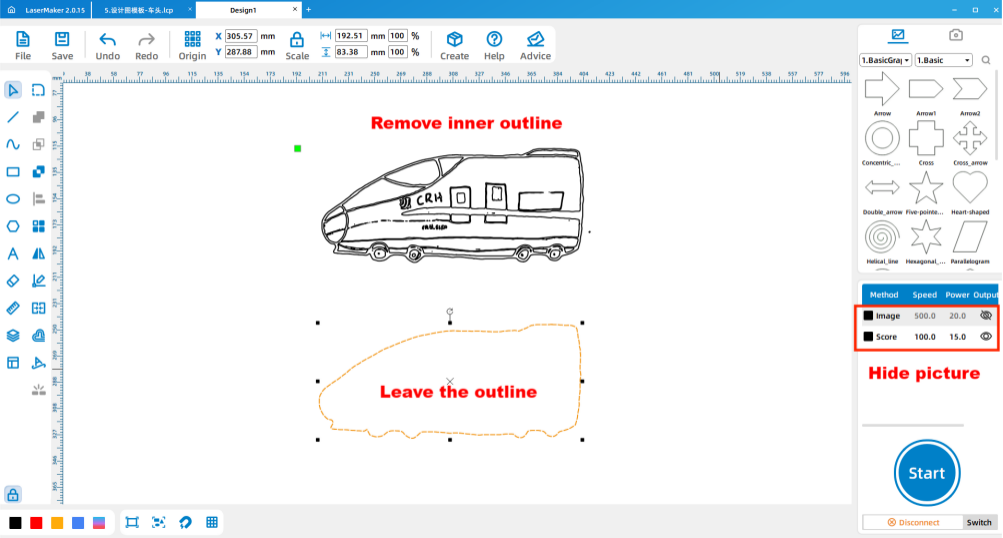
(4) Click “Picture- Outline” to sketch out the outline, and select the inner outline to delete it.
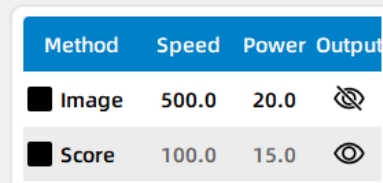
(5) Double-click the layer parameter area on the right side of the software to set the parameters of the layer.
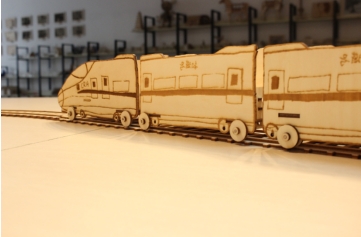
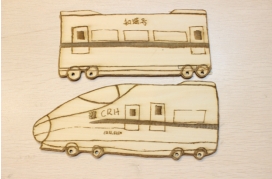
(6) After completing the above Settings, import it into the machine for processing, and the single piece of train will be made successfully!
Although we have successfully made a single piece of train, the locomotive and the carriage of the train are not connected, so our next step is to connect the trains.
Thinking: How do you connect them? We need to make corresponding parts design.
2. Make a three-dimensional version of the train
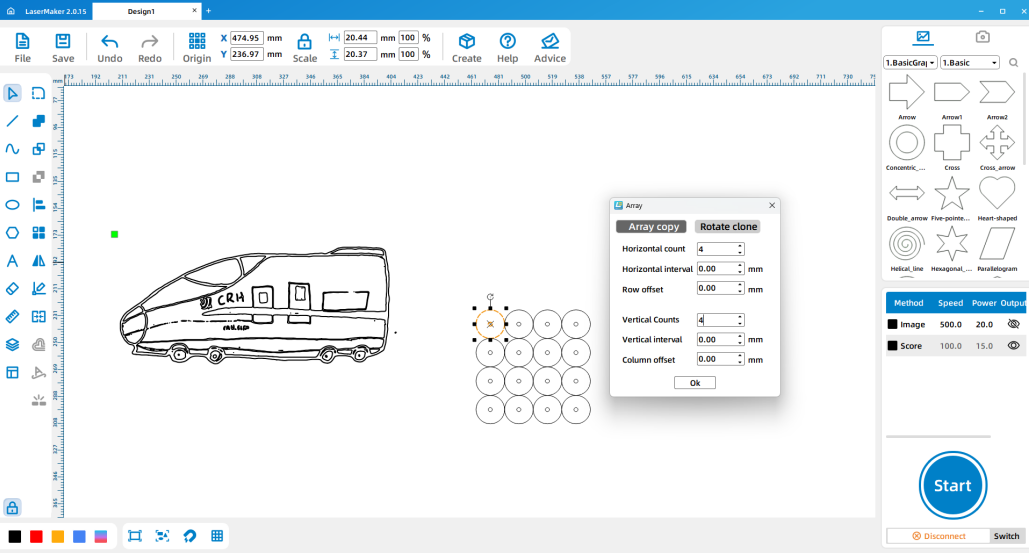
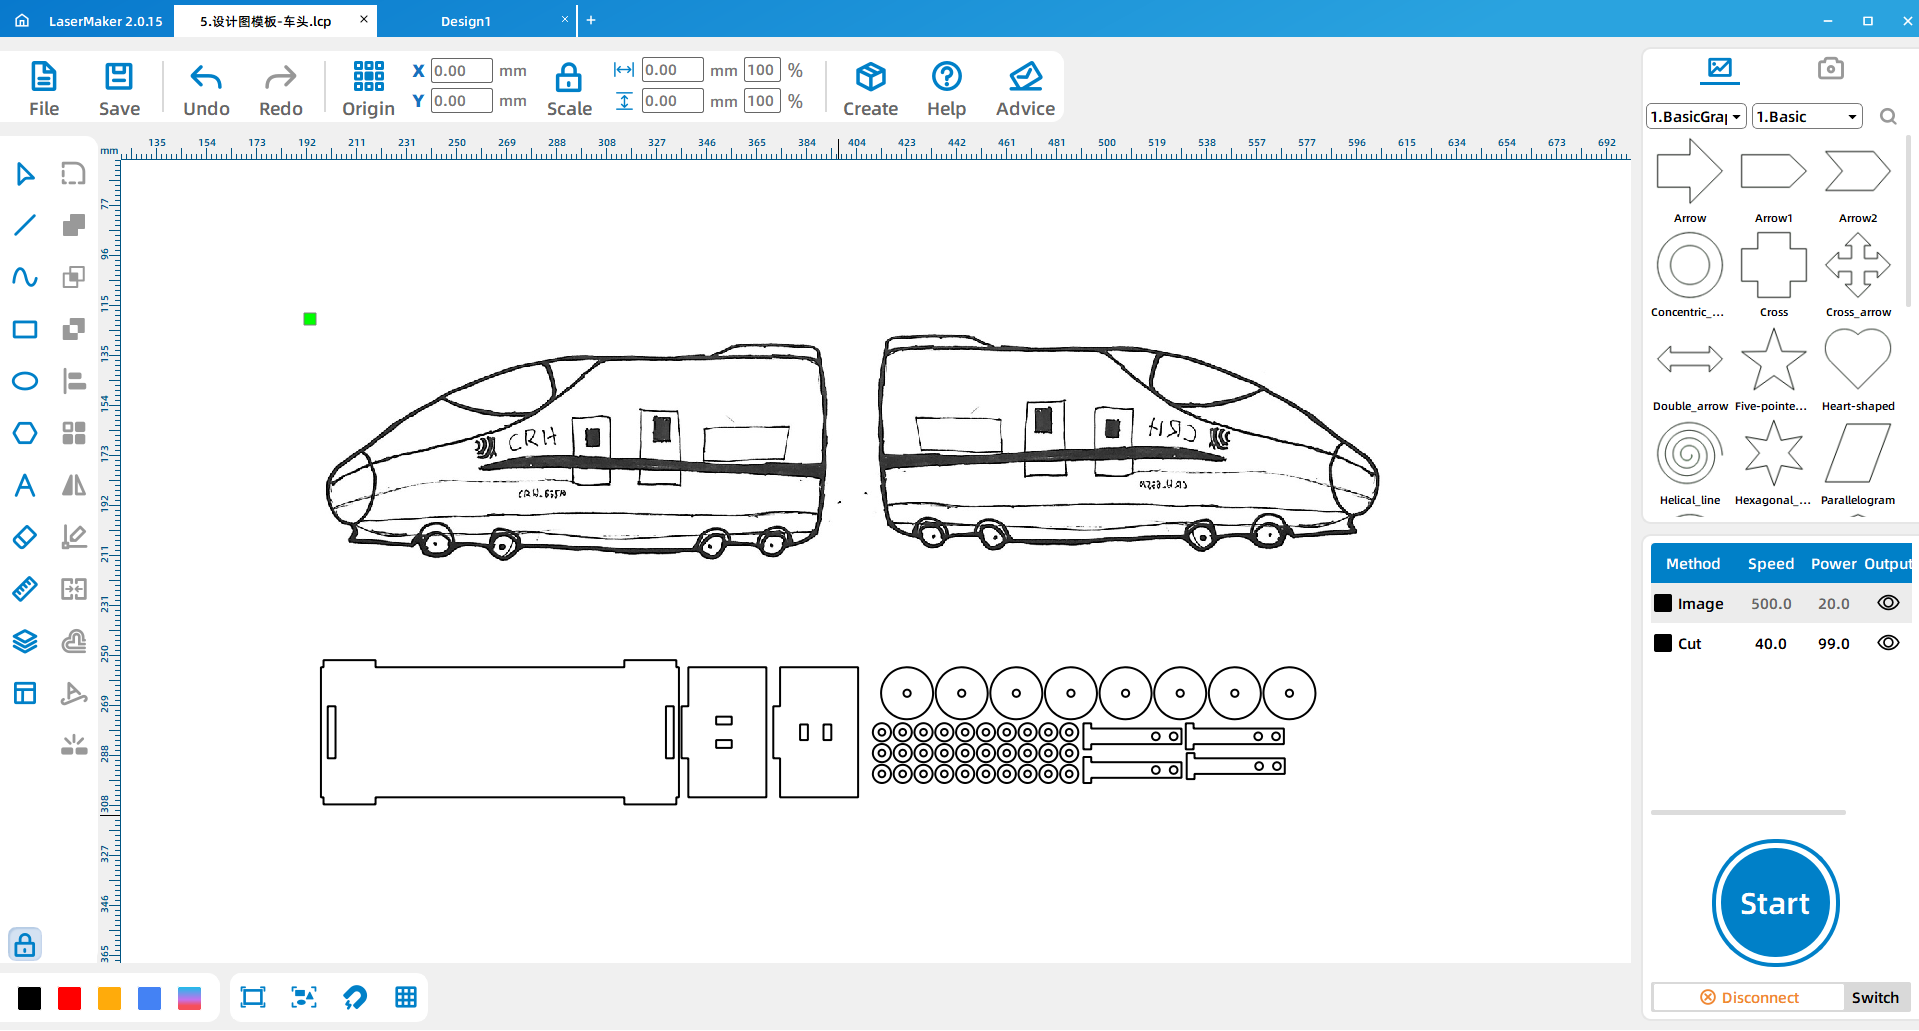
(1) Design the wheels and small wooden circles of the train and make multiple wheels and small wooden circles with the functions of array replication.
(Wheel size 20mm outer circle, 3mm inner circle)
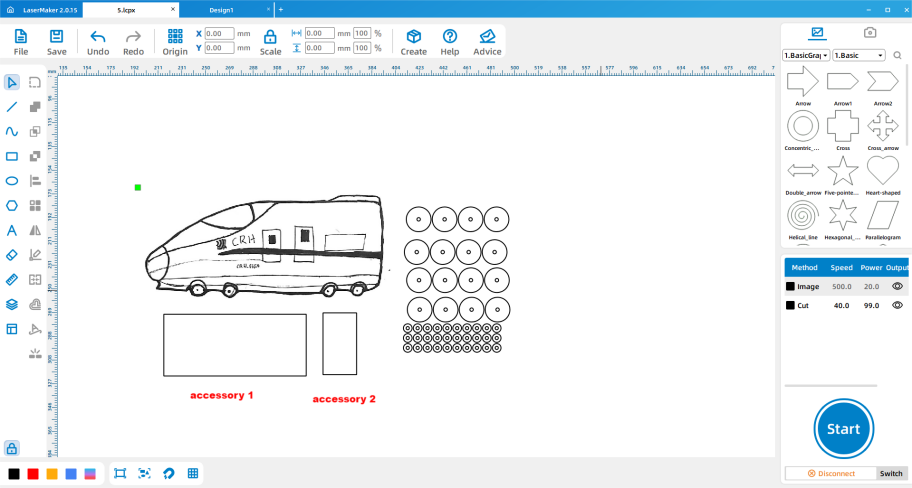
(2) Use the “welding” function to design the welding plate of the train, and weld the card position according to the following picture
(The size of the welding plate is the accessory ①137.65*50mm, the accessory ②30*50mm, the corresponding card size is 20*3mm, 3*20mm)
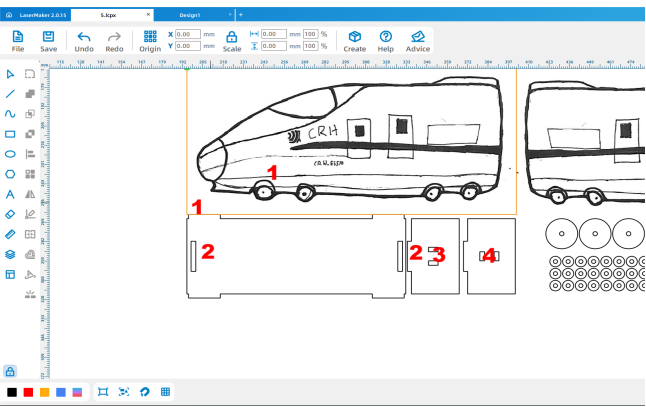
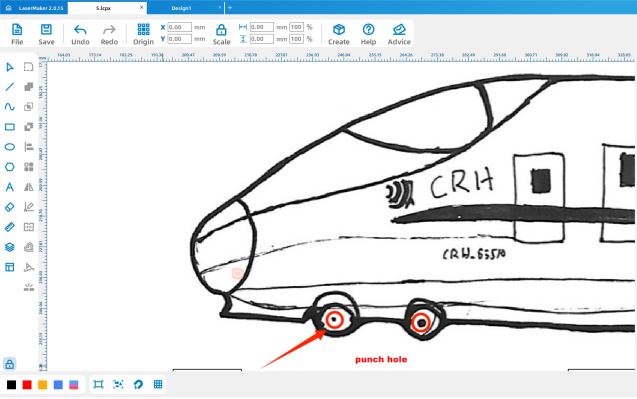
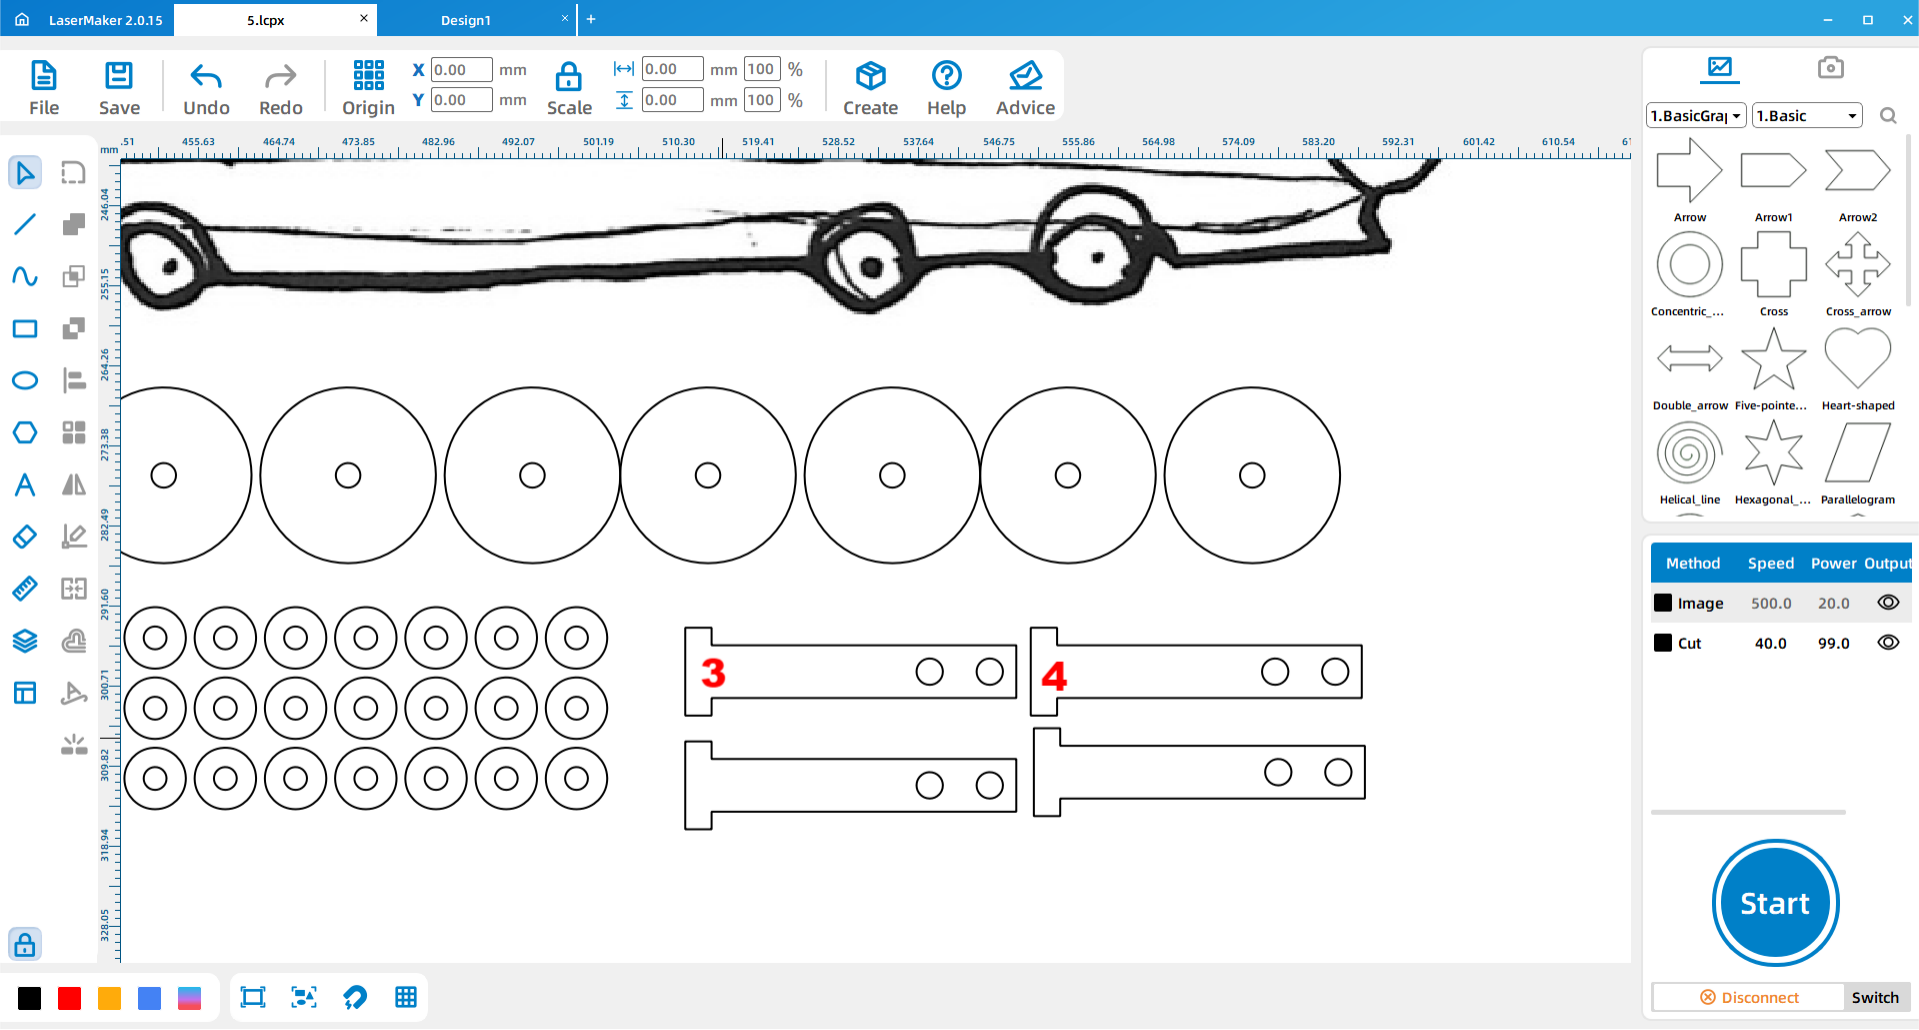
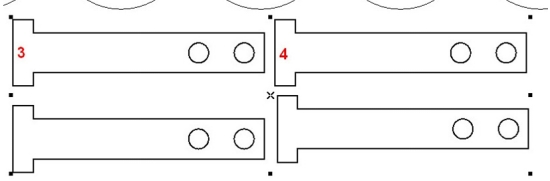
(3) Place the bayonet in the order below, and draw a perfect circle with a diameter of 3mm in the middle of the wheels of the train.
(Where bayonets 3 and 4 are used to connect the train cars.)
(Bayonet dimensions are respectively ①②3*20mm, 20*3mm and bayonet ③④are 6*3mm, 3*6mm)
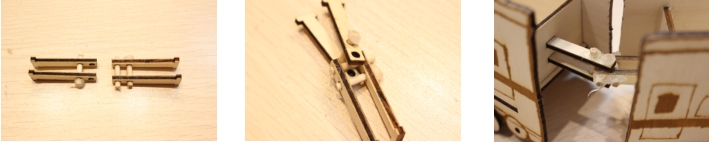
(4) In order to connect the train, design the chain of the train (called coupler buffer device) First draw a 38*6mm rectangle, then draw a 3*10mm rectangle on the left center of the 38*6mm rectangle for welding, and finally draw two circles with a diameter of 3mm placed on the right side of the chain, and make multiple chains with the function of array replication.
(5) Mirror the front and compartment.
(6) Import the designed file into the machine for processing, and take it out for assembly after processing.
(7) Install the wheel and splicing plate on the front and body of the train.
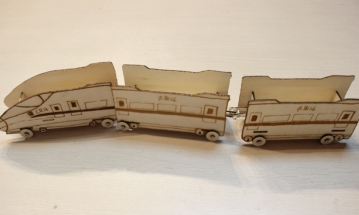
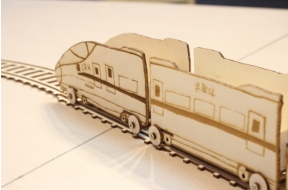
(8) Connect two of the chains to the tail of the locomotive, and then take out two chains to the front of the second car, and use a small stick to connect the four chains, the other cars in turn follow this step to connect and install. (9) So you have a complete train!
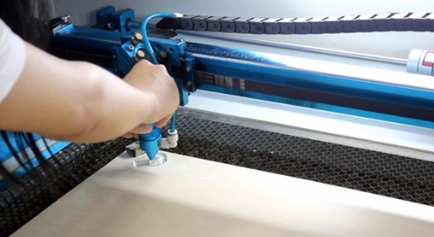
3. Machine processing
The design files saved in the above demonstration are respectively imported into the laser cutting machine for processing. Tip: remember to adjust the focal length before processing to avoid the situation of impenetrable cutting.
4. Works upgrade
Add motor
In order to make the train run itself, we can add small electric motors to the train.
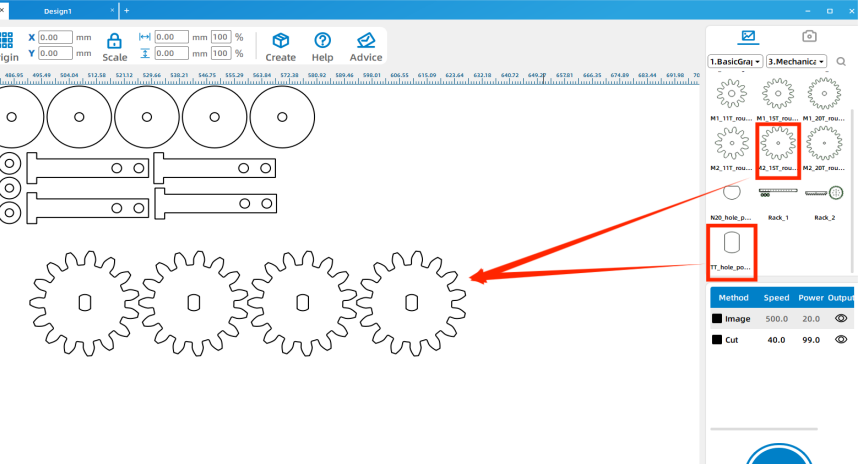
(1) Use the gear design built in the LaserMaker “Gallery”, import it into the interface and copy 4 of the array.
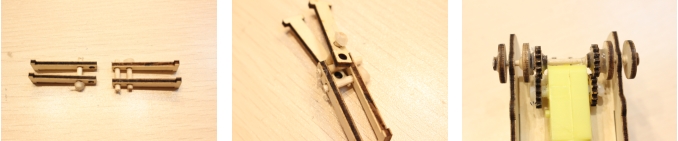
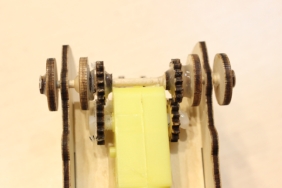
(2) Install the two gears on both sides of the motor, and use glue to stick the small motor under the front. (near the front wheel), and then install the remaining two gears on the wheel shaft, and match the two gears on the motor. (If the gears on the wheel shaft are not securely installed, glue them together)
(3) Connect the positive and negative wires on the battery box to the motor, and a self-moving train is complete!
Making Rails
We can know that both trains and high-speed trains run on rails, so we can also try to make our own track to make your little train look more realistic and interesting!
(3)Classroomfeedback
1. Through the production process of this lesson, what is the basic structure of a train?
2. What are the differences between a train and a car that we can learn from the making process of this lesson?
3. How can you make your train run faster?
(4) Make a comment
Evaluate yourself and your partner.
Evaluation item
Self-evaluation
Peer evaluation
Creativity (30 points)
Firm (30 points)
Beauty (20 points)
Attitude (20 points)
Total (100 points)
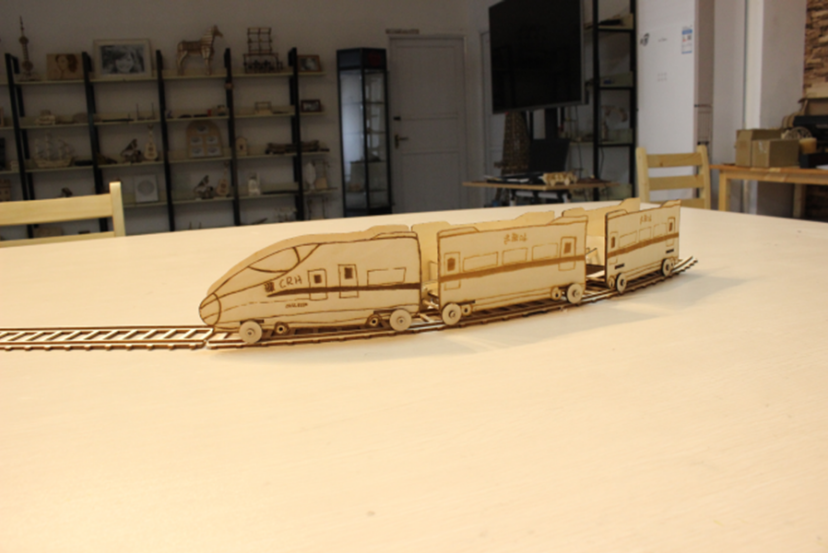
5.Showyourwork
Go to platform together to display the works, and talk about the design and transformation ideas, don’t forget to take photos.
ThunderLaserSTEAMEducationCourse(Thematic)
1.2 Magic Brush Marliang -- A train inventor
Exercise
Guide the students in making a train based on the lesson in lesson one.
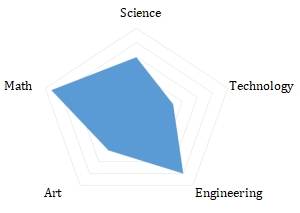
(1)STEAMindex
(2)TeachingObjectives
* Exercise students’ thinking ability and practical ability.
* Improve students’ ability to learn independently.
* Build a train.
(3)Teachingkeypointsanddifficulties
* Consolidate software and machine operation exercises.
* Improve students’ ability to learn independently.
* Build a train.
(4)PreparationforTeaching
* Please prepare relevant consumables, accessories and tools according to the attached table and the actual number of students.
* Ensure that students have the latest version of LaserMaker laser editing software installed on their computers.
* Please prepare the relevant presentation props in advance according to the PPT.
(5) Teaching Process
1.Teachingintroduction
→ Guide students to know the basic structure of a train by asking questions:
(1)Think about it, What is the difference between a train and a car?
Structurally, a car has only one body, and a train has multiple bodies;
In terms of speed, the speed of the car is faster than that of the ordinary train;
In the power plant, the car is driven directly by the internal combustion engine, the train relies on the diesel engine to generate electricity, and the electric motor does work.
(2) What does a train look like as you know it?
The front, the carriage and the tail (body), the internal combustion engine, the underframe, the coupler buffer (locomotives are connected to each other to transfer traction), etc.
(3)What are the two types of trains?
Ordinary trains and high-speed trains.
(4) Where does the train run?
Tracks.
→ Play the Magic Brush Maliang – Train Inventor Teaching Video.
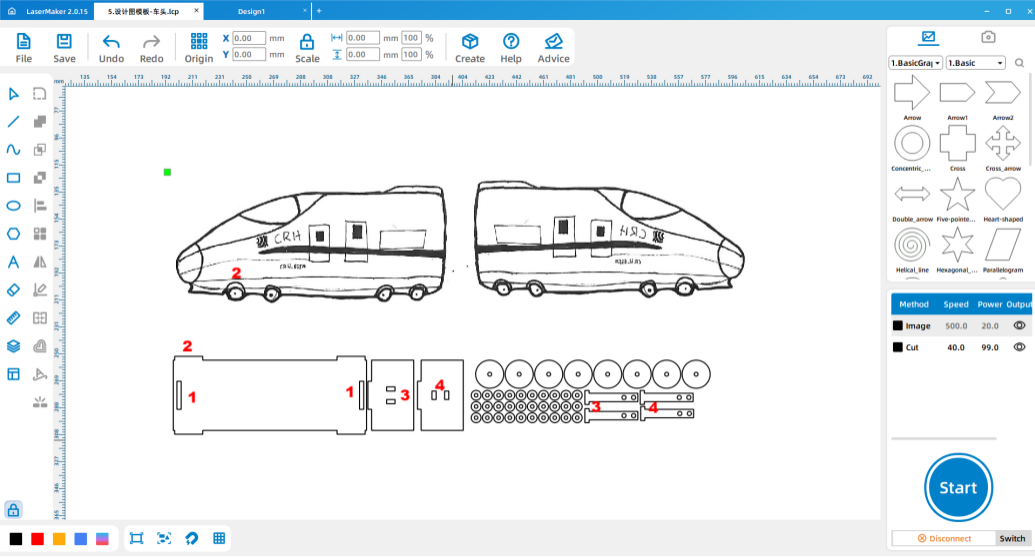
2.Softwaredesigndemonstration
Guide the students to review the main content of lesson 1 and teach the new operating points
Make a single outline train demonstration
(1)Use the mobile APP “Scan Almighty King” to scan the finished drawing and import it into the laser editing software LaserMaker. First, click “Picture-Crop” on the menu bar above the software to crop out the blank part, and then click “Picture -outline” to describe the outline of the image.
(2)In the layer parameter area on the right of the software, select No output image, box out the inner outline and delete it, leave the outer outline, and then select output image.
(3) Double-click the layer parameter area on the right side of the software to set the parameters of the layer.
Make a stereoscopic train demo
(1) Design the train’s wheels and small wooden circles and make multiple wheels and small wooden circles using array replicas.
(Wheel size 20mm outer circle, 3mm inner circle)
(2) Use the function of “welding” to design the welded plate of the train.
(The size of the welding plate is the accessory ①137.65*50mm, the accessory ②230*50mm, the corresponding card size is 20*3mm, 3*20mm)
(3) Place the bayonet in the order below, and draw a perfect circle with a diameter of 3mm in the middle of the wheels of the train respectively.
(Where bayonets 3 and 4 are used to connect the train cars.)
(Bayonet dimensions are respectively ①②3*20mm, 20*3mm and bayonet ③④are 6*3mm, 3*6mm)
(4) In order to make the train connected, the train is designed with a chain (called coupler buffer). First draw a 38*6mm rectangle, then draw a 3*10mm rectangle on the left center of the 38*6mm rectangle for welding, and finally draw two circles with a diameter of 3mm placed on the right side of the chain, and make multiple chains with the function of array replication.
(5) The train is mirrored at last.
After the design of all parts is completed, the design drawing is imported into the machine for processing.
(6) First of all, the car and the front of the train are assembled in three dimensions.
(7) The two chains are connected to the tail of the locomotive, and then take out two chains to connect the front of the second car, and use a small stick to connect the four chains, and the other cars are connected and installed in accordance with this step.
3. Machineprocessingdemonstration
The design files saved in the above demonstration are respectively imported into the laser cutting machine for processing. Tip: remember to adjust the focal length before processing to avoid the situation of impenetrable cutting.
4. Student operation, Teacher assistance
(1)Hand-drawing: Organize to issue pen and paper to each student for hand-drawing creation within 10 minutes. Arrange at least two assistants to help check whether the edge of hand-drawn works is clearly closed, and use mobile phones to collect and import them into their own computers.
(2)Software design: Guide students to complete the complete design, assist in naming the design file with student number and name and transfer it to the matching computer of the laser cutting machine.
(3)Machine processing: Guide students to complete machine processing steps according to the order of completion of the design.
(4) Assembly: Distribute tools in groups and guide students to assemble their works independently.
5.Worksupgrade
Added Small motor
To make the train run itself, add small motors to the train.
(1)Use the gear design built in LaserMaker “Gallery”, import it into the interface and array copy 4.
(2) Fit two of the gears on either side of the motor and glue the small motor under the front. (Near the front wheels)
(3) Install the remaining two gears on the wheel shaft and match the two gears on the motor. (If the gear on the wheel shaft is not securely installed, you can use glue to glue together)
(4) Connect the positive and negative wires on the battery box to the small motor, and you have a train that can drive itself!
Making the rails
This section can be used as a prize to reward students.
(6)Feedbackinclass
Questions:
1. Through the making process of this lesson, what is the basic structure of a train?
A: The front, carriage and tail (collectively called the body), coupler buffers (locomotives are connected to each other to transfer traction), etc.
2. What are the differences between a train and a car that we can discover through the making process of this lesson?
A: On the road, the car is on flat ground, the train is on a track;
Structurally, the car has only one body, and the train has multiple bodies;
In terms of speed, the speed of the car is faster than that of the ordinary train;
In the power plant, the car is driven directly by the internal combustion engine, the train relies on the diesel engine to generate electricity, and the electric motor does work.
3. How can make my train run faster?
A: Change the power unit.
Reviews:
Teachers can make reasonable comments and rewards based on the works produced by students.
(7)Displayofworks
Organize students to the platform to explain the design and transformation ideas of their own works, and select the best creative team from the aspects of ideological, normative, innovative, artistic, technical, teamwork and other aspects to commend, take photos.


.png "laser cutter Globle")


