1. Project objective
Knowledge and skills
Master the comprehensive application method of “Rectangle tool”, “Rounded corner tool”, “rectangular array”, “union” and “difference set” tools.
Thinking training
- Design thinking
(1) Observe the shape of common mobile phone brackets, and learn the shape design and structural design of brackets.
(2) Know the general splicing method of the mobile phone bracket surface and bracket foot: the mortise and tenon structure of the penetrating straight tenon.
- Computational thinking
(1) Master the calculation of matching the size of the mobile phone with the length of the support surface.
(2) Master the size calculation of the mortise and tenon structure in the support surface and the support foot.
- Engineering thinking
(1) Understand the mortise and tenon structure relationship and common form of two flat penetrating straight tenons.
(2) Understand the three points to determine a plane, grasp the inclination, the length and width of the support foot and the center of gravity.
Social responsibility and moral literacy
(1) The content of the works is healthy and civilized, pay attention to the protection of information security, and comply with information laws and regulations, information ethics and moral norms.
(2) In practice, you can imitate others’ works in style, and you must do improved innovation when creating.
2. Application scenario
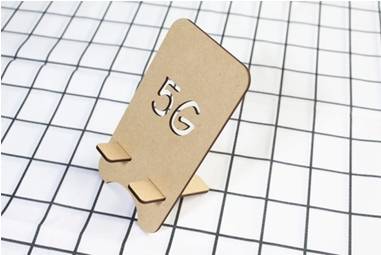
With the improvement of people’s material life and the development of the Internet, watching movies on tablet computers, shopping online and swiping wechat with mobile phones have become a way of life for everyone. Although tablet computers and mobile phones are very easy to carry, the disadvantage is that there is no fixed fulcrum, and the use of time is too long to make users become “phubs”, which is prone to cervical spondylosis. Therefore, products such as mobile phone stand came into being, as shown in the following figure, it plays a supporting role, avoiding the harm caused to the body by holding the mobile phone and looking down, and can also free the hands.
Think about the shape and structure of the mobile phone stand, and think about how to draw a simple mobile phone stand with LaserMaker.

3. Project analysis
(1) The shape of the product: the mobile phone bracket is composed of a bracket surface and a bracket foot. The surface part of the support can be designed in addition to rectangle, and can also be combined with animal, fruit and other shapes. The length and width of the support foot should be designed according to the weight, size, height and tilt Angle of the support surface of the phone. The connection mode of the support surface and the support foot uses the mortise and tenon structure, so the position of the straight mortise and tenon insert should be considered to increase the contact range with the desktop, which is conducive to bearing capacity.
(2) Modeling method: use graphic tools and difference set tools to carry out support surface modeling design, insert mortise and tenon joints, use rectangular tools to design the cutting rectangle of tenon structure and base structure, and do a good job in size matching calculation.
(3) Component size: According to the size of the mobile phone or the size of the universal bracket, set the size of the bracket surface and foot.
(4) Splicing method: The mortise and tenon structure of the penetrating straight tenon will be inserted into the two pieces.
(5) Material selection: basswood plywood board, acrylic board.
(6) Process effect: The use of cutting process can be colored on the board according to artistic design.
4. Modeling process

1.Research and hand-drawn design
Measure
Based on the size of your phone or someone else’s phone, what size phone holder do you plan to draw in LaserMaker? Please measure the size of the phone and fill in the form below.
|
Data recording unit: mm |
|
|
Support surface |
Length: Width: |
|
Support leg |
Length: Width: |
|
Mortise and tenon construction |
Tenon size: Mortise size: Number of mortise and tenon: |
Paint
According to your measurement data and design elements, draw a design sketch of the mobile phone stand in the frame.
2.Software drawing
For the structural analysis of the mobile phone stand, we can complete the drawing of the mobile phone stand graphics through 3 steps.
(1) Draw the support surface
Use the “Rectangle Tool” and “Rounded Tool” to draw the shape of the stand surface. Click the “Rectangle Tool” and draw a rectangle with a width of 100mm and a height of 180mm in the blank of the drawing area. The size of the rectangle can be modified according to the size of the personal mobile phone. Click the Rounded corner tool, move the mouse pointer to the four corners of the rectangle respectively, and click to complete the rounded processing, as shown in the following figure.

Use “Oval tool” and “difference set tool” for modeling design
Click the “Oval Tool”, hold down the Ctrl key, and draw a 45mm diameter circle at the bottom of the rounded rectangle. Use the alignment guide to align the center of the rounded rectangle in Figure 5.107. Select the rounded rectangle and click “Difference Set Tool” to cut out a semi-circle shape on the rounded rectangle, as shown in following figure.

Use the Text Tool to add text
Move the mouse pointer to the drawing box, click “Text Tool”, move the mouse pointer to the drawn rounded rectangle, double click the left mouse button, and the “Draw Text” dialog box will pop up, as shown in the following figure. You can select your favorite font and appropriate size, enter “5G”, and click “OK” button to complete the text addition.

Use the “Rectangle tool” and “Rectangle array” to draw the sockets (also known as mortises) on the surface of the support.
Click Rectangle Tool to draw a rectangle with a width of 25mm and a height of 3mm. Click Rectangle Array, enter 2 in the Number of horizontal columns, 1 in the Number of vertical columns, and 30mm in the Horizontal Spacing column, and click OK. Move them under “5G” and align them in the middle of the rounded rectangle, as shown in the following figure.

(2) Draw the support feet
- Use the “Rectangle Tool” and “Rounded Corner Tool” to draw rounded rectangles.
Click “Rectangle Tool”, draw a rectangle 25mm wide and 90mm high in the blank area of the drawing area, click “Rounded Corner Tool”, enter “5” in the radius of the “Rounded Corner Tool” dialog box that pops up, and round the four corners, as shown in the following figure.

Use the “Rectangular array” to copy the rounded rectangle and make the tenon.
Select the rounded rectangle, click “Rectangular array”, enter 2 in the column of “horizontal number”, 1 in the column of “vertical number”, and 30mm in the column of “Horizontal distance”, and click the “OK” button to complete the replication, and the spacing is equal to the spacing of the base structure of the support plate, as shown in the following figure.

Use the “Rectangle tool” and “Union tool” to connect the tenon of the rounded rectangle.
Click the Rectangle Tool and draw a rectangle 80mm wide and 20mm high in the middle of the two rounded rectangles, using the alignment guide so that it is centered. Select the rectangle and the two rounded rectangles and click “Merge Tool” to merge the three figures into one figure, as shown in the following figure.

After completing the above steps, we have preliminarily completed the drawing of the mobile phone stand face and stand Angle, as shown in the following figure.

- Process pattern design
Select the mobile phone stand object, double-click the corresponding “Black cut” process layer, and the “Processing Parameters” dialog box will pop up. Set the processing material to Osong wood, the process to cut, and the processing thickness to 3mm, as shown in the following figure.
The mobile phone stand works only use the cutting process. If you need to fine-tune the processing parameters, you can enter the “Processing parameters” dialog box to modify the corresponding parameter values.

Thinking and debugging
(1) What is the general size of the support surface of the mobile phone bracket? What are the factors that make the mobile phone stand structure stable? Modify the length of the support surface and foot, and test the effect of the minimum or maximum length.
(2) Modify the position and size of the base on the support surface, and debug the optimal base position and size.
(3) How to adjust the tenon size of the penetration part, which is more suitable for the mobile phone to be placed directly or horizontally?
5.Display of finished products
The finished product is shown in the following figure.

Straight tenon
The straight tenon is a kind of mortise and tenon structure which appeared earlier and was widely used in Chinese woodworking process. The straight tenon refers to the connection with the member, the corners are at right angles, and the mortise and tenon are regular square bodies, which are mostly used for connecting two sides to become open tenon (through the cross section, such as this case) or dark tenon (no tenon can be seen). According to the shape of the tenon shoulder, the straight tenon can be divided into four kinds: straight tenon without shoulder, straight tenon with single shoulder, straight tenon with double shoulder and straight tenon around shoulder, and there are two kinds of single tenon and double tenon according to the number of tenon ends.
6.Extension exercise
When you are just learning to cook, you may like to follow recipes or videos, and it is very convenient to have a shelf on the kitchen counter to place recipes or tablets, so that you can read recipes while cooking. Refer to the example shown in the following figure and use your imagination to try to design different styles of brackets in LaserMaker software.

7.Work appreciation
The following figure is a variety of mobile phone stand works by the LaserBlock open source community for your reference and appreciation.


Browse Thunder Laser Bolt >


.png) International
International
 United States
 Brasil
 Canada
 Costa Rica
 Česká
Česká
 Ελλάδα
 Polska
 Ireland
 Portugal
 Lietuva
 Россия
 Deutschland
 Britain
 Україна
 France
 Sverige
 Italia
 Norway
 Denmark
 Romania
 한국
한국
 中国
中国
 ประเทศไทย
 中国香港
中国香港
 Israel
 中國臺灣
中國臺灣
 India
India
 پاکستان
 پශ්රී ලංකා
 ジャパン
ジャパン
 Australia
 New Zealand
 South Africa