fbpx
Search
Close this search box.
Home> Blog> Small Table Lamp

Small Table Lamp

26/06/2024
Share:

1. Project objective

Knowledge and skills

Understand the operation method of template generated by “Quick box making” and the design principle of box structure.

Thinking training

    • Design thinking

    (1) Understand the design of the finger joint structure connecting two adjacent surfaces of the box structure.

    (2) Knowledge refers to the three-dimensional modeling and two-dimensional drawing of joint structure design.

    • Computational thinking

    (1) Master the size calculation method of the tenon and tenon of the tenon structure.

    (2) Master the three-dimensional structure of the box hexahedron and the calculation method of the two-dimensional expansion diagram.

    • Engineering thinking

    (1) Understand the general design and fabrication methods of hexahedral structures.

    (2) Feel the efficiency of making mortise and tenon structure boxes by using the one-button template generation function of “Quick box making”.

Social responsibility and moral literacy

In practice, you can imitate others’ works in style, and you must do improved innovation when creating.

2. Application scenario

Table lamp is a kind of lamp used for lighting in people’s life, mainly used for reading and learning, and often used as an ornament on the bed, desk and TV cabinet in the bedroom to create an atmosphere, as shown in the following figure. There are a variety of styles of small table lamps, table lamps are generally cylindrical, rectangular or cuboid shapes, and there are also various artistic designs. The flat expansion diagram of the cuboid table lamp shade is composed of a rectangle or square, and the 6 faces are spliced together to form a lampshade. In order to better light transmission, you can do some processing on the lampshade surface, install the circuit and the lamp inside the lampshade, and form a simple small table lamp. Now let’s try to design and build a small lamp using LaserMaker software.

software Small Table Lamp 1

3. Project analysis

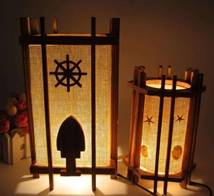
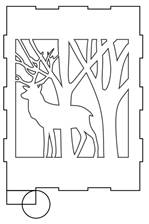
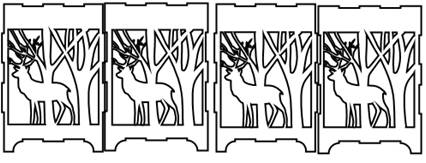
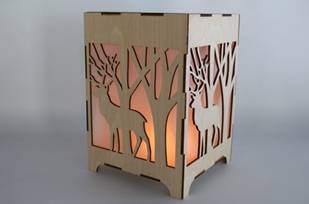
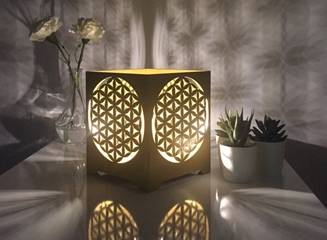
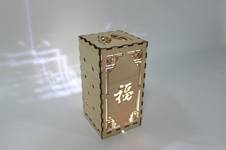
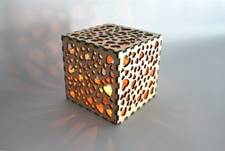
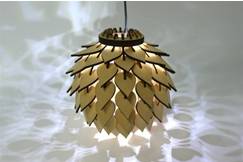
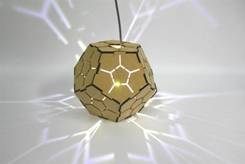
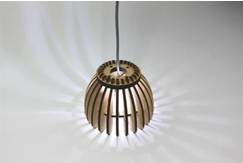
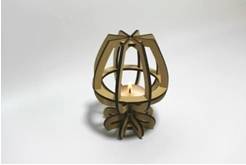
(1) Shape of the parts: the lamp shade has a variety of shapes, such as cuboid, ring, half sphere, etc., different shapes and structures, drawing methods are different. Hexahedral table lamps can be made according to the box structure, ring and semi-spherical table lamps, involving curves, can be composed of cross section and longitudinal section. In order to strengthen the tightness of the connection, it can be connected by means of finger joint, that is, multiple tenons and sockets are connected.

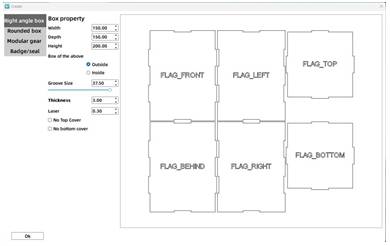
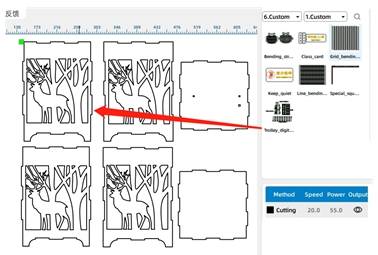
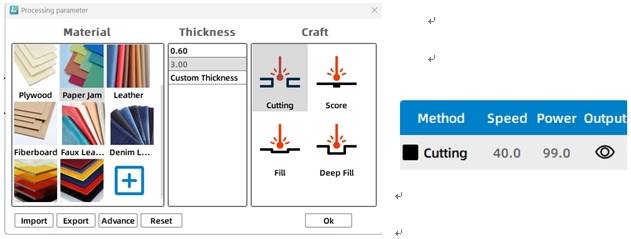
(2) Modeling method: LaserMaker has a “quick box” function, which can be used to complete the drawing of hexahedron expansion graphics with tenons and sockets.

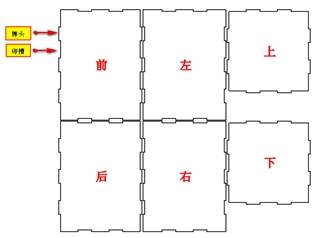
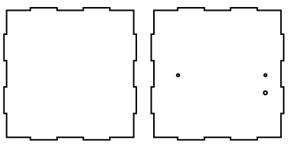
(3) the size of the parts: according to the size of the table lamp and the working format of the laser cutting machine to determine the size; Since the adjacent two sides of the box are connected, the mortise and tenon structure belongs to the finger joint, and the size of the tenon and the base should be set to be consistent.

(4) Splicing method: The adjacent two sides of the tenon and tenon tenon splicing together, because the tenon and the joint size is the same, in order to make the tenon and tenon bite tight, you need to use a hammer or other heavy objects to hammer the tenon hammer into the joint.

(5) Material selection: basswood plywood board, Osson board, Wacli board or corrugated paper.

(6) Process effect: you can do some art pattern design around the lampshade 4 faces or all 6 faces, you can use the cutting process to achieve the hollowing effect, you can also use the tracing process or engraving process to form the etching effect, you can color the parts.

4. Modeling process

software Small Table Lamp 2

1.Research and hand-drawn design

Measure

 The above figure is Small table lamp modeling process.

                         Data recording                    unit: mm

Length:

Width:

Height:

Paint

According to your measurement data and design elements, please draw the design sketch of the small lamp in the frame.

2.Software drawing

After the structural analysis of the small table lamp, we can draw the graph of the small table lamp through 5 steps.

(1) Use the “quick box building” function to draw small table lamp lampshade and mortise and tenon structure

  • There are two ways to draw the lamp shade of the small table lamp. One is to draw 4 rectangles with the tool of the drawing box and draw the tenon structure or the base structure of each rectangle. The other is to directly use LaserMaker’s “Quick box making” function to input the box size and generate a cuboid box as the lamp shade of the small table lamp. The latter method is faster, and as a fast creation, it avoids the cumbersome calculation of mortise and tenon principle, size calculation and drawing, and improves the efficiency of creation.

On the toolbar, click Quick Box Creation. The Quick Box Creation dialog box is displayed. Enter the size of the lampshade. As shown in the following figure, enter 150mm in “Box width”, 200mm in “box height” and 150mm in “box depth”. The above dimensions are the “external dimensions” of the box, the groove size is selected as 25mm, and the “material thickness” is 3mm by default. Modify the “laser compensation” to 0.12mm, after input, click “Create box”, you can add the box to the drawing area, the lamp shade frame of the small table lamp is completed, as shown in the following figure.

software Small Table Lamp 3
software Small Table Lamp 4

(2) Add lampshade pattern with “Select Gallery”

● Delete the text “front, back, left, right, up, down” on the box, and click “Select Gallery” “8. Find the “forest deer” pattern in “Custom Gallery”, drag it to the 4 sides of the lampshade, and the lampshade pattern part is added, as shown in the following figure.

software Small Table Lamp 5

(3) Draw a small table lamp base

  • Use the Rectangle Tool and Ellipse Tool to draw the base shape

Click the Rectangle Tool and draw a rectangle with a width of 31.43mm and a height of 15mm to align it with the bulge on the left side of the lampshade. Click the Ellipse Tool and draw a circle with a diameter of 30.19mm, with a quarter of the circle aligned with the small rectangle, as shown in

software Small Table Lamp 6

Handle base graphics using “Difference set” and “Union set”

Select the circle, click “Difference Set”, use the circle to remove part of the rectangle shape, form a foot of the base, copy this foot and do “horizontal flip”, align it with the right side of the lampshade. Hold down the Ctrl key, select the two feet of the lampshade frame and the base, click “union”, one side of the lampshade base is completed. The remaining 3 lampshades can directly copy the base that has been drawn, as shown in

Finally, drag the process layer and adjust the process sequence to shallow carving → tracing → cutting, as shown in

software Small Table Lamp 7

(4) Use the “oval tool” to draw the screw holes and wire holes on the bottom plate of the small table lamp.

● Click the “Ellipse Tool”, draw two circles with a diameter of 3mm in the bottom surface, the horizontal distance between the two circles is 99mm (the length here is based on the length of the LED strip installed on the small table lamp), and pull to the middle of one of the squares, which are the two screw holes used to fix the lamp strip to the bottom plate. Then draw a circle with a diameter of 4mm, set 20mm directly below the hole on the right, as the outlet of the wire. As shown in the following figure, the screw holes and wire holes of the base plate are drawn.

software Small Table Lamp 8

After completing the above steps, the graph of the small lamp is drawn, as shown in the following figure.

software Small Table Lamp 9

(5) Process pattern design

Select the small table lamp object, double-click its corresponding “black cut” process layer, pop up the “processing parameters” dialog box, set the processing material to basswood plywood, the process is cut, the processing thickness is 3mm, click “OK” and exit, the processing parameters are displayed in the process layer.

The small table lamp works only use the cutting process, as shown in the following figure.

software Small Table Lamp 10

Thinking and debugging

(1) If the “quick box making” function is not used, what method can be used to connect the adjacent two sides? Thinking and debugging effect?

(2) What are the dimensions of the tenons and sockets on the two adjacent sides related to? What happens if I make the tenon smaller than the tenon? How much smaller is feasible? What changes might occur to the material when the temperature or humidity changes?

(3) Can the number of mortises and mortises be increased or decreased accordingly? How does it work?

5.Display of finished products

The finished product is shown in the following figure.

software Small Table Lamp 11

Finger Joint

Finger jointing is one of the traditional mortise and tenon processes. The finger jointing plate is made of a number of pieces of wood splicing, similar to the fingers of the left and right hands, so it is named “finger jointing”, as shown below. Finger tenons are often used on box structures because they increase the area of gluing, thereby enhancing the robustness of the structure.

6.Extension exercise

Carving technology is one of the excellent folk arts and crafts of the Chinese nation, carving table lamp in addition to daily use, but also can add elegant atmosphere to the family. After completing the drawing of the small lamp above, you will certainly have a certain degree of understanding of the drawing of the lamp. Can you draw the exquisitely carved table lamp shown in the following figure in LaserMaker? Try hands-on crafting to add a touch of art to your home!

software Small Table Lamp 12

7.Work appreciation

The following figure is a variety of lighting works from the LaserBlock open source community for your reference and appreciation.
software Small Table Lamp 13
software Small Table Lamp 14
software Small Table Lamp 15
software Small Table Lamp 16
software Small Table Lamp 17
software Small Table Lamp 18

From idea to realization, we need the spark of imagination, but also need the down-to-earth technology. The most impressive thing about laser cutting creation is that the hand-designed things immediately appear in front of your eyes – there are surprises in the creation.

Browse Thunder Laser  Bolt >

Thunder laser Bolt Plus

Recent Blog

    America

    Europe

    Aisa

    Oceanica

    Africa