Tic Tac Toe, also known as “Three in a Row,” is a common two-player board game. The board consists of a 3×3 grid, with each square representing a position where a player can place their piece. The goal of the game is to be the first player to get three of their pieces in a row (horizontally, vertically, or diagonally) to win.
In this lesson, we will introduce you to the design of a three-dimensional version of Tic Tac Toe. Through this course, you can break away from the traditional two-dimensional concept of Tic Tac Toe and explore more ways to play and enjoy the game! The Laser Wizard brings you the creation called “Three-Dimensional Tic Tac Toe”!
I. Analysis of the Creation
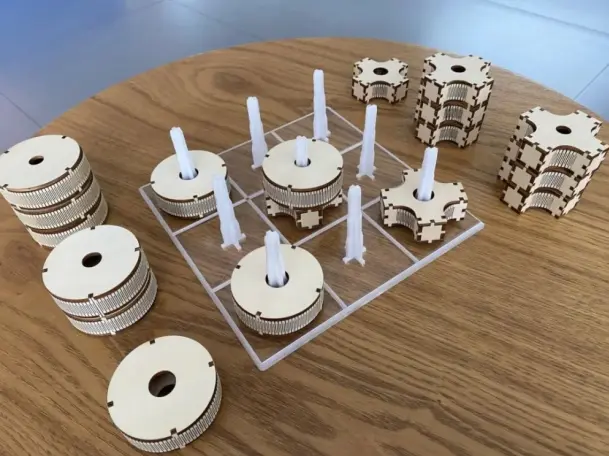

II. Materials List
III. Laser Modeling
1. Designing the Three-Dimensional Pieces
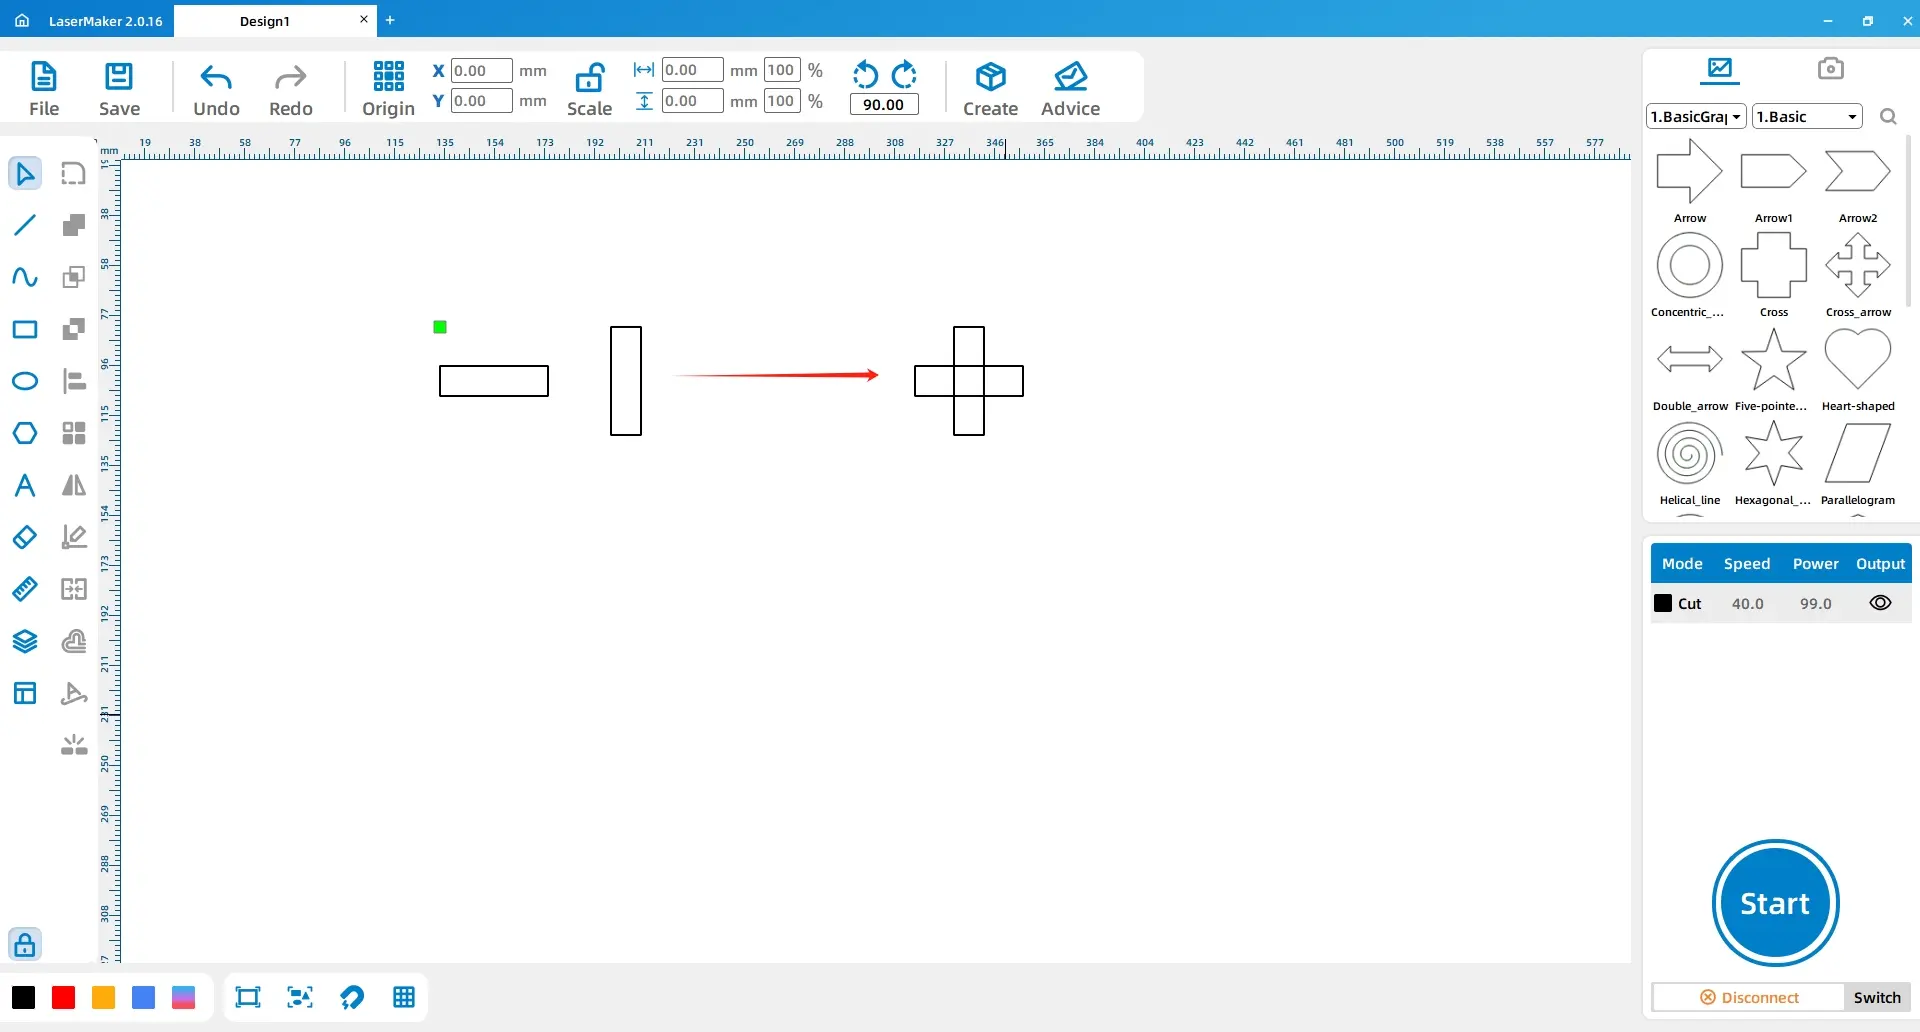
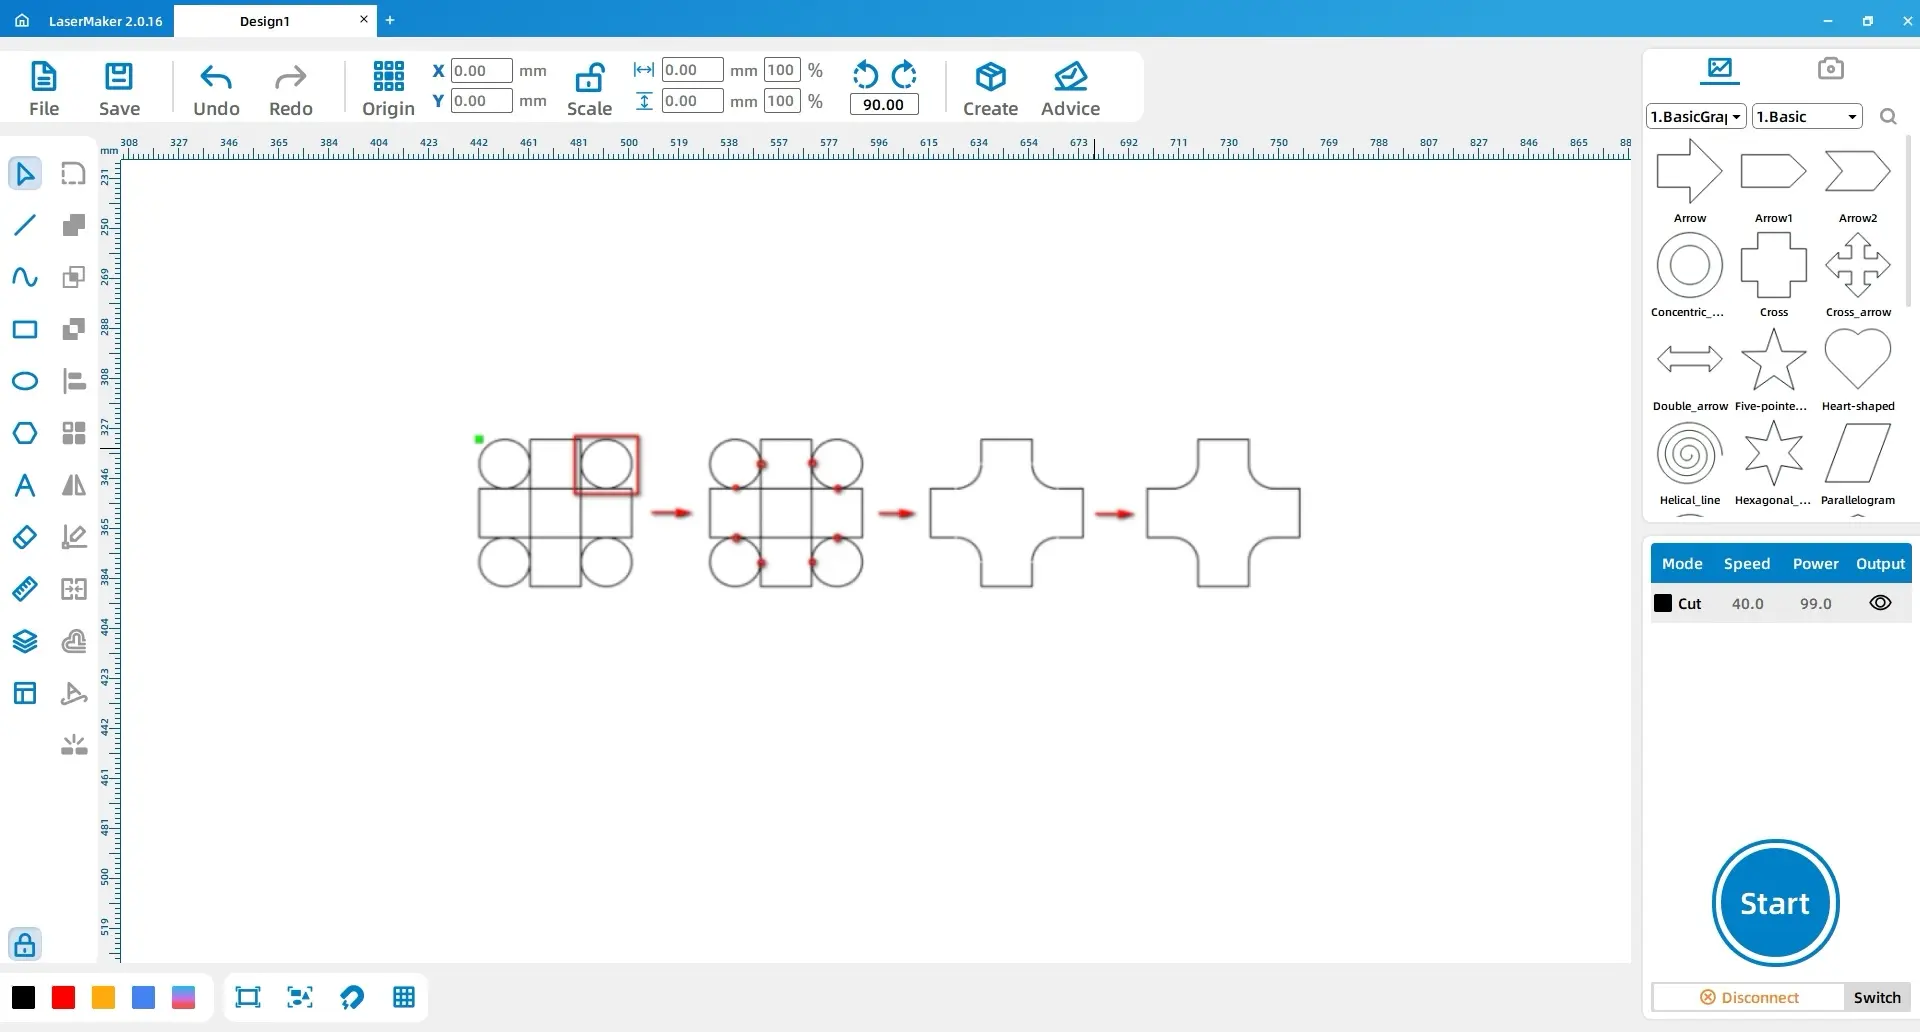
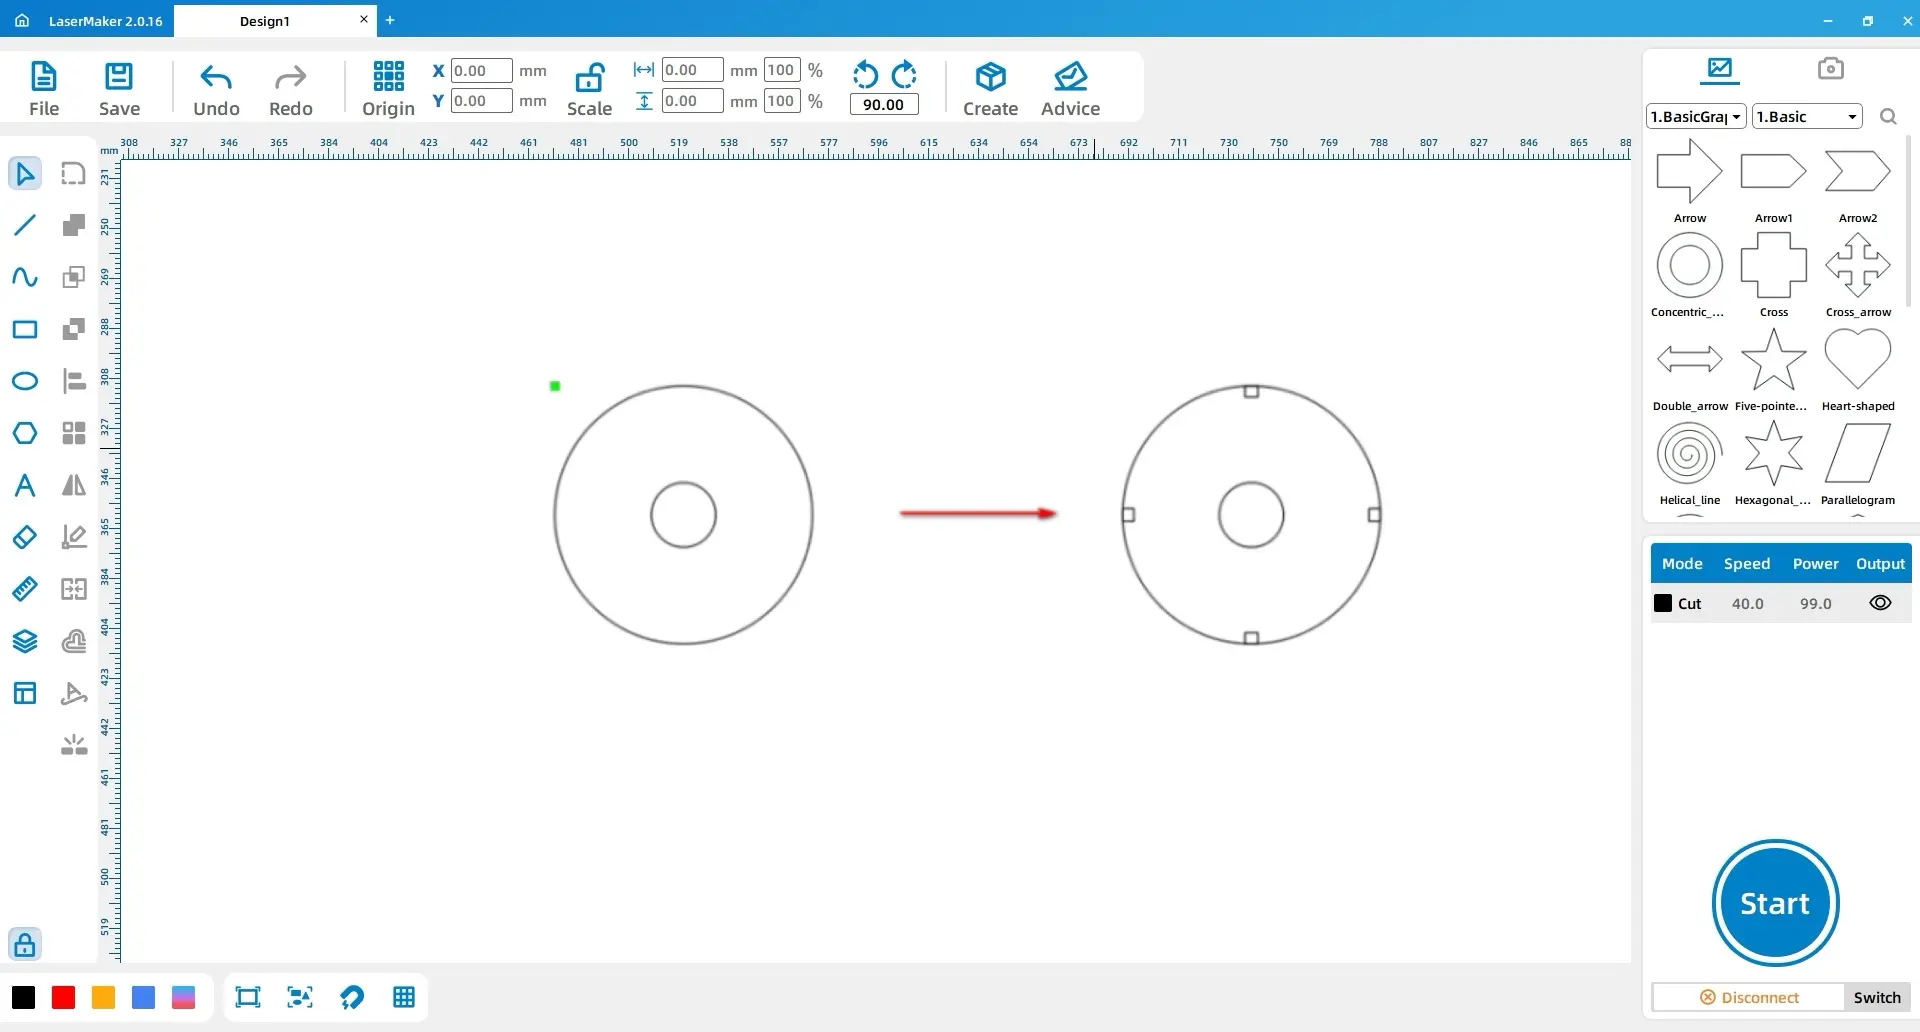
(2) Select the “Ellipse” tool from the left toolbar using the left mouse button, draw four perfect circles, and set the length and width to “20, 20”. Position them at the four corners of the cross.
Select the “Eraser” tool from the left toolbar using the left mouse button, activate the eraser function, and adjust the size to 1mm. Erase the parts where the four circles overlap with the cross.
While holding down the Ctrl key on the keyboard, select the cross-shaped line segments and the four circular arcs in the middle of the pattern with the left mouse button, and click to delete them.
Select the pattern with the mouse, click the “Combine Curves” tool in the left toolbar using the left mouse button, set the center value to 1mm, and click “Confirm”. See the image below for reference.
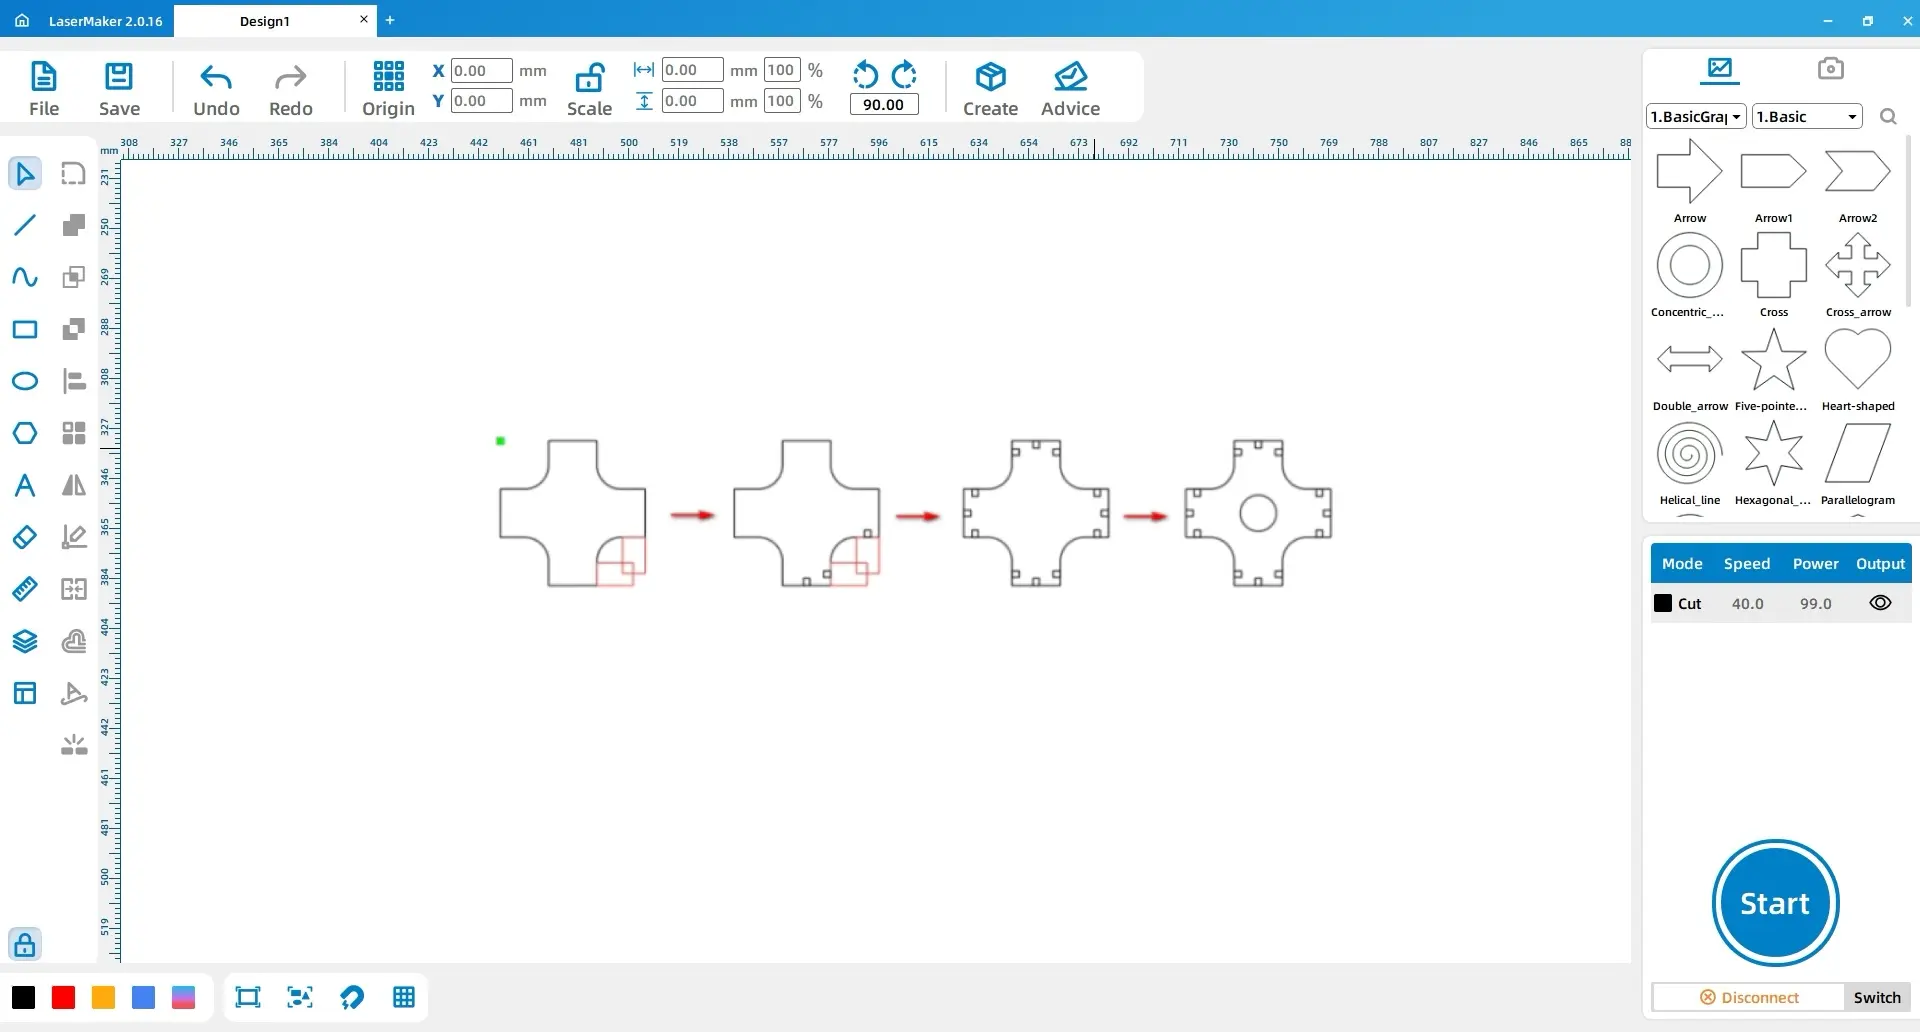
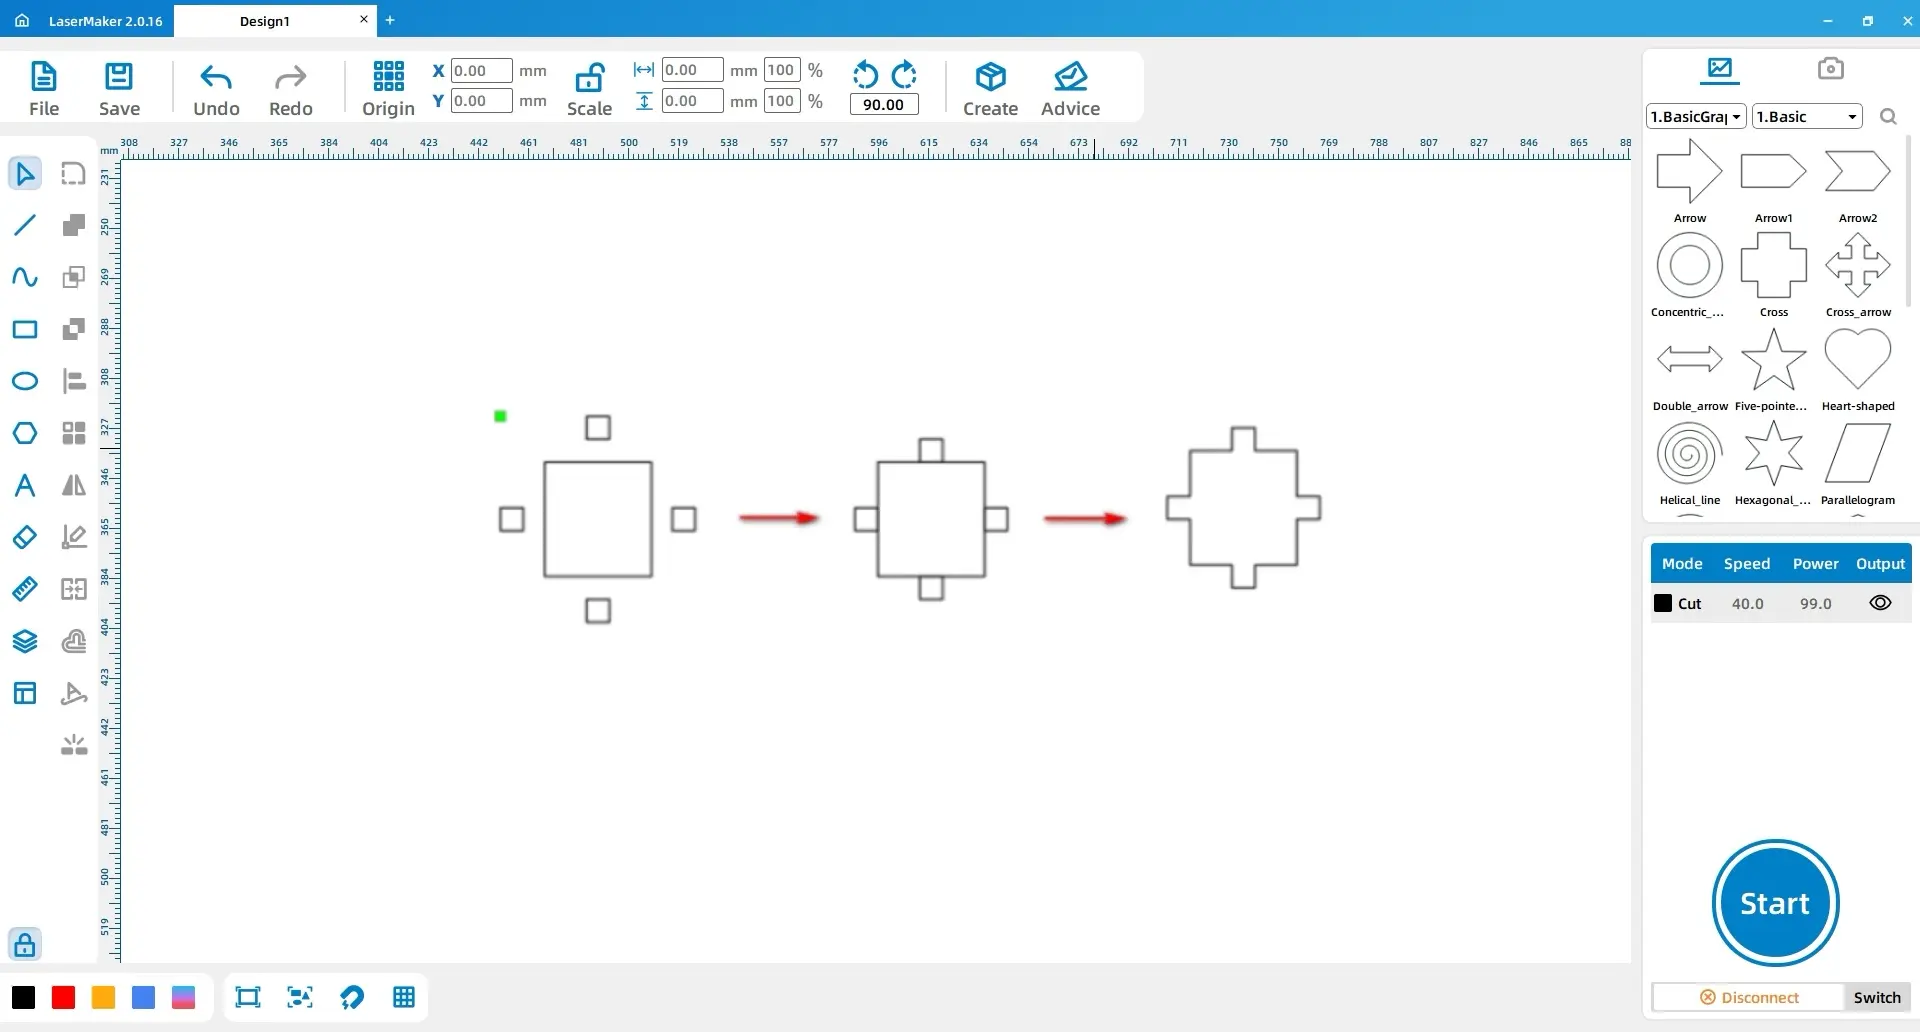
(3) Select the “Rectangle” tool from the left toolbar using the left mouse button, draw two rectangles, and set the dimensions to “15, 9.4” and “9.4, 15”. Position them along the edges of the cross.
Select the “Rectangle” tool again from the left toolbar using the left mouse button, draw three rectangles, and set the dimensions to “2.6, 3”. Align them horizontally and vertically with the two rectangles and the cross, respectively.
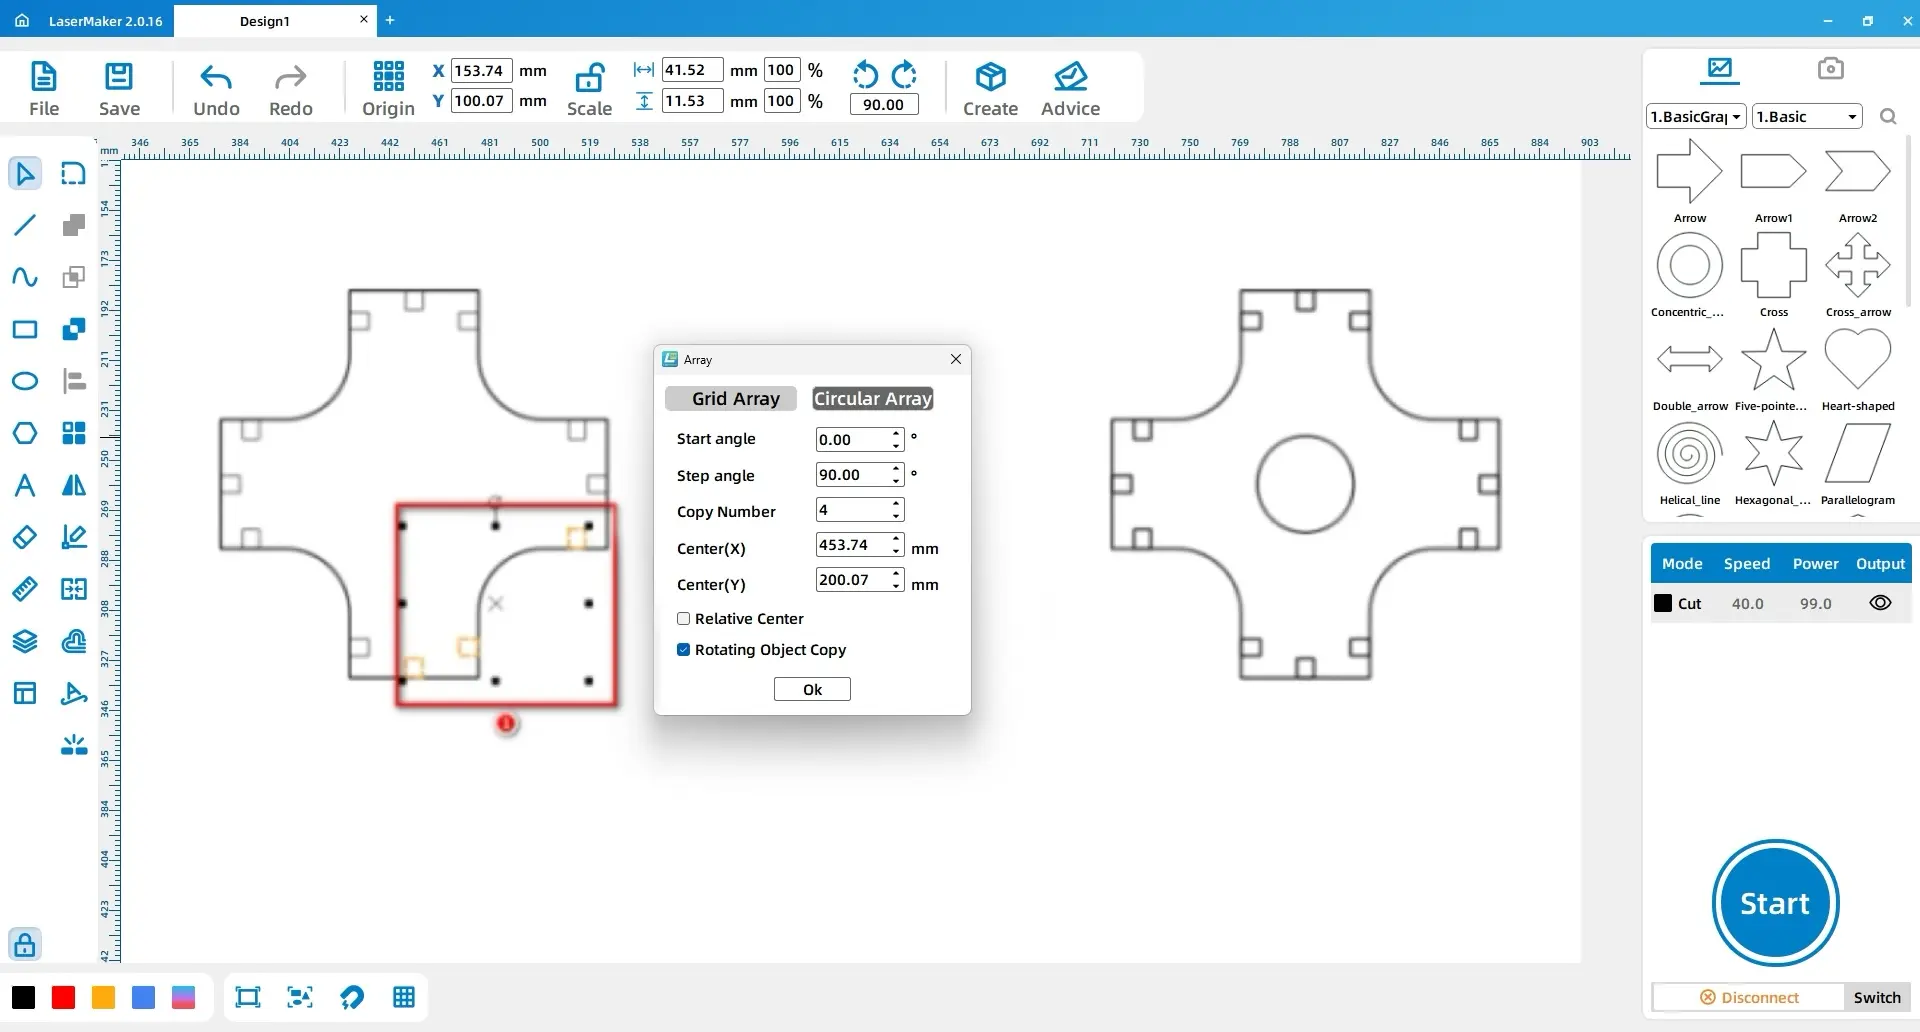
Select the shapes within the red box labeled 1 in the following figure, click the “Circular Array” tool in the left toolbar using the left mouse button, set the start angle to 0°, step angle to 90°, replication count to 4, center (X) to 312.65, and center (y) to 118.50. Uncheck “Relative to Rotation Center” and change the values to center (X) 300 and center (y) 100, as shown in the following figure.
Click the “Ellipse” tool in the left toolbar using the left mouse button, draw a perfect circle, and set the dimensions to “15, 15”. Center-align this circle with the cross pattern, as shown in the following figure.
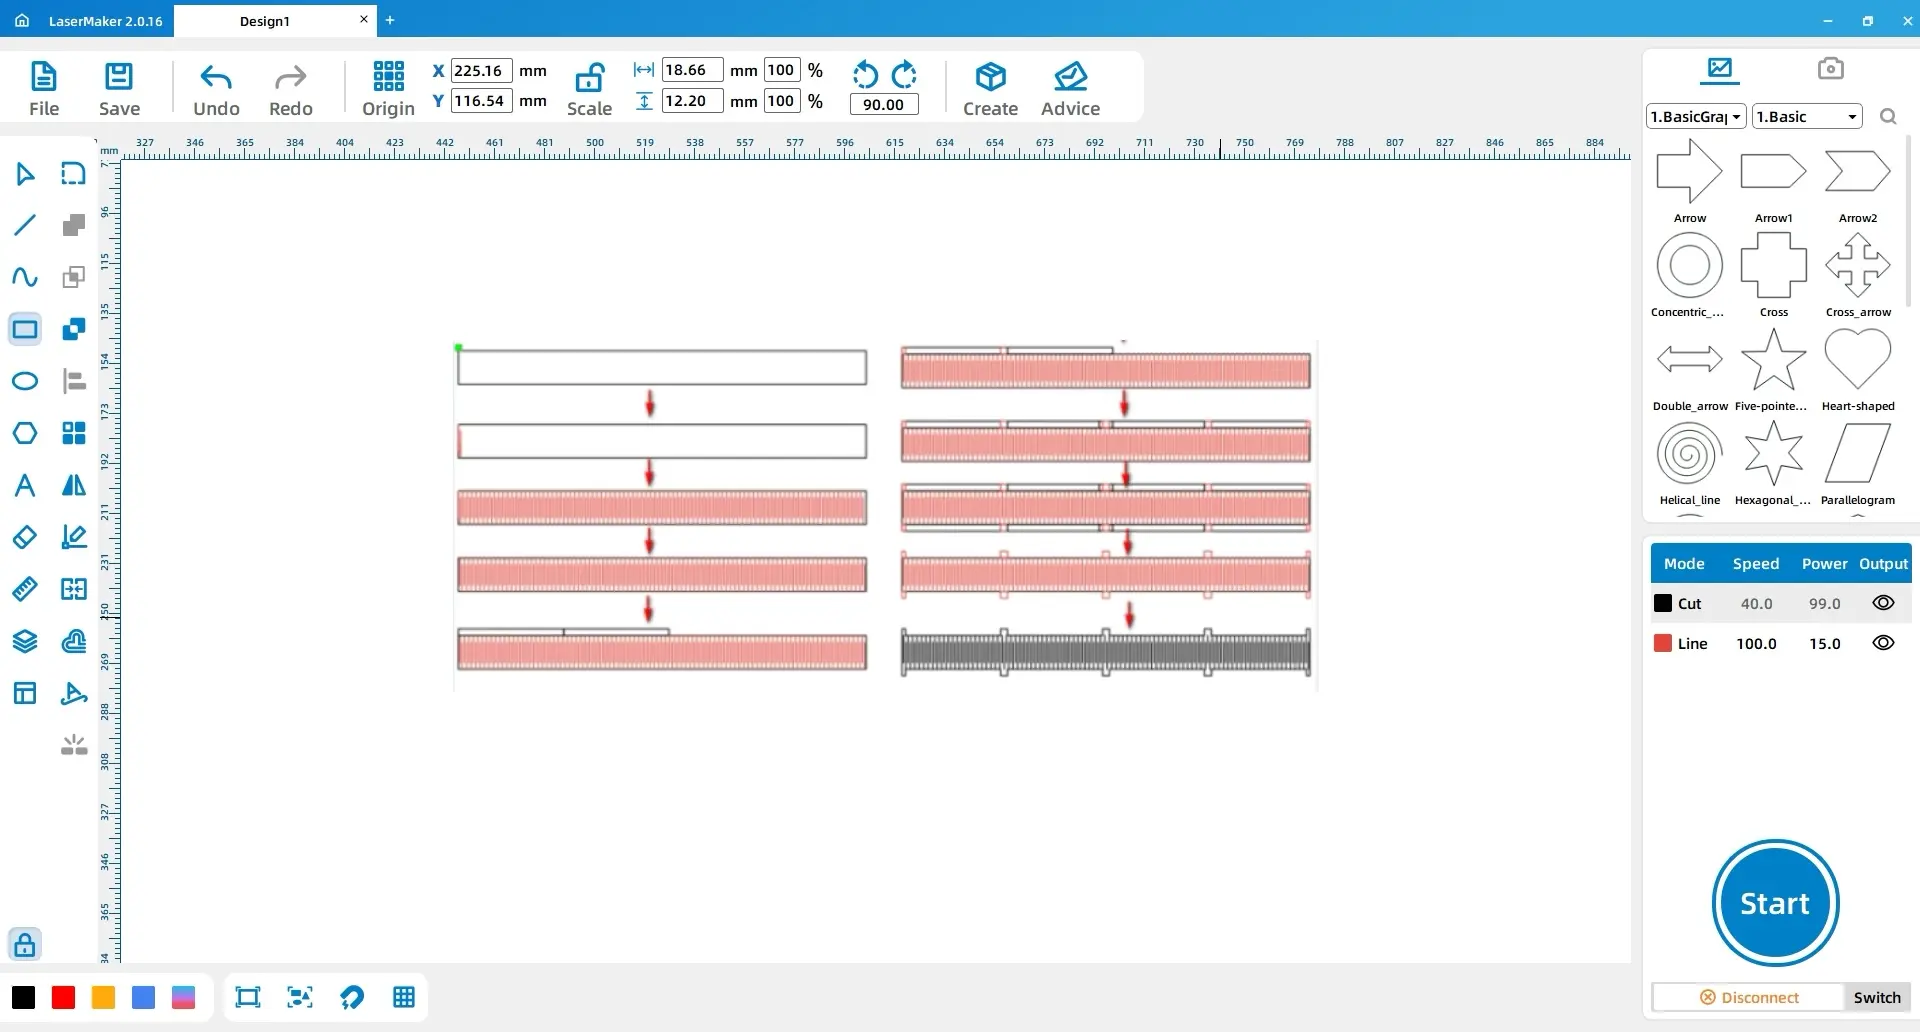
(4) Select the “Rectangle” tool from the left toolbar using the left mouse button, draw two rectangles, and set the dimensions to “34.5, 15” and “15.7, 15”. Select both rectangles and center-align them.
Select the “Line” tool from the left toolbar using the left mouse button, hold down the Ctrl key on the keyboard, and draw a line with a length of “12”.
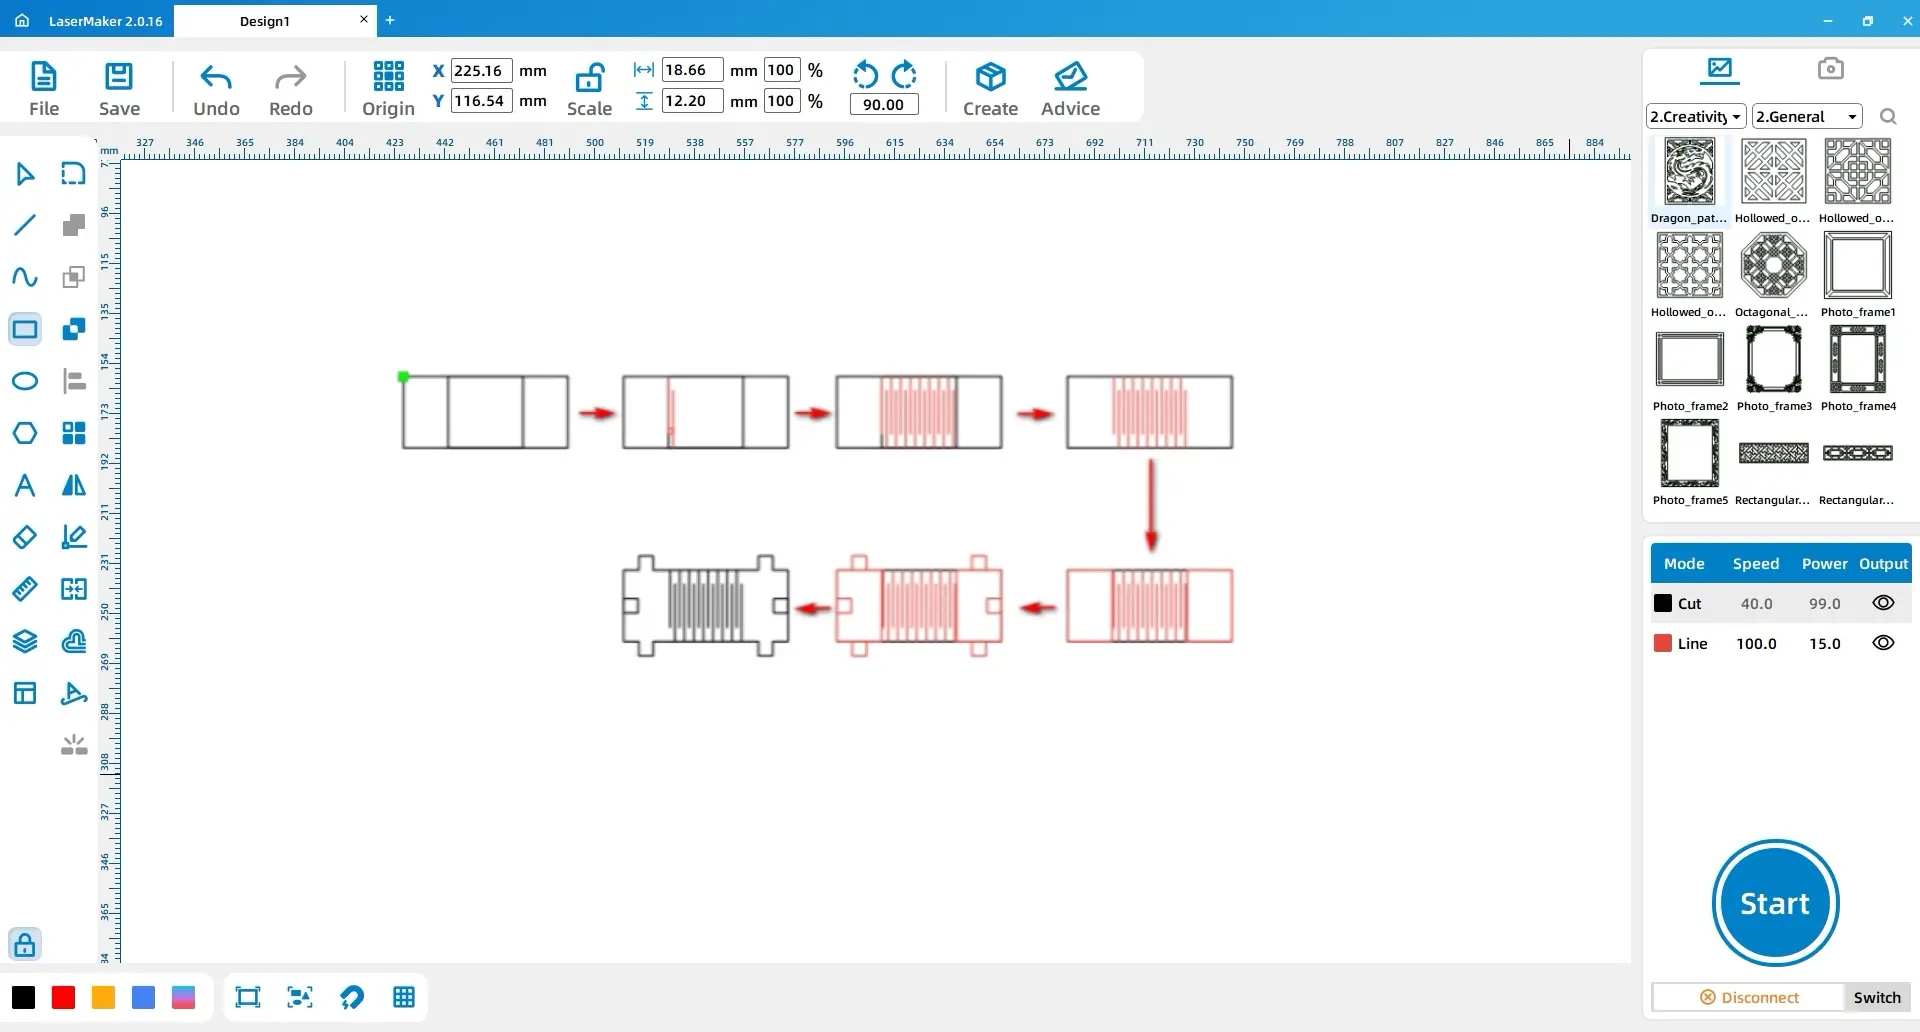
Select the “Rectangle” tool from the left toolbar again using the left mouse button, draw a rectangle with dimensions of “1, 1”, and align it with the line created in the previous step. Duplicate the line and align it below the rectangle. Select the rectangle and click to delete it, as shown in the following figure.
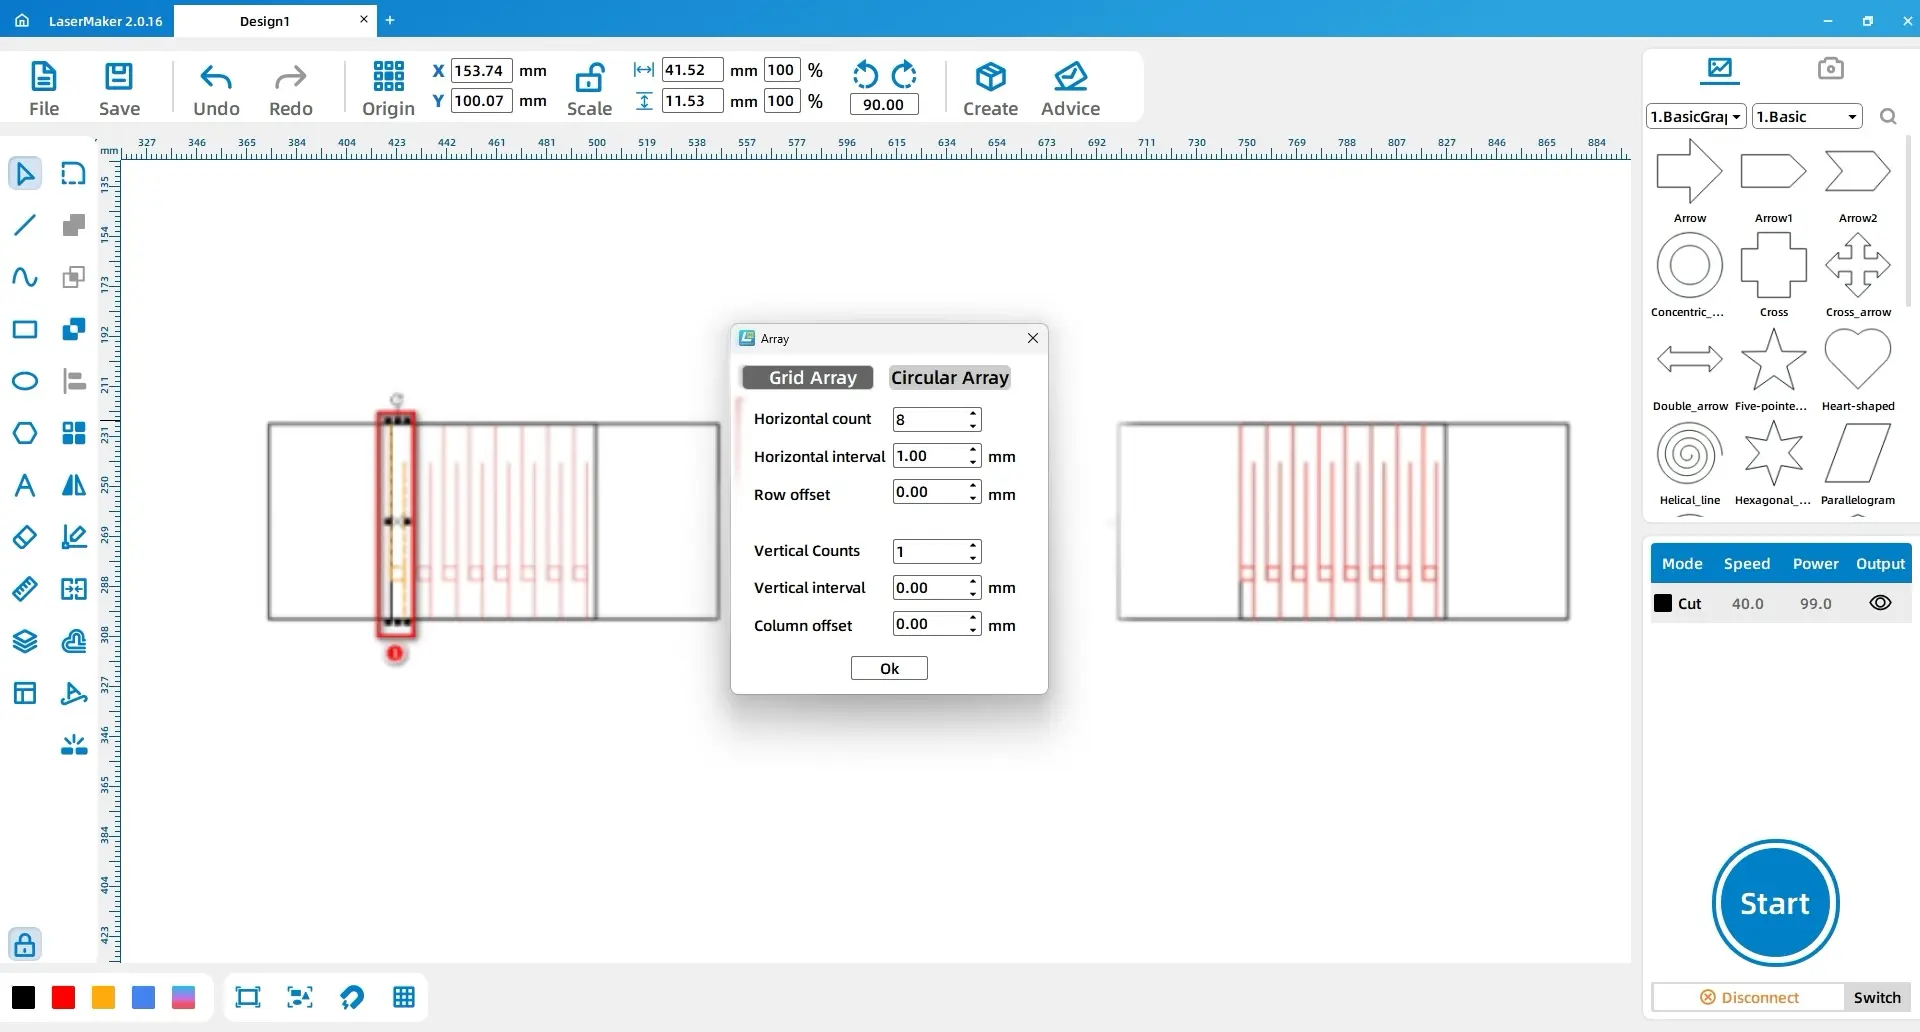
Select the two line segments with the mouse, click “Array” in the left toolbar using the left mouse button, set the horizontal count and horizontal spacing to “8, 1”, and click “Confirm”, as shown in the following figure.
Select the patterned shape after arraying, right-click to group it, hold down the Ctrl key on the keyboard, click the middle rectangle, click “Center Align”, and then delete the rectangle, as shown in the following figure.
Select the “Rectangle” tool from the left toolbar using the left mouse button, draw two rectangles with dimensions of “9.4, 15”, and align them to the left and right of the middle rectangle, respectively, as shown in the following figure.
Select the “Rectangle” tool from the left toolbar again using the left mouse button, draw six rectangles with dimensions of “3, 3”, align them horizontally and vertically after attaching them to the two rectangles, as shown in the following figure.
Finally, delete the two rectangles, select the four rectangles above and below, as well as the middle rectangle, click “Union”, and adjust the layer to the black layer, as shown in the following figure.
(6) Select the “Ellipse” tool from the left toolbar using the left mouse button. Draw two perfect circles, and set their dimensions to “60, 60” and “15, 15”, respectively. Select both circles and click “Center Align”.
Select the “Rectangle” tool from the left toolbar using the left mouse button. Draw four small rectangles with dimensions of “2.6, 3”. Align them horizontally and vertically after attaching them to each other, as shown in the following figure.
Select the “Rectangle” tool again from the left toolbar using the left mouse button. Draw a rectangle with dimensions of “182.4, 15”.
Select the “Line” tool from the left toolbar using the left mouse button. Draw a line with a length of “12”. Then, select the “Rectangle” tool and draw a small rectangle with dimensions of “3, 3”. Attach it to the line. Duplicate the line, attach the duplicate to the right and below the small rectangle, and delete the small rectangle, as shown in the following figure.
Select the two lines, and in the left toolbar, click “Array” with the left mouse button. Input the horizontal count and horizontal spacing as “91, 1”, click “Confirm”. Select the arrayed shapes, right-click to group them, hold down the Ctrl key on the keyboard, click the rectangle, click the alignment toolbox, and select “Center Align”.
Select the “Rectangle” tool from the left toolbar using the left mouse button. Draw two rectangles with dimensions of “47.1, 3” and place them in sequence above the large rectangle, as shown in the following figure.
Select the “Rectangle” tool again from the left toolbar using the left mouse button. Draw two small rectangles with dimensions of “1.5, 3” and “3, 3”. Align them to the left and right of the first rectangle, respectively, as shown in the following figure.
Select all the rectangles above the large rectangle, duplicate them, click the “Mirror” tool, select “Horizontal Mirror”, and align them to the right of the large rectangle. Draw a small square with dimensions of “3, 3” and center it above the large rectangle, as shown in the following figure.
Copy all the patterns above the large rectangle, paste them below the large rectangle, select all the rectangles with a length of “47.1”, click to delete them. Hold down the Ctrl key on the keyboard, select all the small rectangles and the large rectangle, click “Union”, and change the layer to black, as shown in the following figure.
2. Support Column Design
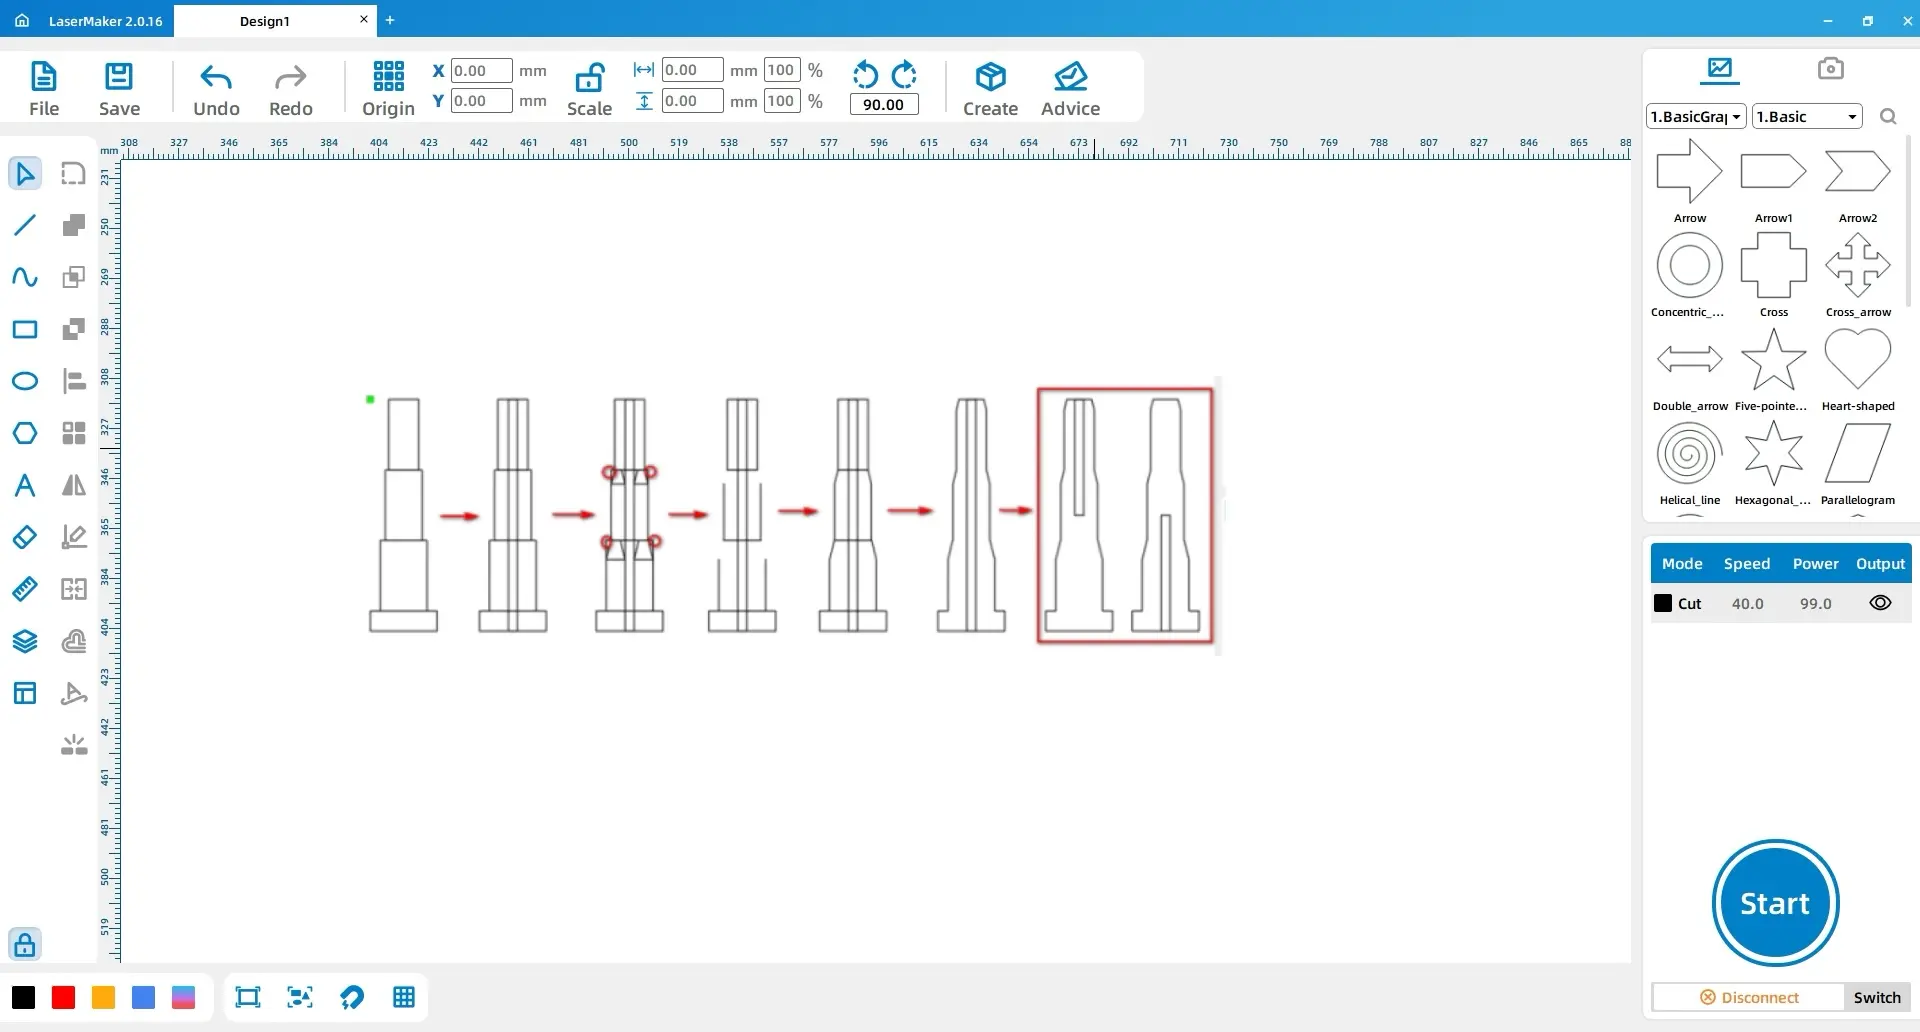
Using the left mouse button, select the “Rectangle” tool from the left toolbar. Draw four rectangles with dimensions set to “20, 6”, “14, 21”, “11, 21”, and “9, 21”. Stack them vertically and click “Horizontal Align” to align them horizontally.
Again, using the left mouse button, select the “Rectangle” tool from the left toolbar. Draw a rectangle with dimensions of “3, 69” and place it in the center of the combined rectangles. After clicking “Horizontal Align”, drag a trapezoid from the basic shape library, adjust its size appropriately, and place it on both sides of the second and third rectangles, as shown in the figure.
With the left mouse button, select the “Eraser” tool from the left toolbar and choose the “Crop Segment” option. Use it to crop the sections indicated by the red circles, and then delete the four trapezoids, as shown in the figure.
Using the left mouse button, select the “Line” tool from the left toolbar and choose the “Connect Segments” option. Connect the lines to form closed shapes. Select the four closed rectangles and click “Union” to combine them into a single shape.
Duplicate the unioned shape. Click the origin point and change it to “Upper Center”. Select the middle rectangle and divide its width by 2. This will give you the left image in the red box. For the right image, repeat the process, but change the origin point to “Lower Center” and divide the width of the corresponding rectangle by 2. Arrange the results as shown in the figure.
3. Chessboard Design
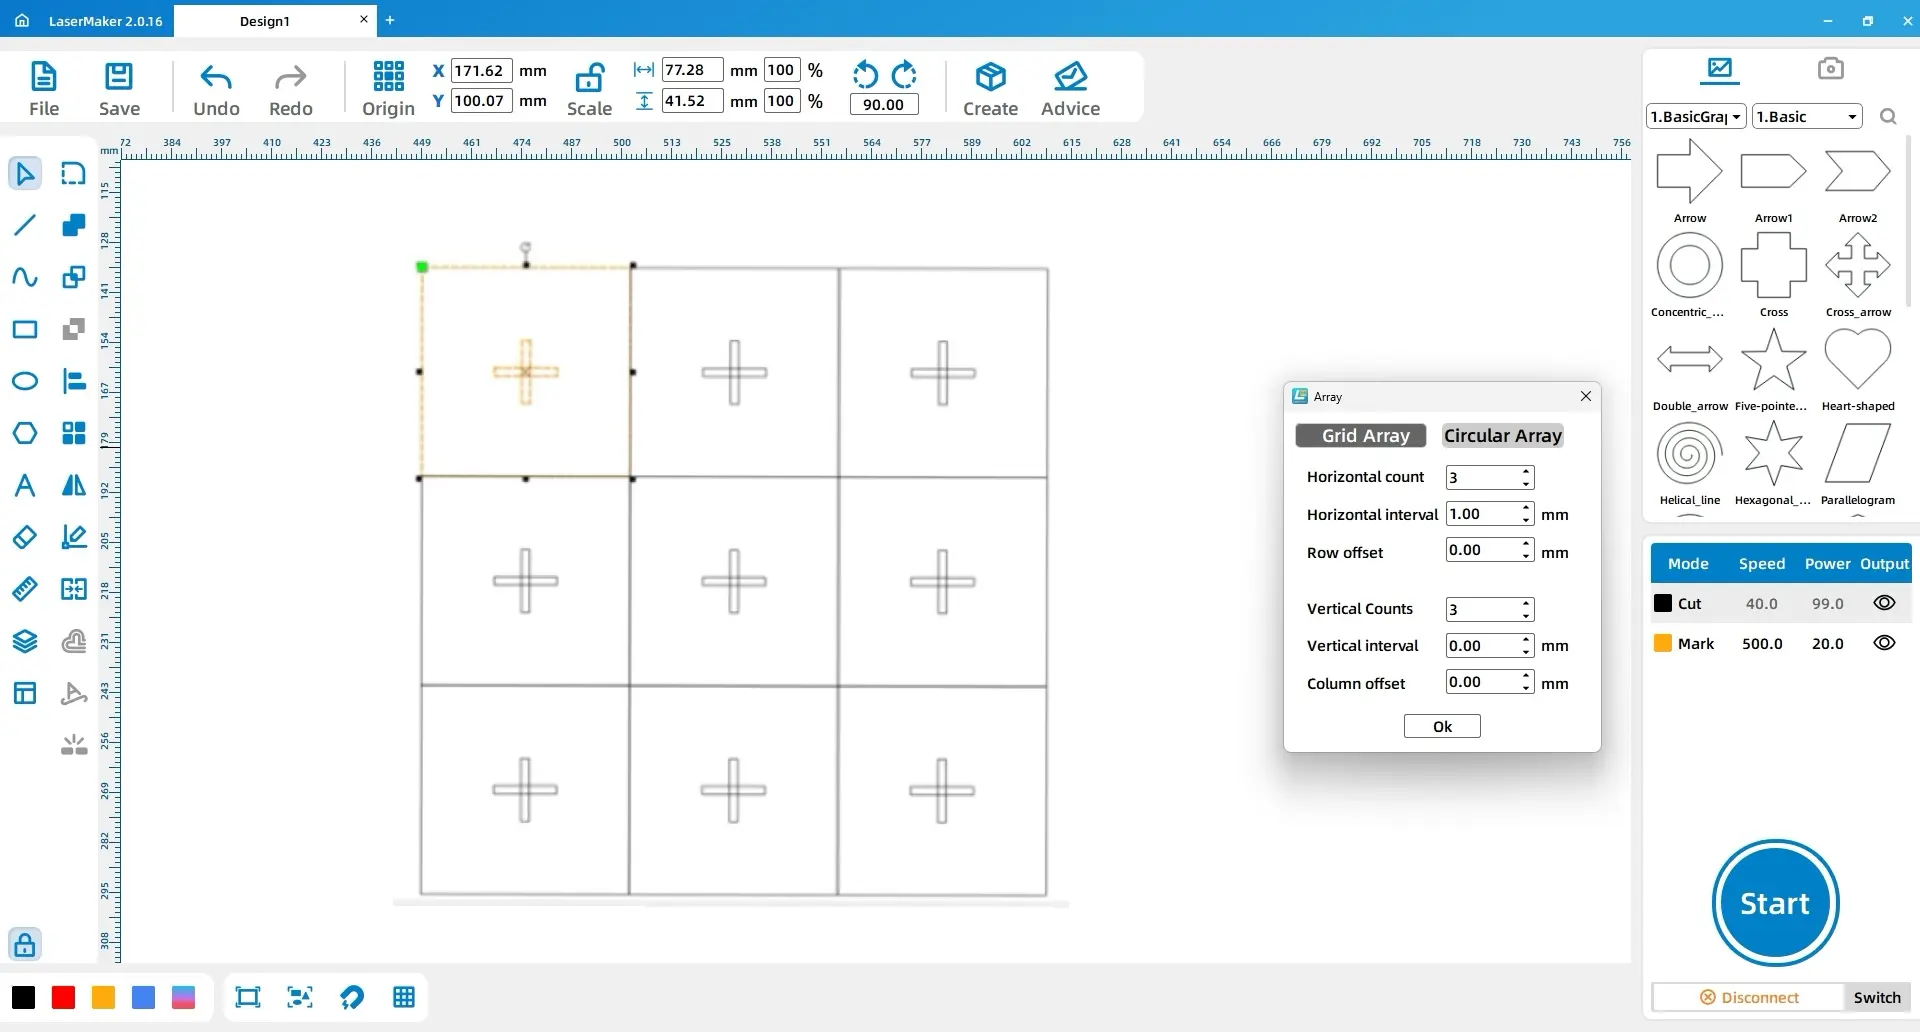
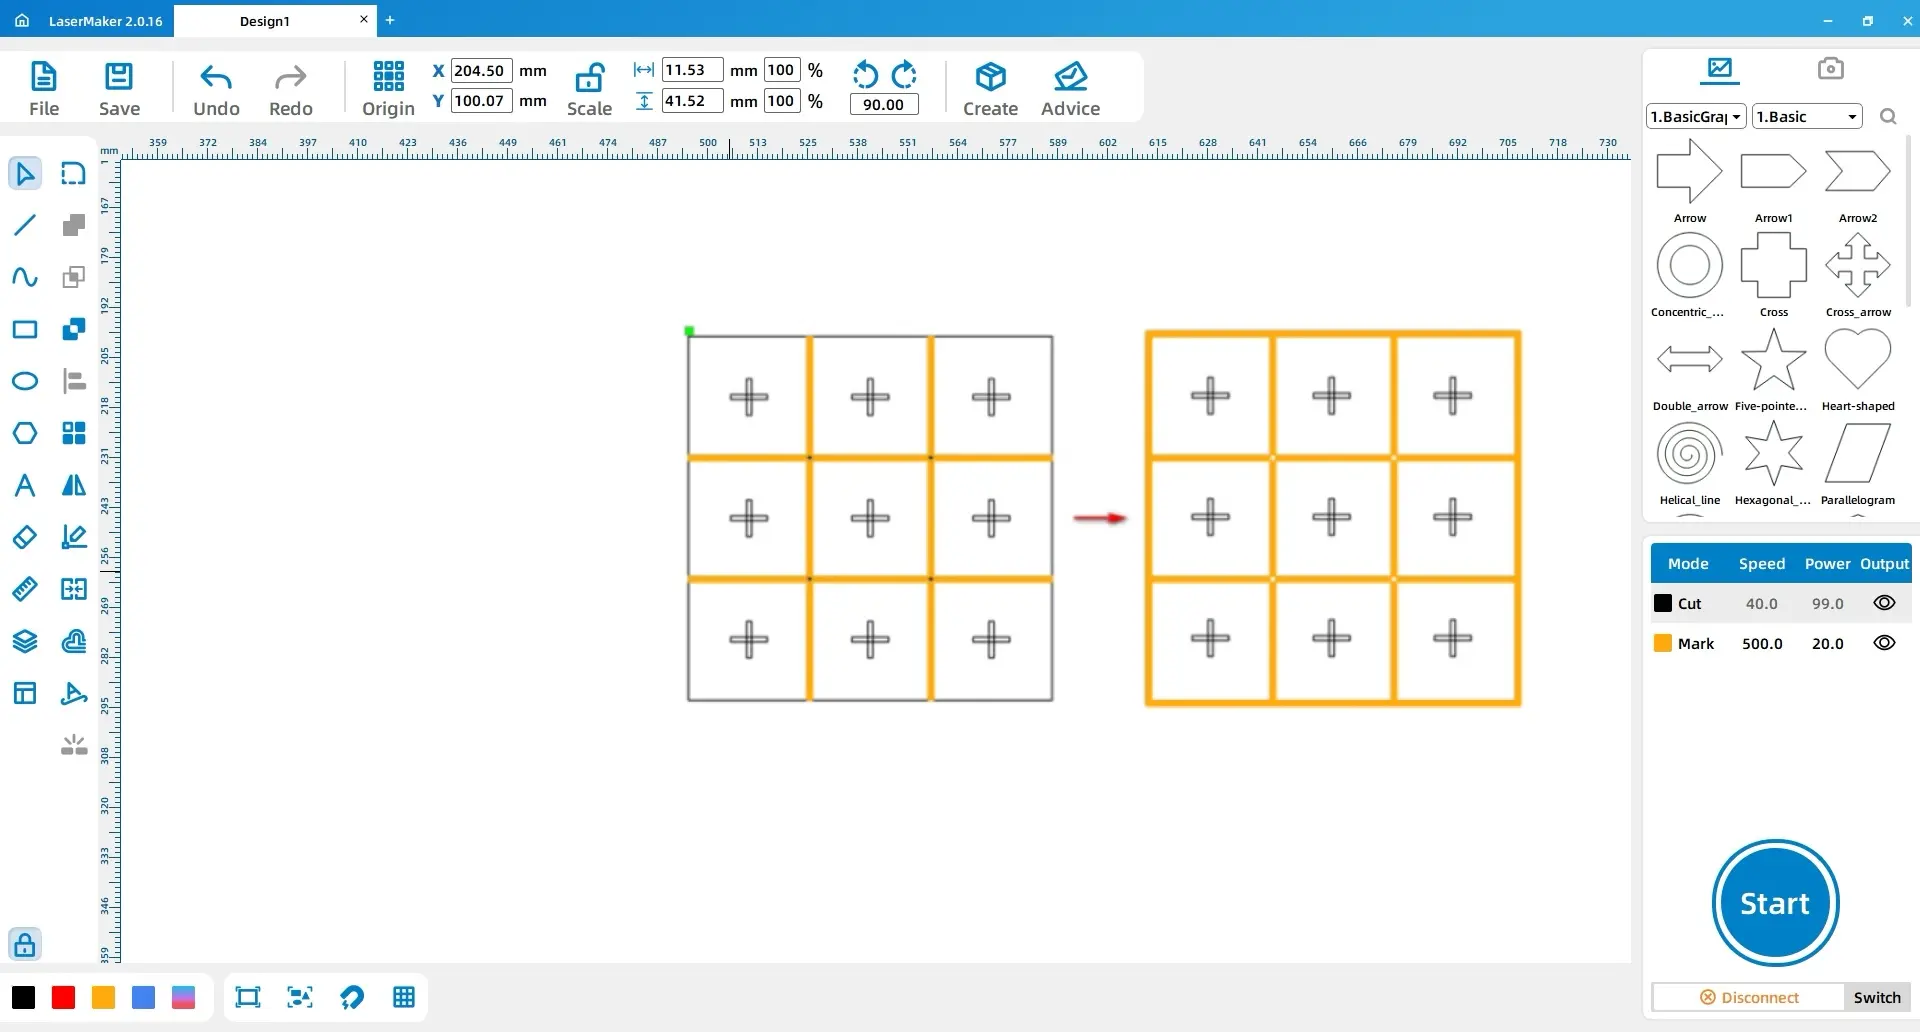
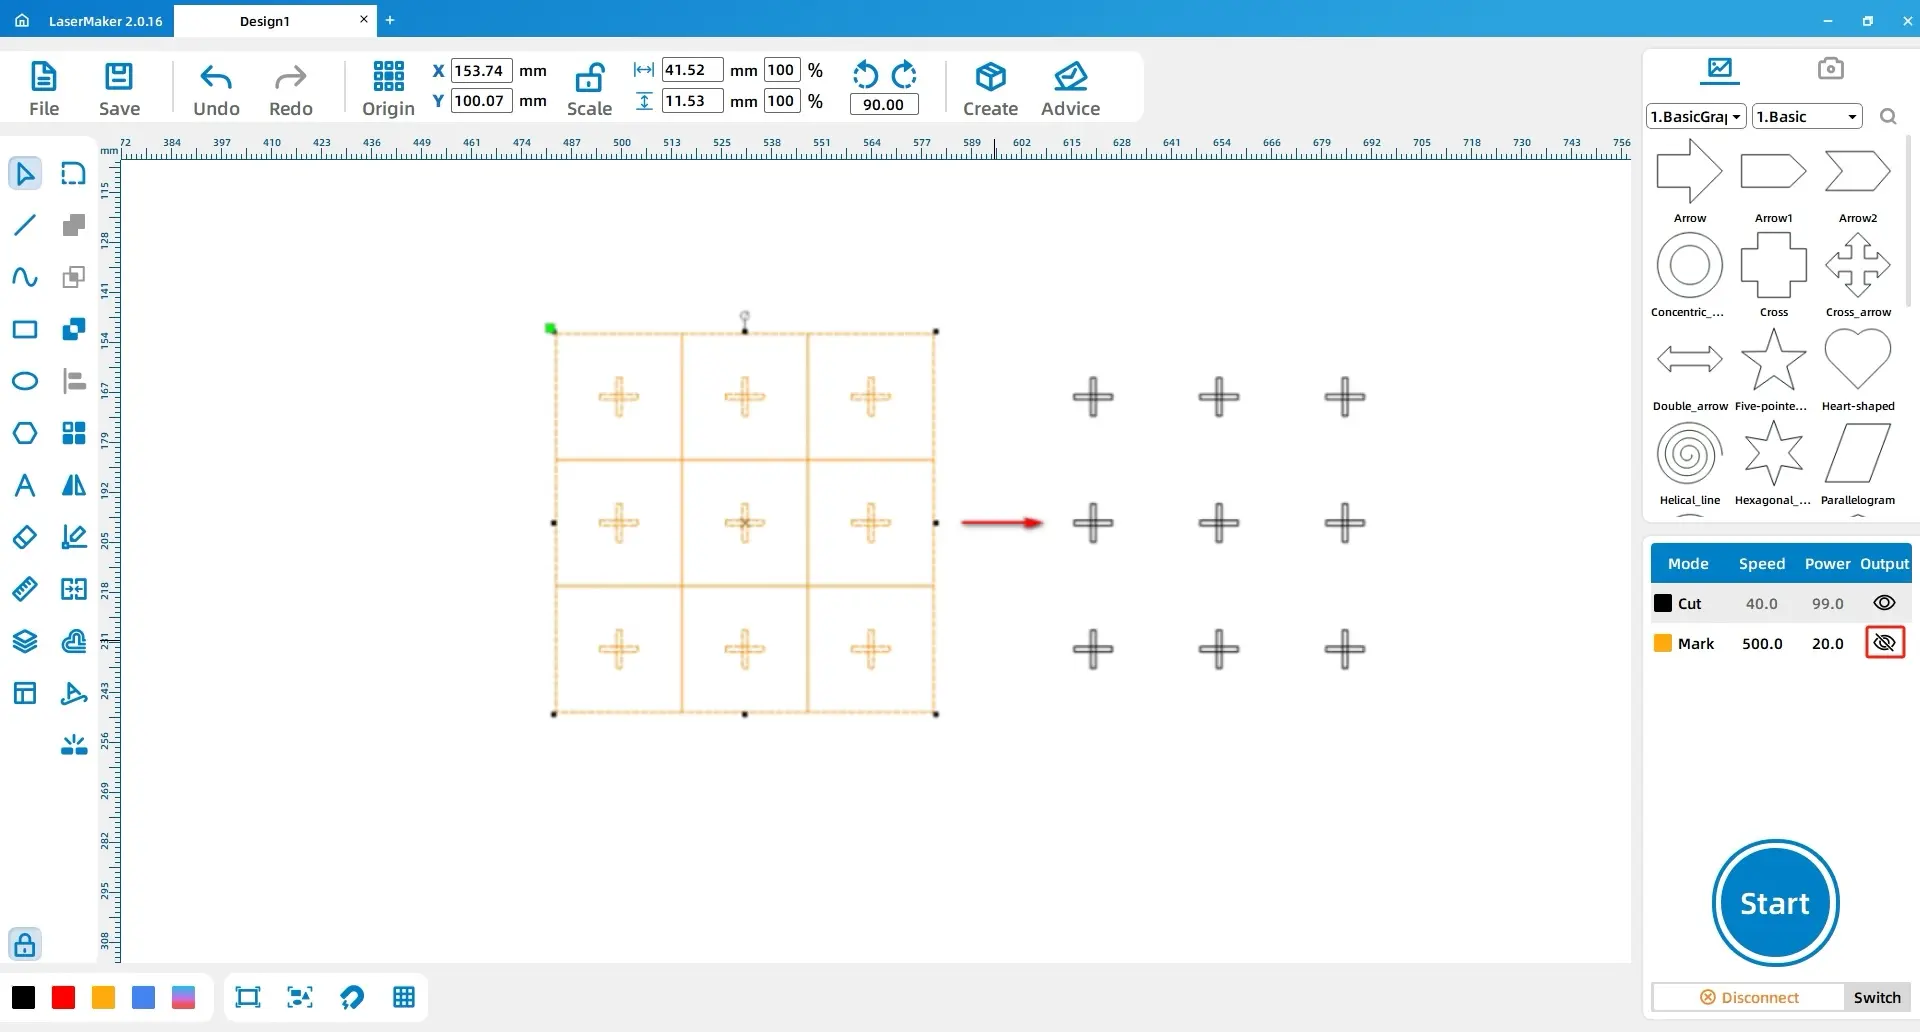
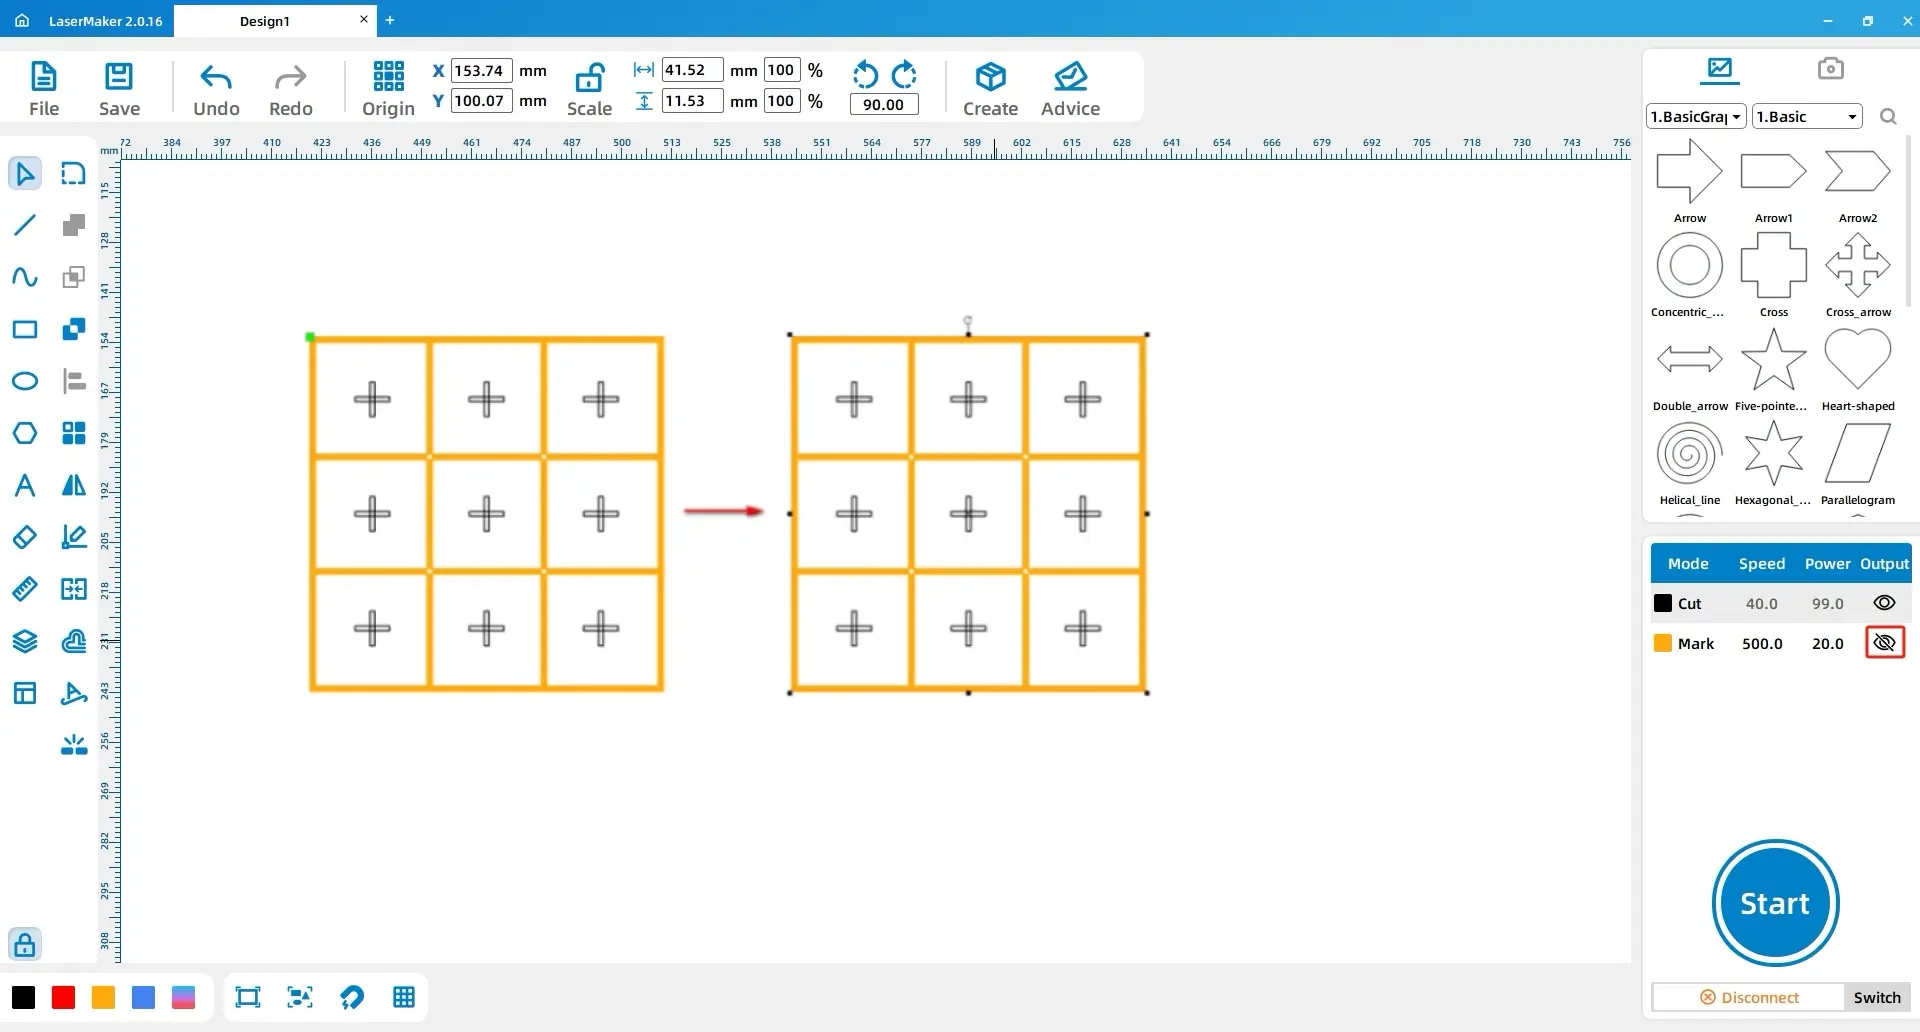
Ⅳ. Laser Processing
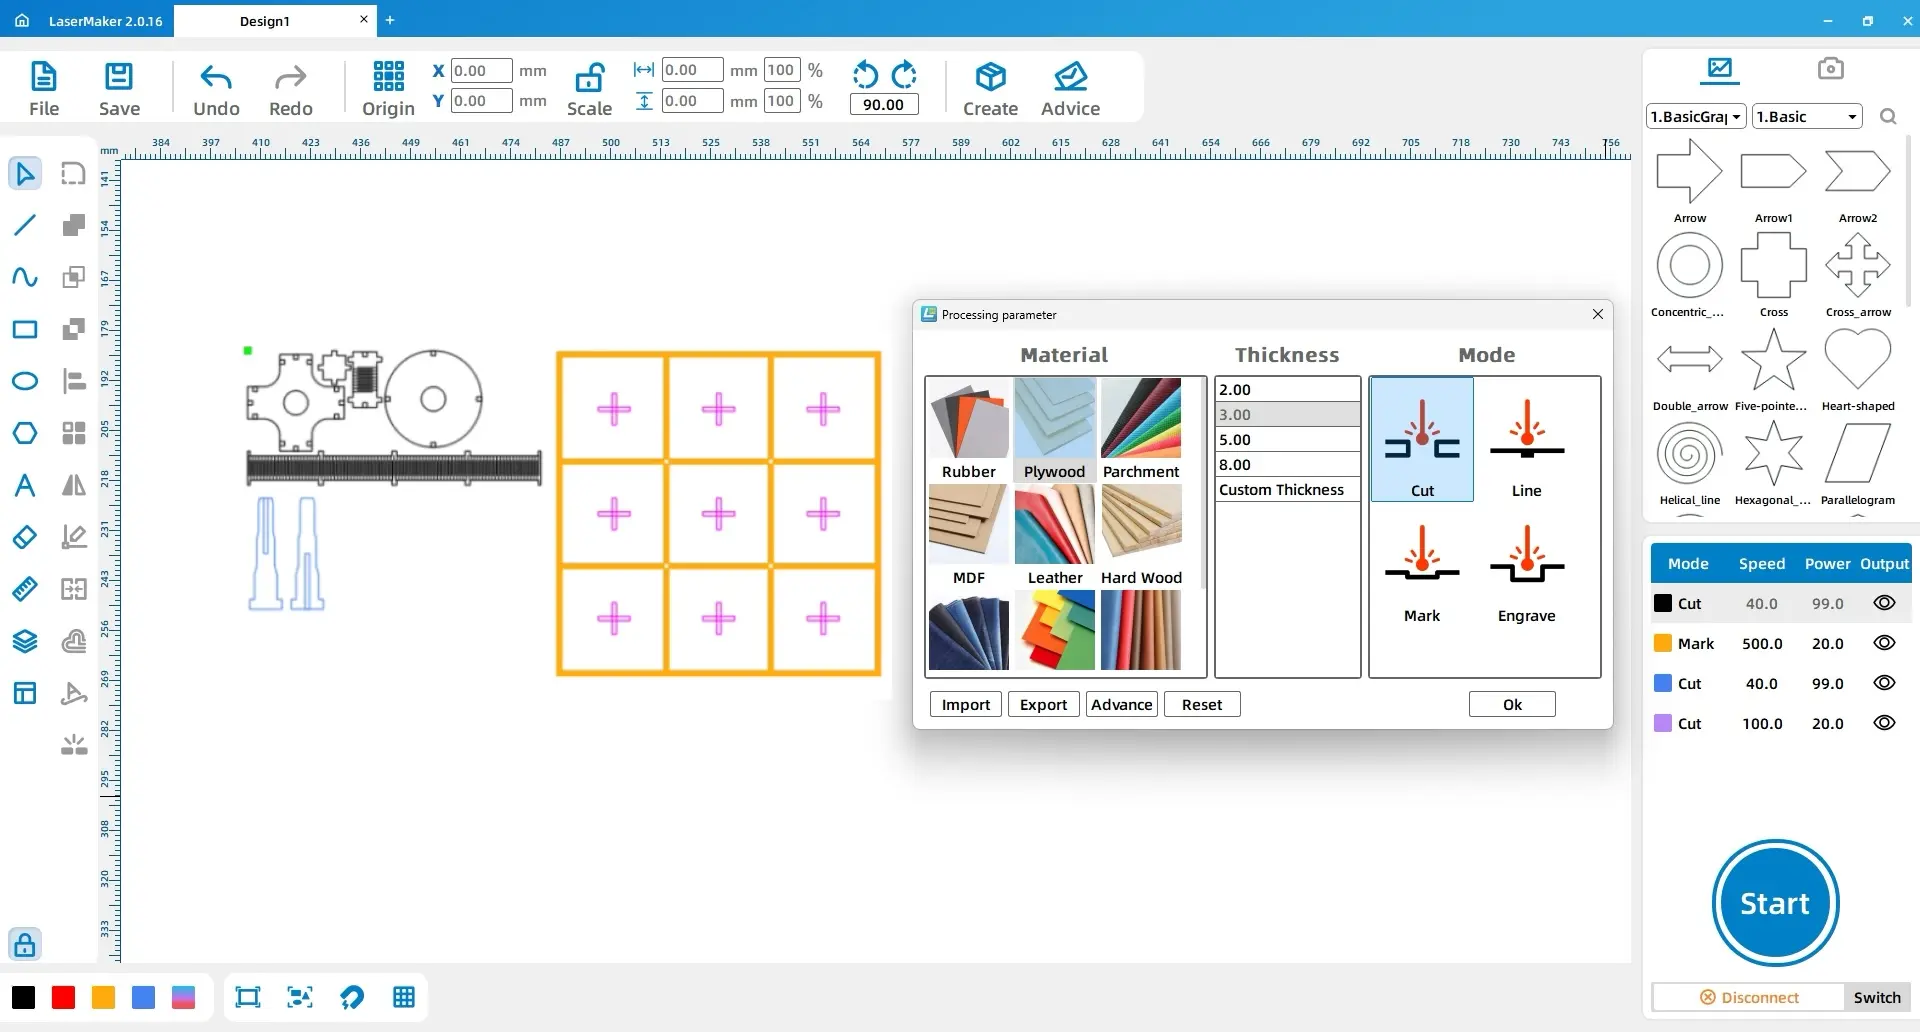
Parameter Settings for Three-Dimensional Tic-Tac-Toe Craft
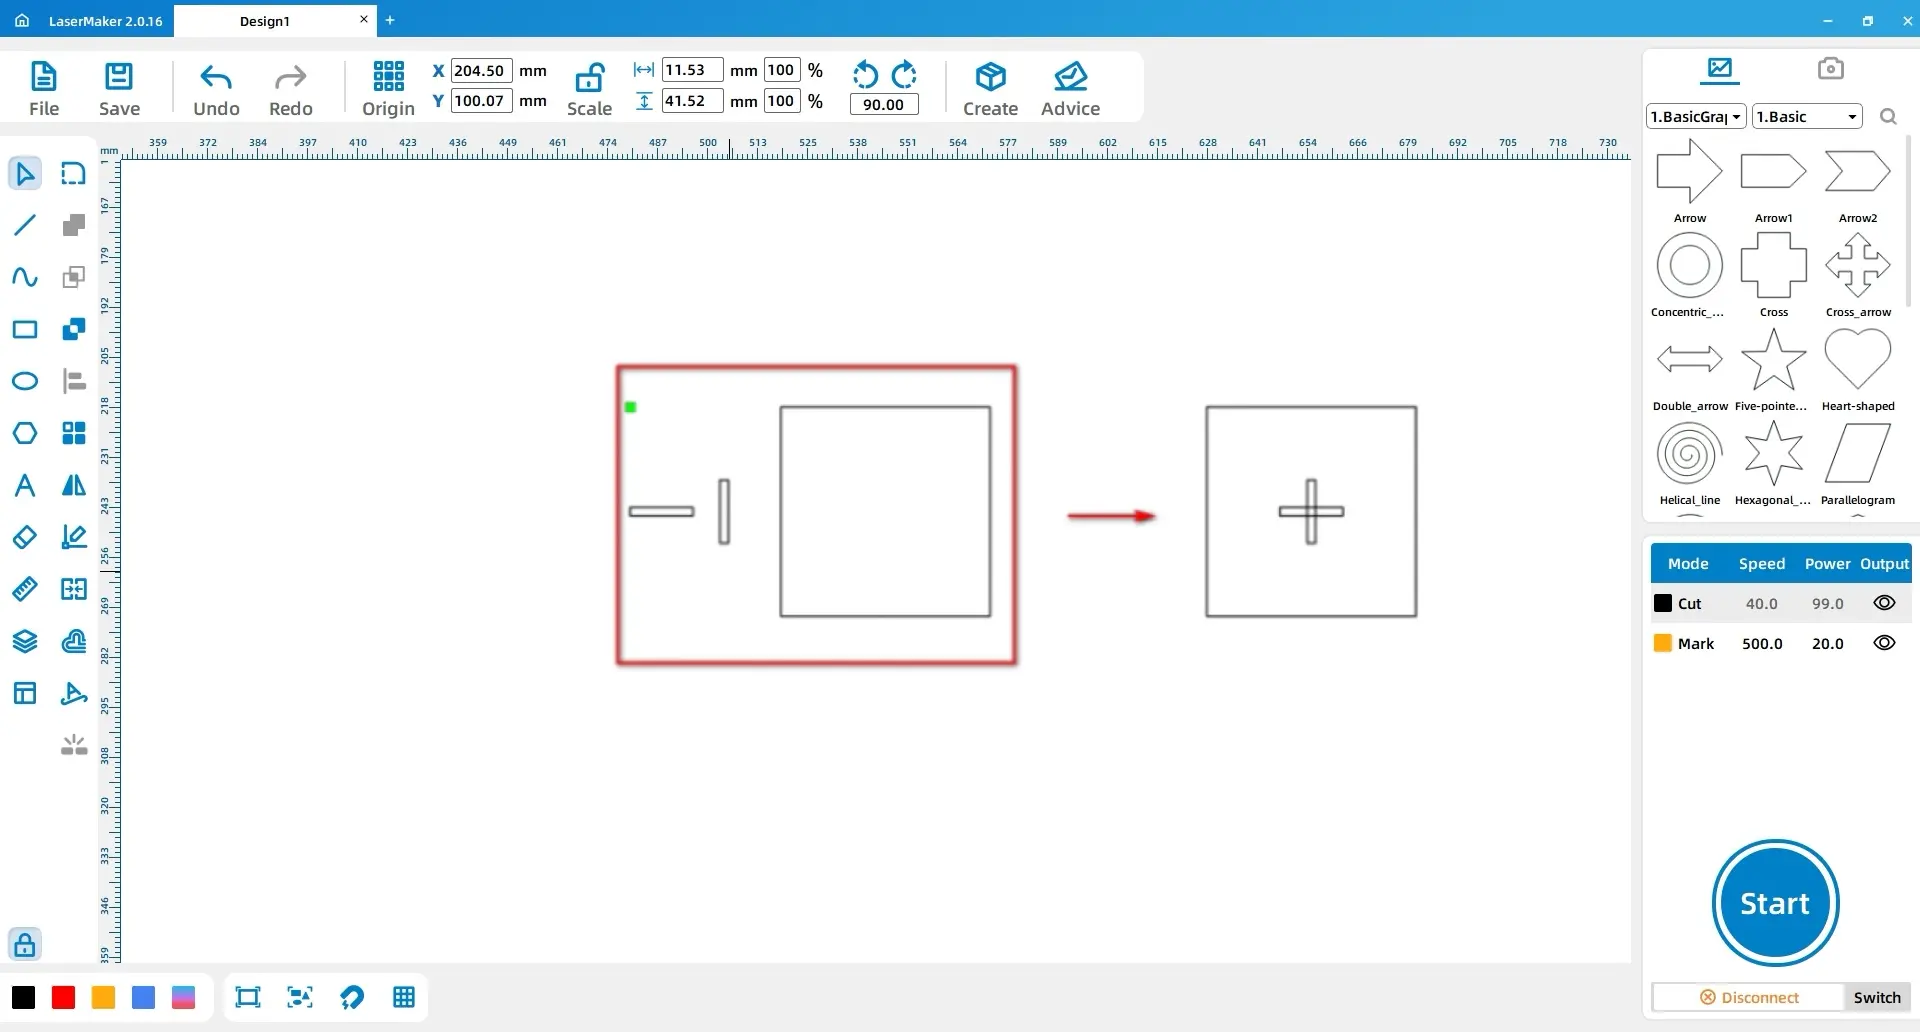
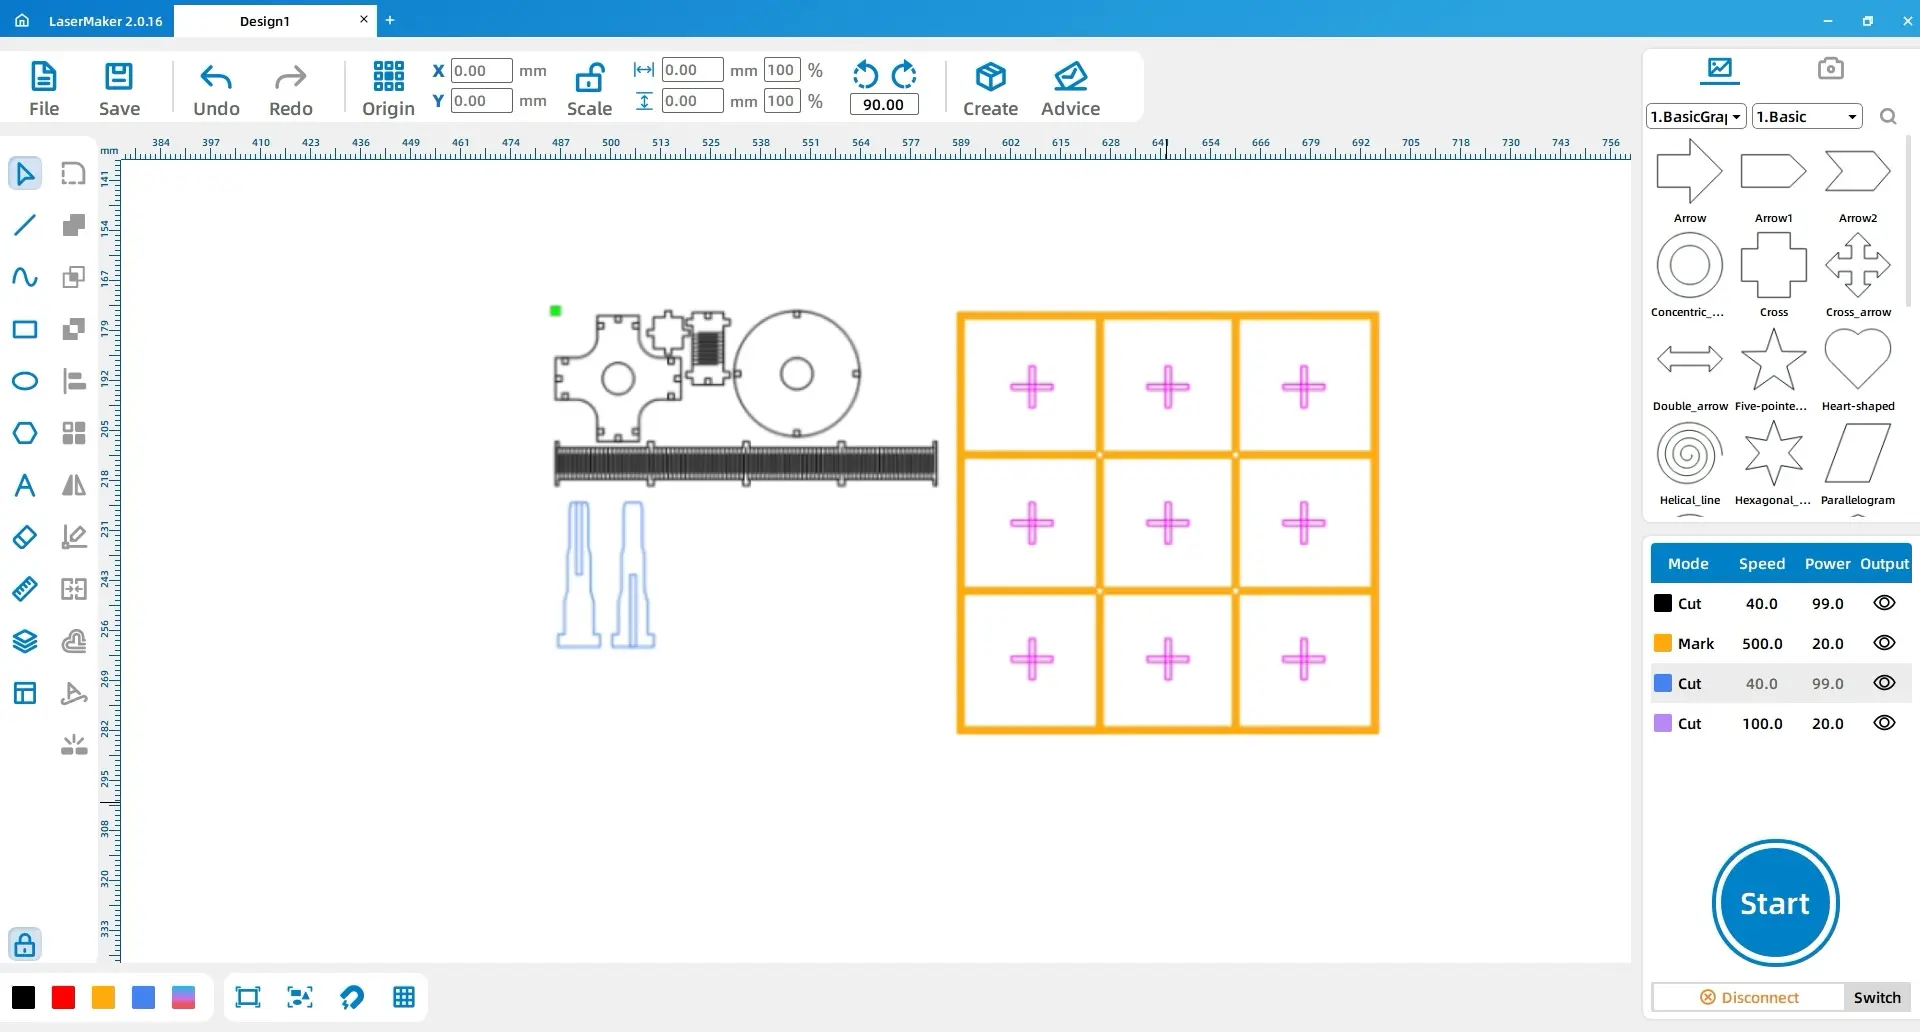
(1) Select the chess pieces and change the layer to black by left-clicking on the layer panel at the bottom left. Select the two support columns on the left side and change the layer to blue using the same method. Finally, select the cross within the nine-square grid and change the layer to pink by left-clicking on the layer panel. The setup is as shown in the figure below:
Ⅴ. Assembly Tutorial
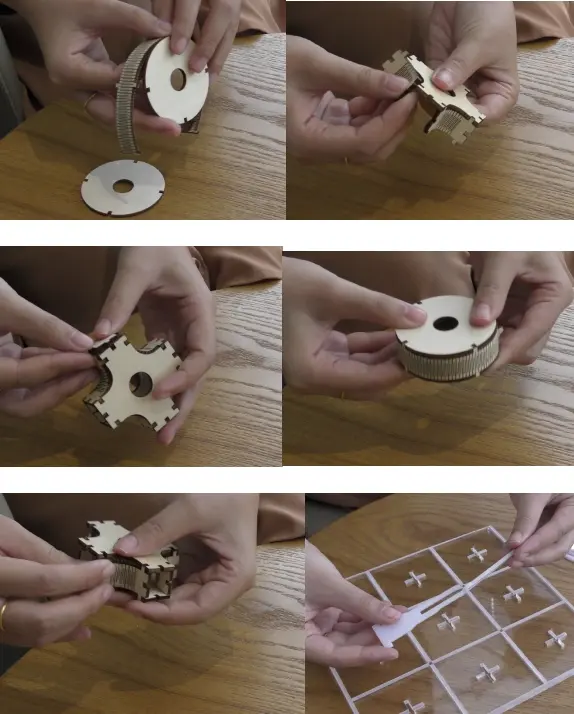
Step 1: Connect the curved ring and the round plate using the mortise and tenon joint.
Step 2: Join the cross with the four curved rings using the mortise and tenon joint.
Step 3: Combine the support columns using the pins or dowels.
Step 4: Finally, attach the support columns to the cross on the chessboard.
Note: Ensure that each step is carefully executed to ensure a secure and stable assembly. Check the alignment and fit of each part before proceeding to the next step. If any adjustments are needed, make them accordingly.
Ⅵ. Work Display

Ⅶ. Summary
In this issue, we have brought you a tutorial on how to design and create a three-dimensional Tic-Tac-Toe game. Through this process, we have moved beyond the traditional two-dimensional perspective of Tic-Tac-Toe and explored more playstyles and fun in a three-dimensional space!
Encountering difficulties during the making process is not something to be afraid of.
We can use various methods to solve problems. Keep up the good work, little designers!
Browse Thunder Laser
Bolt >




.png) International
International
 United States
 Brasil
 Canada
 Costa Rica
 Česká
Česká
 Ελλάδα
 Polska
 Ireland
 Portugal
 Lietuva
 Россия
 Deutschland
 Britain
 Україна
 France
 Sverige
 Italia
 Norway
 Denmark
 Romania
 한국
한국
 中国
中国
 ประเทศไทย
 中国香港
中国香港
 Israel
 中國臺灣
中國臺灣
 India
India
 پاکستان
 پශ්රී ලංකා
 ジャパン
ジャパン
 Australia
 New Zealand
 South Africa