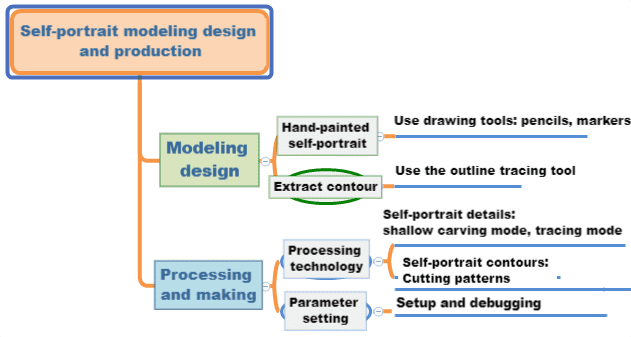
(1) Use the “Contour tracing” tool to extract the outline of the hand-painted pattern
(2) Learn to extract hand-painted pattern skills, graphic effect is better
(3) Know how to use [parameter setting], and set parameters correctly according to the design intention
Thinking training
Design thinking
(1) Anticipate the visual effect between hand-painted portrait style and sculptural effect.
(2) Foresee the use of hand-painted portrait engraving effects of the work piece scene.
Computational thinking
(1) Processing and calculation of hand-drawn graphics, image graphics scanning and engraving effects.
(2) Know the difference between hand-drawn graphics and other images in engraving effect.
Engineering thinking
(1) Understand the process of transforming hand-drawn graphics into cutting works.
(2) Understand the time cost and effect of carving with different materials.
Social responsibility and moral literacy
(1) Be careful not to play pranks on others with hand-painted portraits
(2) Be careful to obtain the consent of others to publish the style of the portrait
2. Application scenario
Self-portrait generally refers to the portrait works painted by artists for themselves, also known as the portrait in the mirror. Each self-portrait represents the artist’s unique personality and artistic style, expressing some of the artist’s own feelings at the moment, such as confidence or pain. As a representative figure of post-Impressionism, Van Gogh is one of the most outstanding artists in the 18th century, and his self-portrait is one of the representative works of artist self-portraits, as shown in following figure.
Through the expression of self-portrait, we can analyze the psychological characteristics of artists, so self-portrait can also be called a mirror to express the personality characteristics of artists. Ordinary people also often express their image, style, or character through self-portraits. Try designing and making your own self-portrait with LaserMaker.
3. Project analysis
(1) The shape of the part: the outline can be square and round, drawn by the designer and achieved by cutting.
(2) The content of the piece: the hand-drawn stick figure self-portrait, through laser engraving on the work piece material to form a portrait painting effect. The portrait can be hand-painted, then scanned into an image file and imported into the software drawing area.
(3) Part size: Set the part size according to the needs of the work.
(4) Mode of use: Consider the use or use scenario, such as being used as a key chain, or a product brand sign, etc., and consider whether to do waterproof, mildew proof or color treatment.
(5) Material selection: basswood plywood or acrylic board.
(6) Process effect: tracing effect or engraving effect.
4. Modeling process
1.Research and hand-drawn design
Measure
Through the project analysis, you calculate the size of the stick figure self-portrait, and fill in the size of the piece in the table below.
Measurement data
recording unit:mm
Length:
Width:
Paint
Please draw a self-portrait in the frame according to your measurement data and your own characteristics.
2.Software drawing
After the structural analysis of the self-portrait, we can draw the self-portrait through 3 steps.
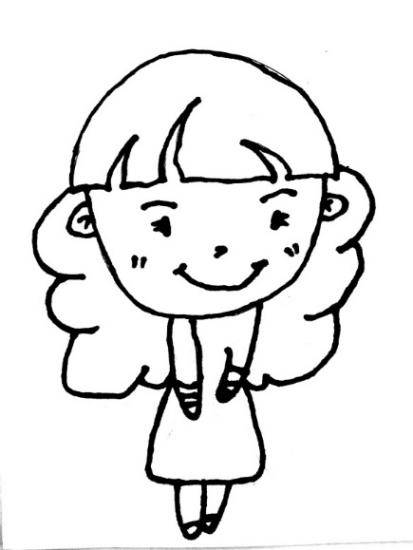
(1) Using markers to draw self-portraits
Draw your own self-portrait on the drawing paper with a marker. After the painting is completed, use scanning software to scan the picture, export the picture, and save it in the local computer. It is recommended to select the “black and white” mode for better scanning effect and clearer outline, as shown in following figure.
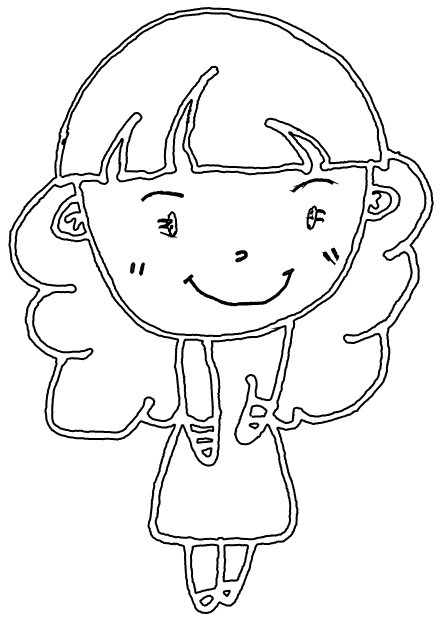
(2) Use the “Contour tracing” tool of the drawing box to extract the outline of the hand-painted self-portrait
Move the mouse pointer to the toolbar and click Open. The Open dialog box is displayed. Select the scanned self-portrait file and click Open to open the image. As shown in following figure.
Use the drawing box “Contour tracing” tool to extract its outline, retain the extracted outline, and delete the original picture.The following figure shows the extracted marker self-portrait outline.
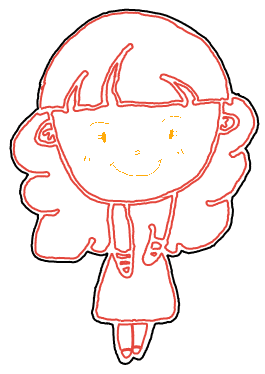
3. Process pattern design
Select the self-portrait facial expression object, set it as the “Yellow light carving” process layer, double-click the layer, set the processing material as acrylic plate, the process as shallow carving, and the processing thickness is 0.1mm.
Select the internal outline object of self-portrait and set it as the “Red Tracing” process layer. Double-click the corresponding layer and set the processing material as acrylic plate. The process is tracing line and the processing thickness is 0.1mm.
Select the self-portrait external contour object, double-click the corresponding “Black cut” layer, set the processing material to acrylic plate, the process to cut, and the processing thickness to 3mm. The processing parameters of self-portrait have been set, as shown in following figure.
Finally, drag the process layer and adjust the process sequence to shallow carving → tracing → cutting, as shown in


.png "laser cutter Globle") International
International
 United States
 Brasil
 Canada
 Costa Rica
 Česká
Česká
 Ελλάδα
 Polska
 Ireland
 Portugal
 Lietuva
 Россия
 Deutschland
 Britain
 Україна
 France
 Sverige
 Italia
 Norway
 한국
한국
 中国
中国
 ประเทศไทย
 中国香港
中国香港
 Israel
 中國臺灣
中國臺灣
 India
India
 پاکستان
 پශ්රී ලංකා
 Australia
 New Zealand
 South Africa